
Prolaborate Best Practices – Active Directory
When it comes to User Management in Prolaborate, it is recommended to enable Single Sign-On for better security and user experience.
This can be achieved by integrating Prolaborate with Active Directory (AD) or any SAML based apps like Azure AD, Okta, IBM SAM, Oracle ICS, etc.
In this blog post, we will be looking at the best practices when you are integrating Prolaborate with Active Directory.
The Goal
The goal is to deliver the best experience to all the Prolaborate users with minimal efforts!
The objective is to make it easy and effortless for
- Admins to manage users and their experience in Prolaborate. Experience refers to what EA model information is shared with the users and whether they can edit or collaborate, what information is presented to them through dashboards, etc.
Importantly, there shouldn’t be any additional effort to admins when there are some changes to users or groups in Active Directory. - Users to manage their credentials and use Prolaborate
Configure Active Directory
Get started by configuring the details of Active Directory in Prolaborate.
Click on Menu > Active Directory. Click on Setup Active Directory.
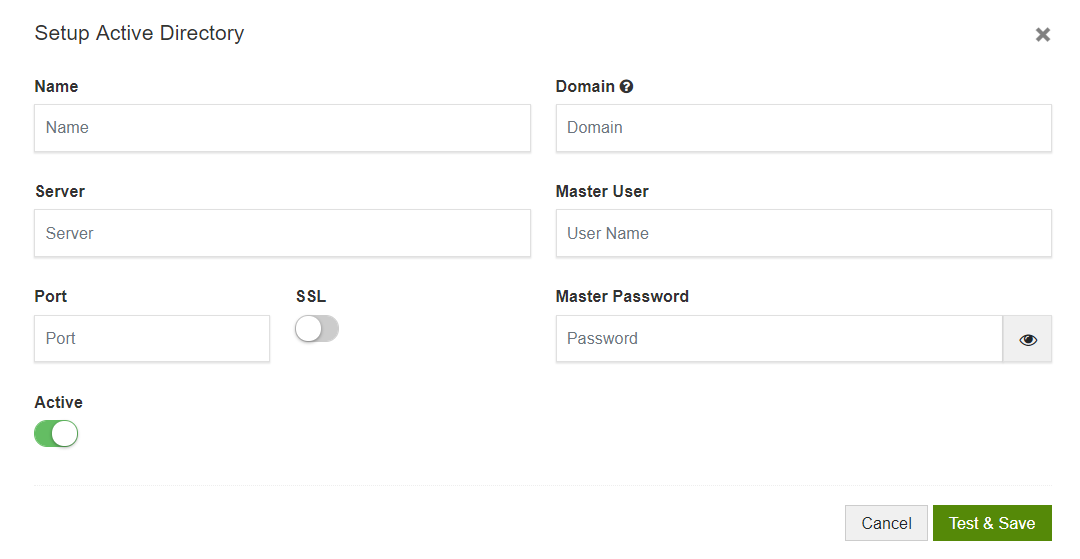


You can get the details mentioned below from your IT team.
- Give a Name to the setup. It’s better to give a name based on the domain or sub-domain
- Enter the Active Directory Server’s IP address or DNS and Port number
- Enable SSL if it is enabled in AD
- Enter the domain address in the Domain field
Please ensure proper domain or sub-domain is entered here. For example, if you are Volkswagen, you should not configure Volkswagen.com domain in Prolaborate. Instead, you should configure the sub-domains like audi.volkswagen.com, skoda.volkswagen.com, etc. - Enter the User name and Password to login to the AD server. This is the user with permissions to access and retrieve AD objects
- Click on Save
On clicking Test & Save, Prolaborate will check whether the details you entered are valid. If they are valid, the settings will be saved. Else, you will see an error message and the details will not be saved.
If you have more than one domain or sub-domain, repeat the above steps for each.
Once the details are saved successfully, enable the Windows Sign-in.
Add AD groups
This step is a prerequisite to enable Active Directory users to log in to Prolaborate.
An AD user will be allowed to log in to Prolaborate only when
- an AD group that a user is part of is added to Prolaborate (we will talk about this in this section) or
- that user’s account is directly added to Prolaborate (we will talk about this in the next section)
To add an AD group, open a repository and click on Menu > Users.
In the Users page, click on Active Directory Groups and then on Add AD Group.
If you have configured more than one domain, ensure the right domain is selected.
- In the AD Browser, select a folder. The groups available in that folder will be listed under AD Groups section on the right
- Select the Groups you want to add
- Click on Add icon to add the selected AD Groups
If you want to add the selected AD groups to a Prolaborate user group, select the group in Default Group dropdown. The rationale behind this will be explained in the Create User Groups section below.
Add AD users (Optional)
While this is not recommended, there is one exception.
You should add an AD user directly to Prolaborate when a user needs access to Prolaborate but he/she is not part of any relevant groups that need access. So, instead of adding the group, you only add that user to Prolaborate.
If these individual AD users are increasing in count, it is better to create a new group in AD and add all the users who need access to Prolaborate to it.
But if creating groups in AD is complicated, you can create one easily in Prolaborate. Refer to next section for details.
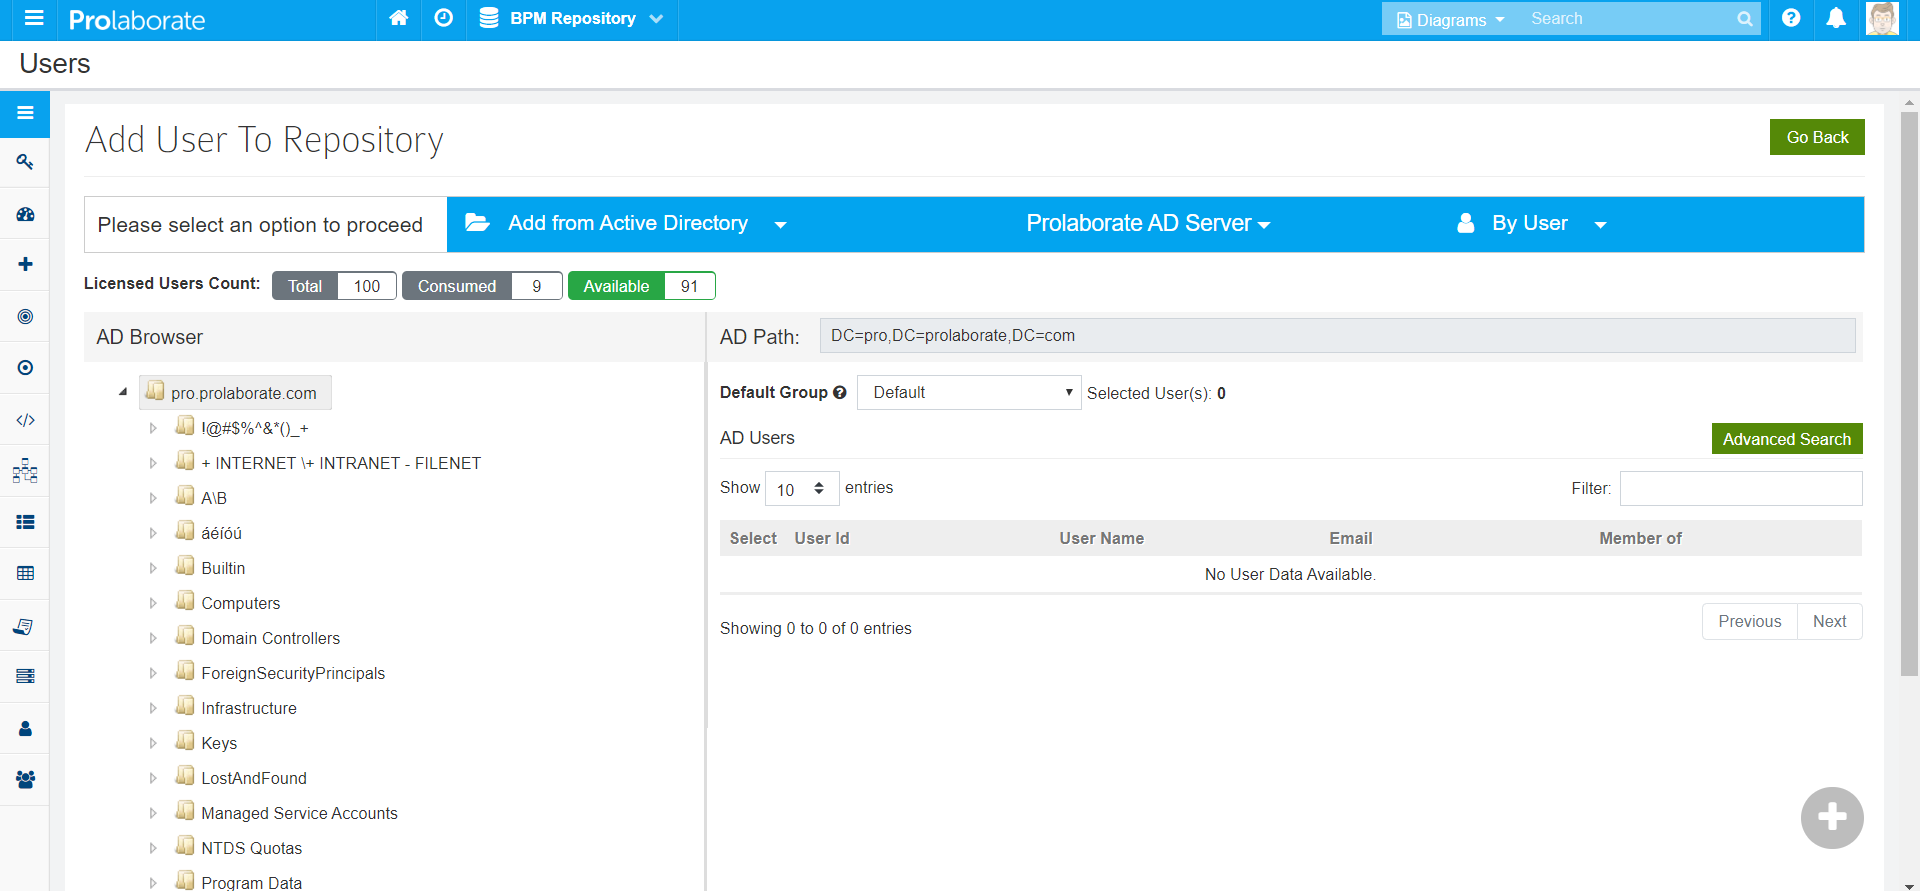
To add an AD user, open a repository, click on Menu > Users. In the Users page, click on Add User.
Select Add from Active Directory > appropriate AD domain > By User.

- In the AD Browser, select the appropriate folder and the users available in that folder will be listed under AD Users section on the right
- Select the users you want to add and the Add icon will be enabled
- Click on Add icon to add the selected AD users
Optionally, if you want to add the selected users to a specific group, select the group in Default Group dropdown. The rationale behind this will be explained in the Create User Groups section below.

If you can’t locate a user, you can select the top folder and click on Advanced Search.
Create User Groups (Optional)
User groups in Prolaborate serve the same purpose as the groups in AD. Groups makes it easier to manage the experience of a bunch of users easily.
This step will be needed only in the following situations:
- You want to manage multiple AD groups in the same way
- You had to add individual AD users and you want to group them to manage them easily
- You want to group AD groups and users and manage them in the same way
- You want to provide role-based admin access to specific capabilities in Prolaborate
To add a group, click on Menu > User Groups. Click on Add Group
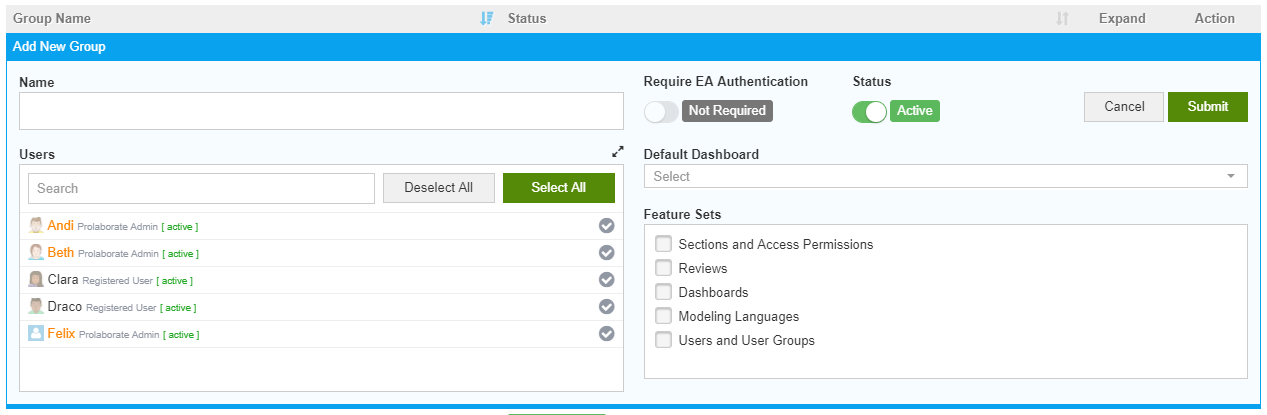
Fill the following details and click on Submit to create a group.
- Mention the Name of the group
- Add the AD Users and/or Groups that need to be part of this group
- Default Dashboard – Ignore this for now. We will set a default dashboard after creating one. We will see more details on this in Create Dashboards section.
You can leave the other fields for now.
Learn more about User groups here.
Configure Access Permissions
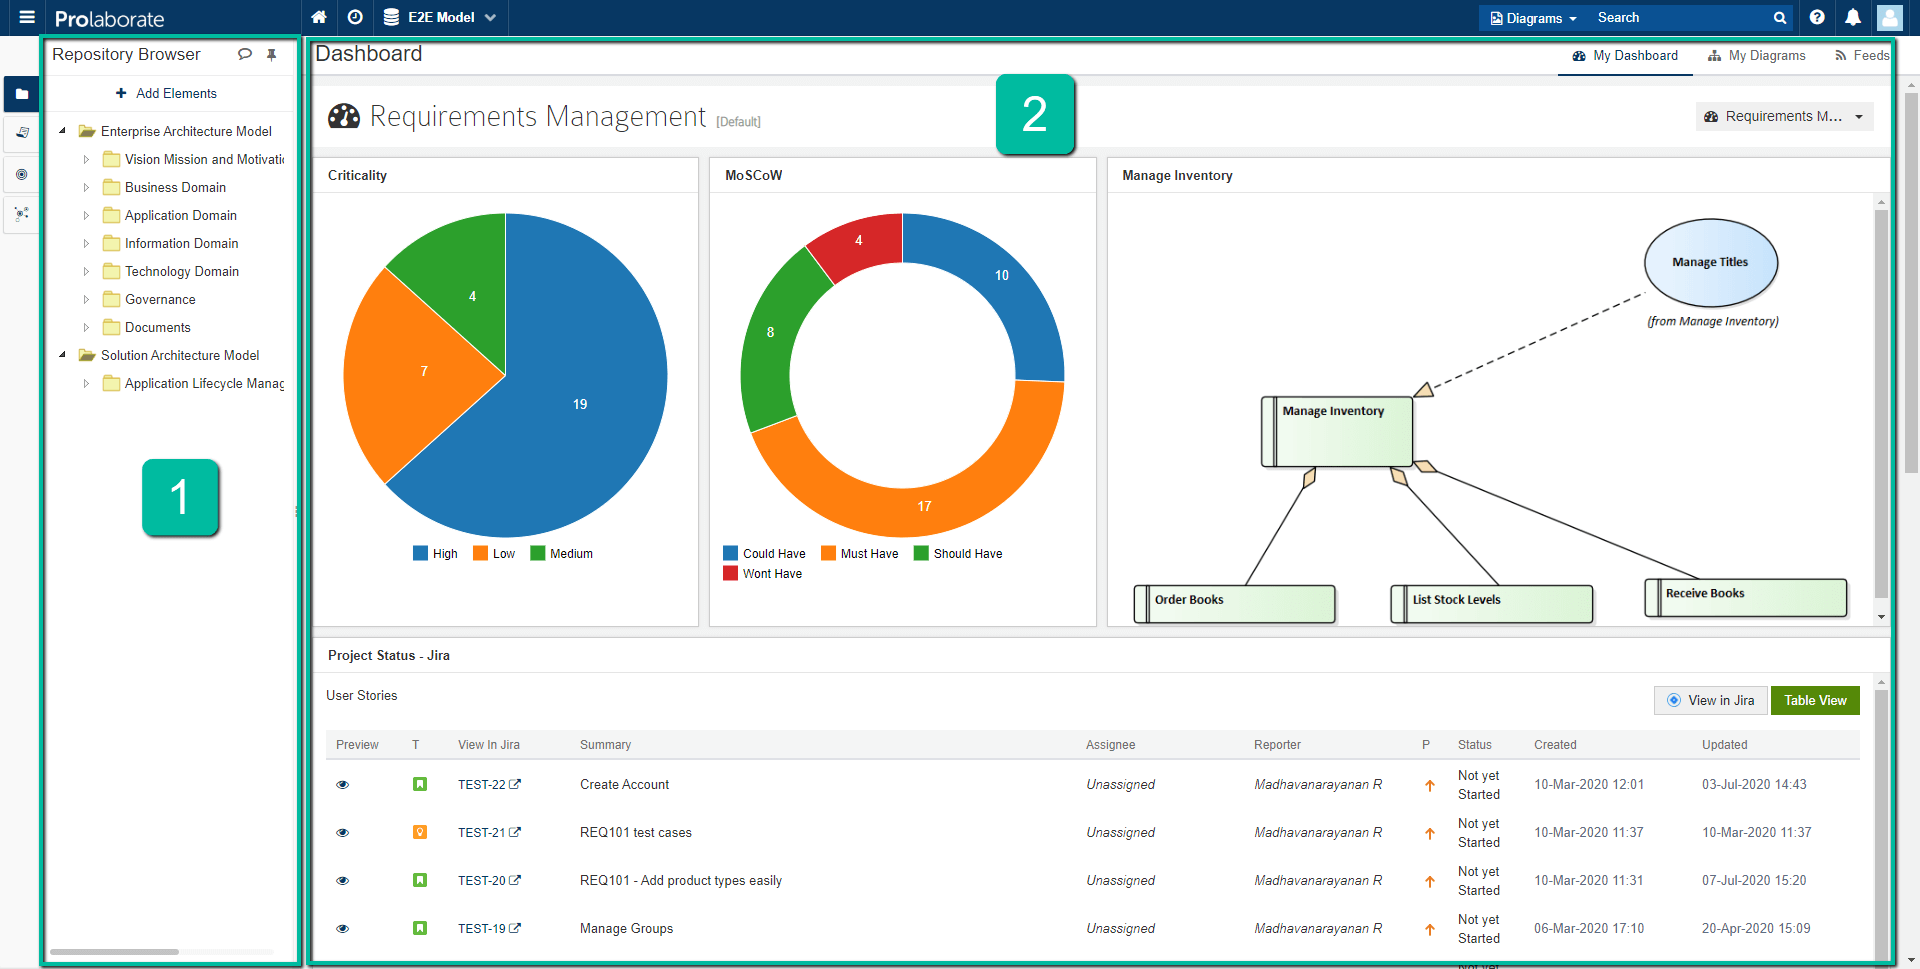
When a user logs in to Prolaborate, he/she is shown
- Repository browser
- Dashboard
In this step, we will decide which group can see which parts of the EA models in the Repository browser and what they can do specifically.
The most important benefit of adding AD groups or creating Prolaborate groups is providing and managing access permissions easily.
Once the permissions are configured for these groups, all the users who are part of these groups get the same access that are provided to the groups they are in.
Note that once the permissions are configured, you are not expected to do anything even when users are added to or removed from the AD or Prolaborate groups. Prolaborate integrates with Active
Directory in real-time and so, status of a user in the Active Directory is checked every single time a user is logging in or opening Prolaborate.
Depending on the steps you have done so far, you have three options now:
- Configure access for an AD group
- Configure access for a Prolaborate user group
- Configure access for both
Anyway, irrespective of the option you choose, the steps to provide access remain the same.
Click on Menu > Access Permissions

- Select a model/view/package from Repository Browser
- Select an AD or Prolaborate group
- Choose the Type of Access. There are four types of Access:
- Read – View live modeling information
- Read and Write – View and edit models
- Read and Collaborate – View model information and participate in discussions
- Read, Write and Collaborate – Complete access
- Click on Add icon
Repeat the above steps for every group. You can repeat the steps for the same group if you want to provide access to different parts of a model for that group.
Learn more about Access Permissions here.
Assign Dashboards
When a user logs in to Prolaborate, he/she is shown
- Repository browser
- Dashboard

In this step, we will decide which group will be presented what kind of information through the dashboard
While Dashboards is a huge topic (Learn more here), we would recommend you to at least create one dashboard per group.
And you can start simple by adding widgets like EA Item Links and Diagram Thumbnails in each dashboard. These dashboards make it easier for the users to get to the intended model information.
Once dashboards are created, the next step is to assign these dashboards to appropriate AD or Prolaborate groups.
Assign Dashboard to AD Groups
If you have assigned access permissions to AD groups, you should assign a dashboard as a landing page for those groups.
Click on Menu > Users.
In the Users page, click on Active Directory Groups. Edit the group and set the newly created dashboard as the Default Dashboard for this group.
Repeat this step for all groups.
Assign Dashboard to Prolaborate User Groups
If you have assigned access permissions to Prolaborate user groups, you should assign a dashboard as a landing page for those groups. Click on Menu > User Groups.
Edit the group and set the newly created dashboard as the Default Dashboard for this group.
Repeat this step for all groups.
How it works?
Let’s quickly recap how these steps help us achieve the goals we mentioned at the start of this blog post.
When an AD user logs in, he/she will be
- Shown relevant EA model content in the Repository Browser as per the access set the groups that user is in and
- Presented with a dashboard with important model information
Every single AD user will have a seamless experience as the relevant information is shared and important information is presented to them.
And the admins don’t have to do anything at all even if there are changes to the groups in Active Directory or Prolaborate.
Best experience delivered to all with extremely minimal efforts; Goal achieved!
Sync Prolaborate and Active Directory
Whenever a user from an AD group logs in, Prolaborate creates a local user account.
This is to enhance the user experience and provide special capabilities to that user. For example, the local user account lets the users add a profile picture, take up admin tasks, and access few profile capabilities.
Note that this local user account has nothing to do with authentication. Authentication with AD is always real-time.
Bettering the experience for a lot of users requires a small effort from admins. They will have to sync the users between AD and Prolaborate once in a week or a month.
To sync the user accounts, click on Menu > Users.
In the Users page, click on Active Directory Groups and then on Sync Users.
When you click on Sync Users, the users who are neither present in any group in the AD Groups list nor directly added to Users list from AD are shown. You can either choose to inactivate them preventing them logging in to Prolaborate or leave them as it is.
Learn more here.
Admin Access
To make an AD user as an admin, go to the Users page, edit the user and make the user an admin. This user will have access to all admin capabilities.
Role-Based Admin Access
If you don’t want to make an user a Prolaborate admin but want to provide him/her admin access to only specific capabilities, that is also possible.
For example, if you want let users manage access permissions but not add or remove users or just manage dashboards.
This can be achieved through the Prolaborate User Groups functionality.
To provide role-based admin access to specific AD users or groups, click on Menu > User Groups.
- Create a user group and add the required AD users or groups to it
- Select the Feature Sets you want this group to have access to
For example, if you just want this group to just manage dashboards, enable Dashboards.