Dashboard and Widget
Dashboard and Widget
The article covers how to create, manage & use dashboards and widgets in Prolaborate
Prerequisites
User must have access to EA Repository in Prolaborate.
To create and manage a dashboard you must be part of a user group where the admin has given access to the user group for dashboards.
Dashboards
Prolaborate allows EA & Non-EA users to design & display the key information in various reporting formats to their business stakeholders using dashboards.
Create Dashboard
Dashboard creation
There are a couple of ways to create Dashboards in Prolaborate, one way is to create dashboards from the dashboards listing page and another way is to create dashboards using the Dashboards drop-down in the menu bar.
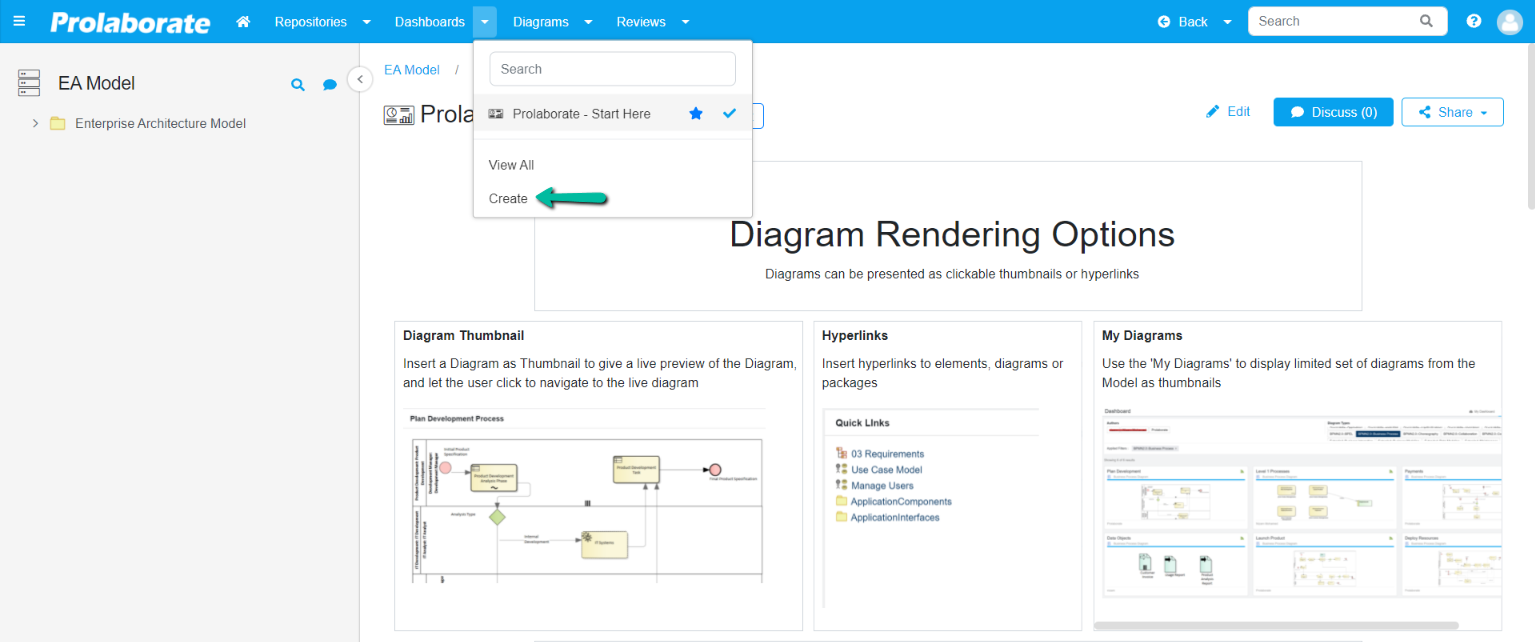
Create Dashboard from Dashboard Drop Down Menu
The creation of dashboards is at ease when you browse through the pages of a particular repository, be it when you are on the review page or diagram page, or repository overview page.
To create a dashboard when you are on any of the repository’s pages, On the Header, click on the Dashboards drop-down and select Create.


Create Dashboard from Dashboards Listing Page
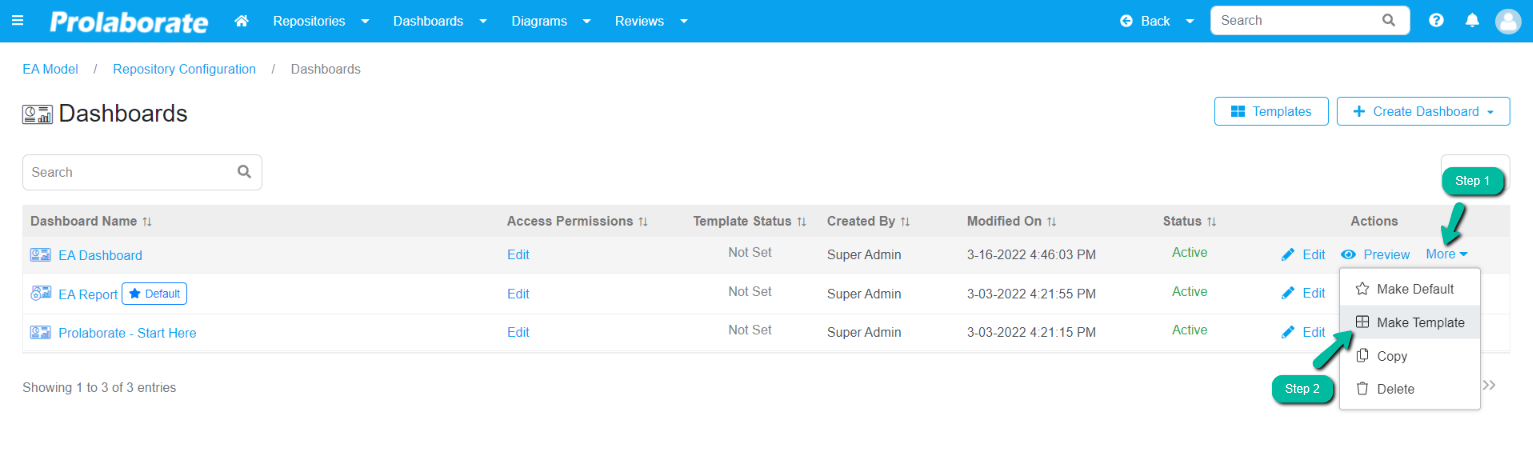
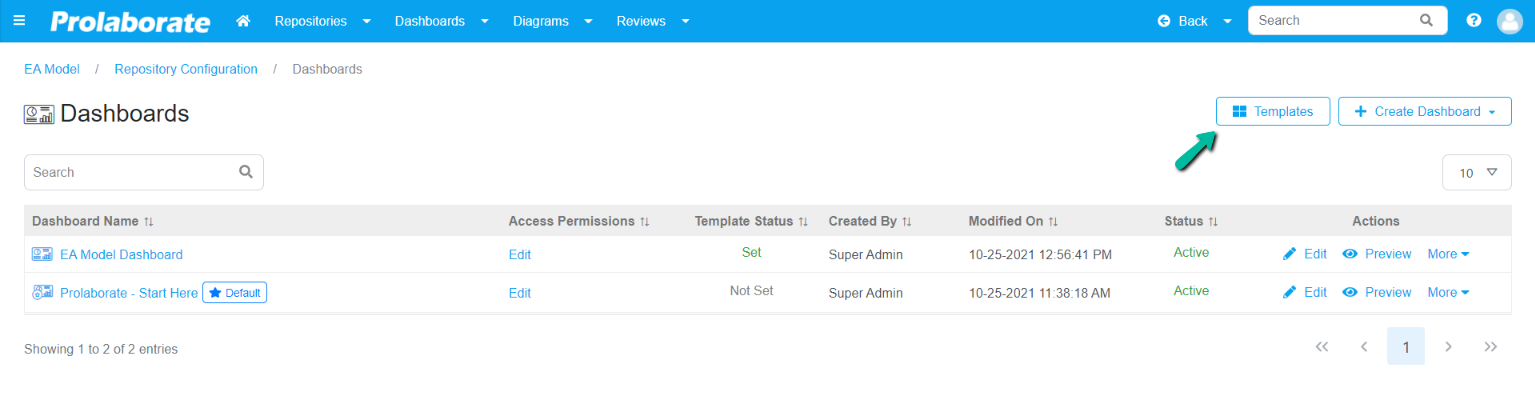
The Dashboards page lists all the dashboards created in the repository.
To create a dashboard from the dashboards listing page, click on Create Dashboard > Create New

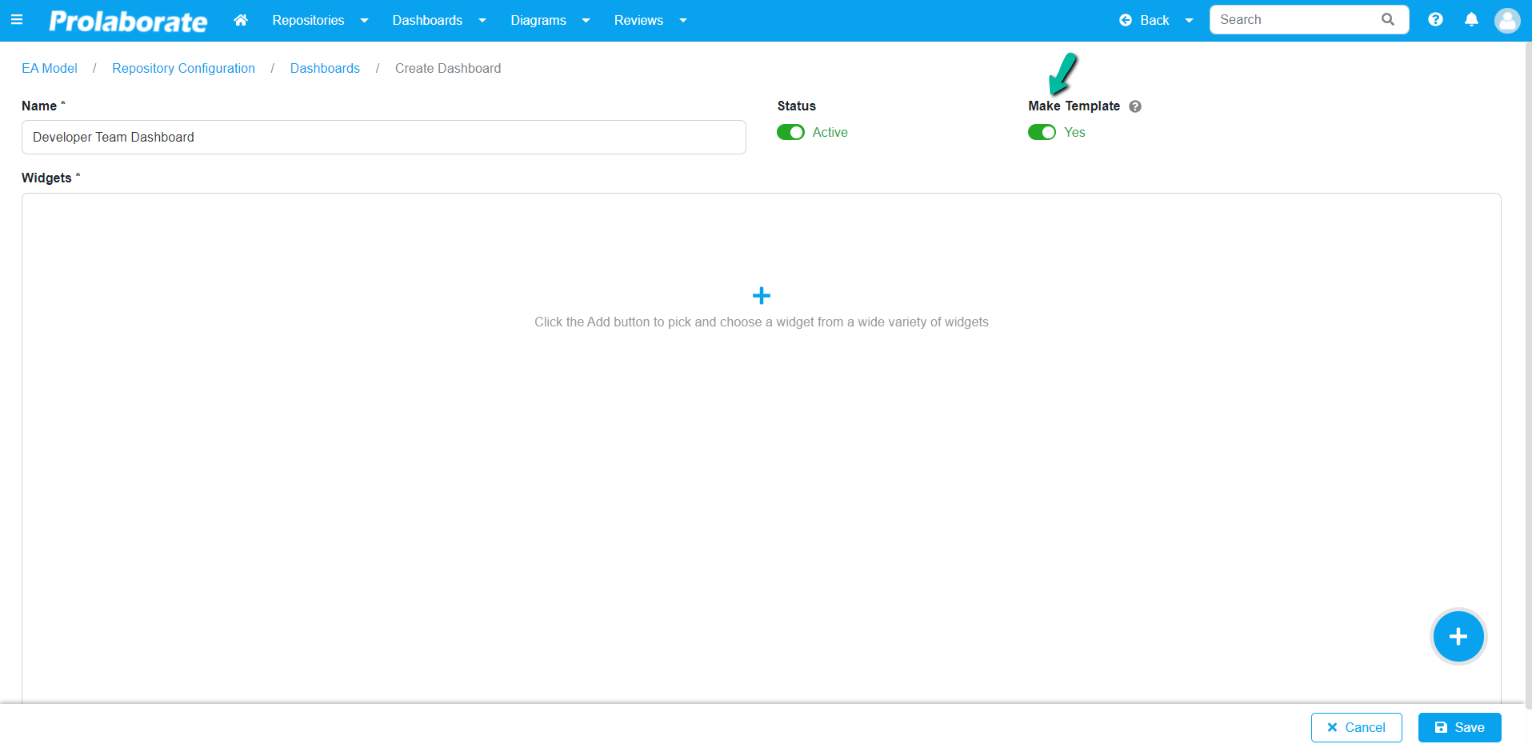
On landing on the Create Dashboard page
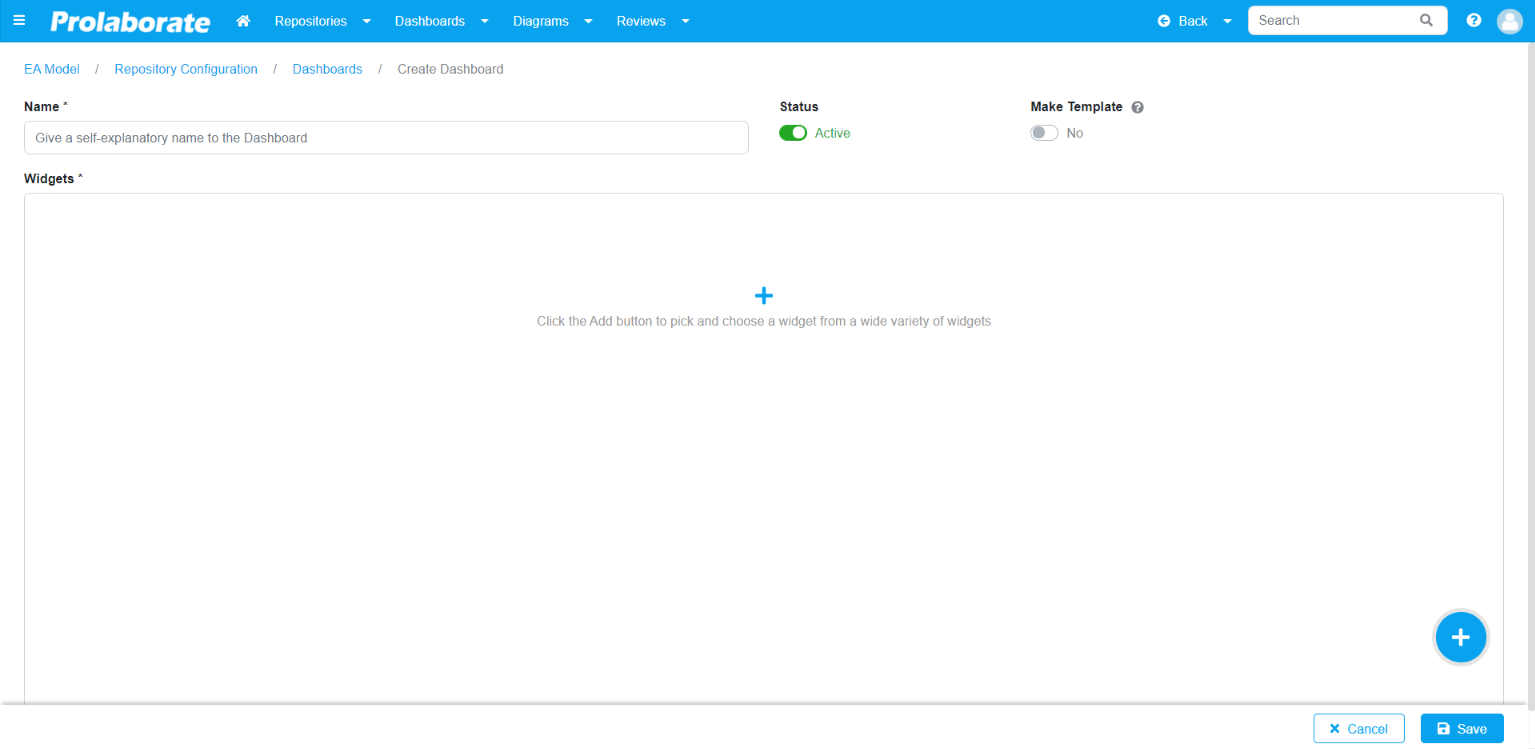
| Title | Description |
|---|---|
| Name | Enter a name for the dashboard |
| Status | By default, the status of the dashboard will be Active, Toggle the Status button to make the dashboard inactive. |
| Make Template | By default, the status of the Make Template will be set as No. Toggle the button as Yes to make the dashboard a template. |
Click on Add Button > Add New to add widgets and after adding the widgets click on Save to create a dashboard.
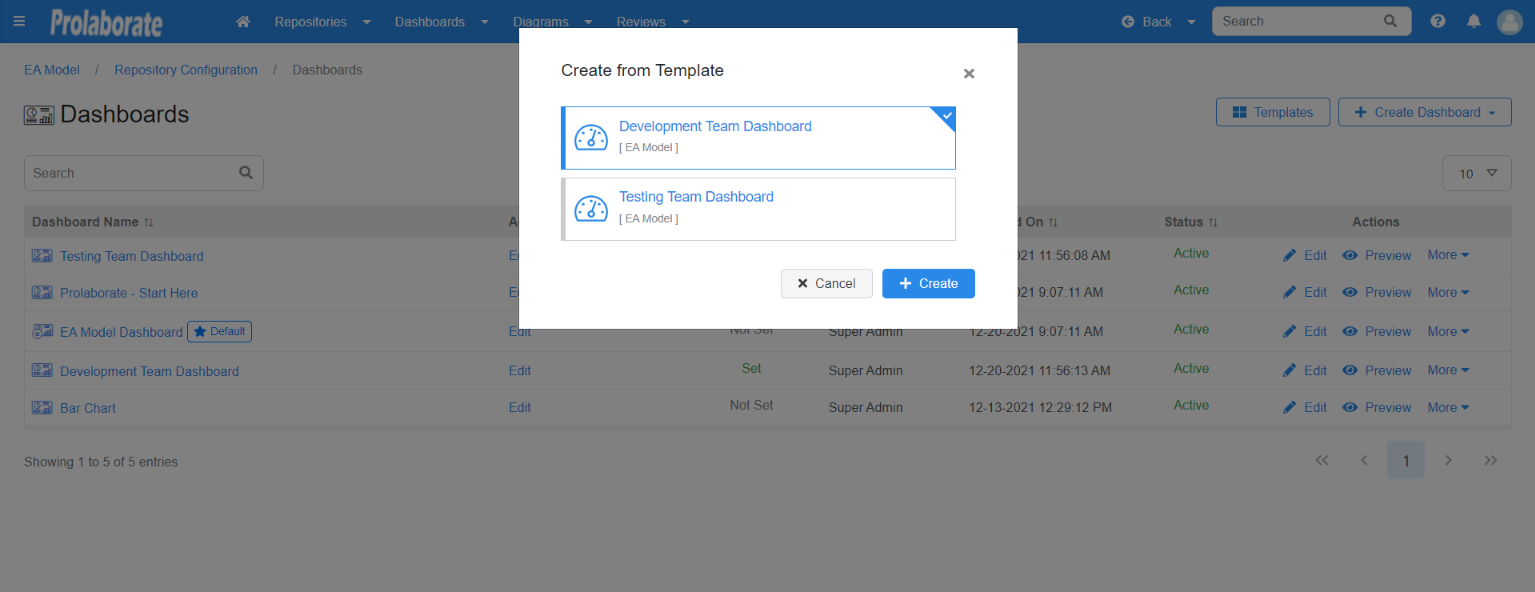
Create Dashboard From Template
You can create a dashboard using the templates. A template will be available if dashboards are marked as a template either at the time of the creation of a dashboard or when it was marked as a Template after the dashboard is created.
To create a dashboard using the existing template, click on Create Dashboard > Create from Template.
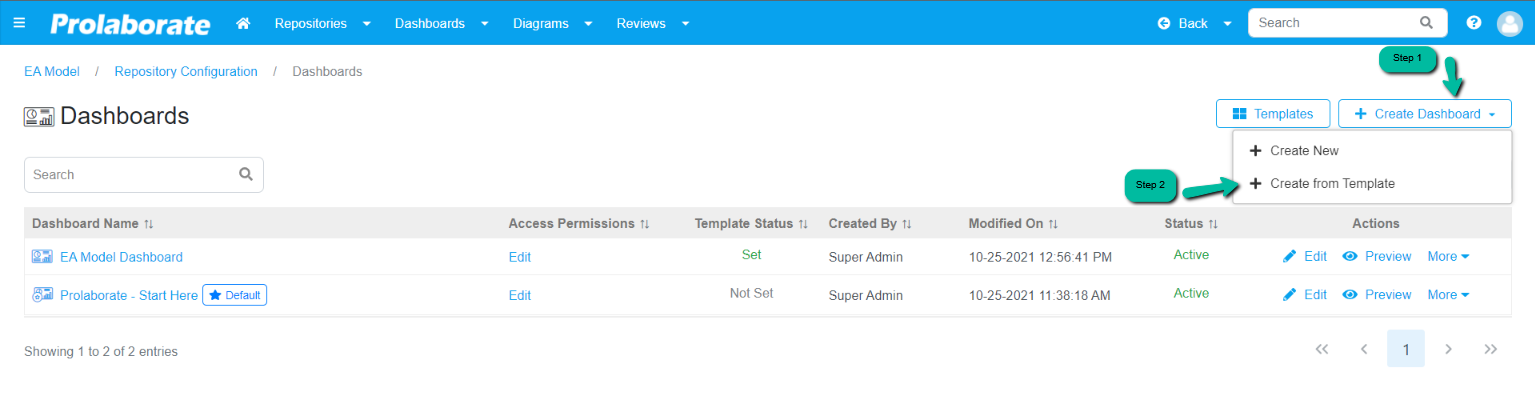
Now choose the template from which you want to create a dashboard and click on Create.
Edit Dashboard
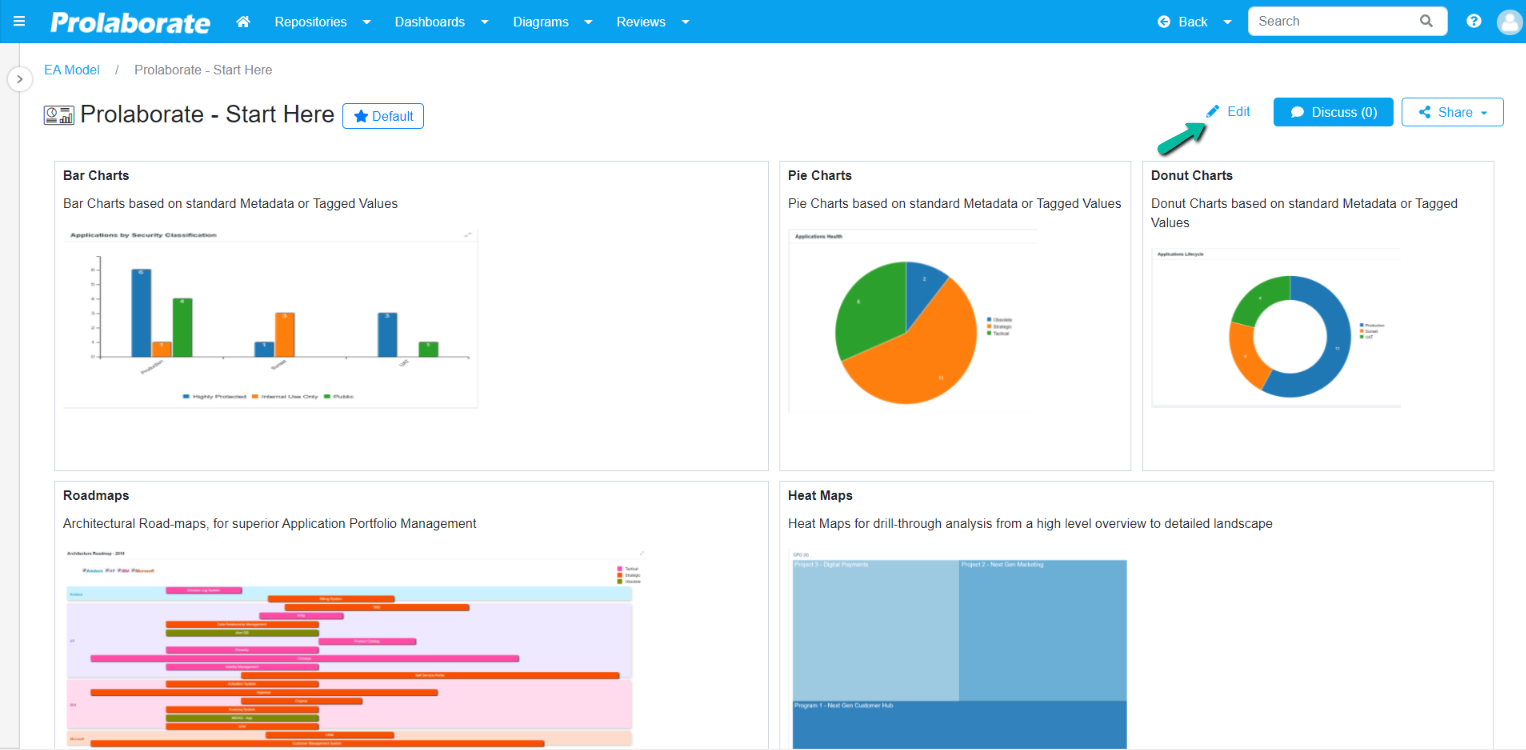
To edit the dashboard, click on the Edit icon to edit the dashboard i.e., adding a new widget or copying the widget or relocating the widget, or formatting the widget.
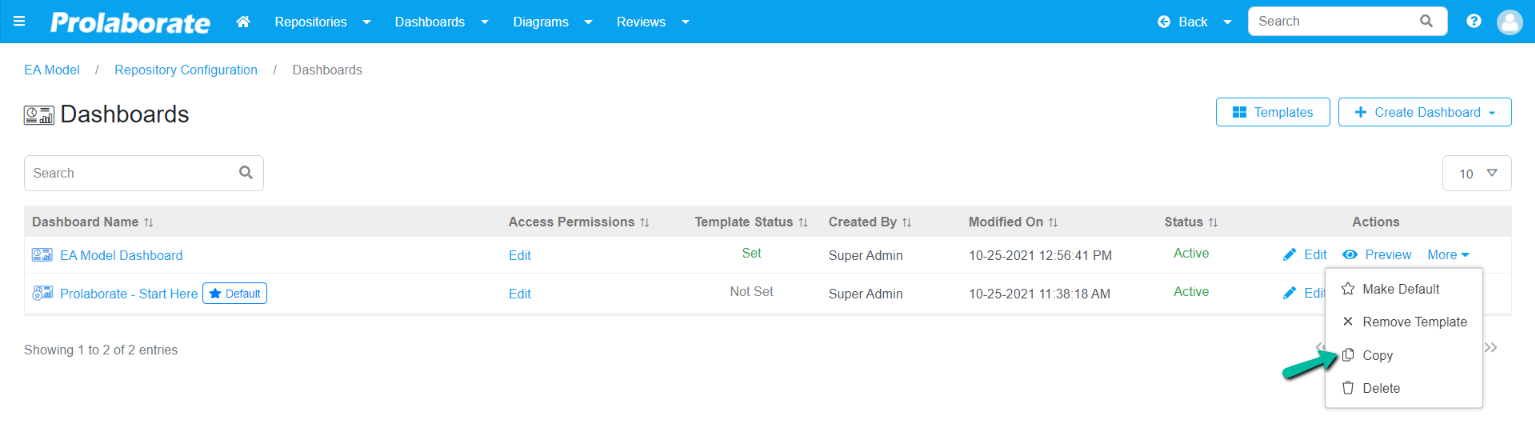
Copy Dashboard
Recreate dashboard just by simply copying dashboard. To copy a dashboard, click on More > Copy.
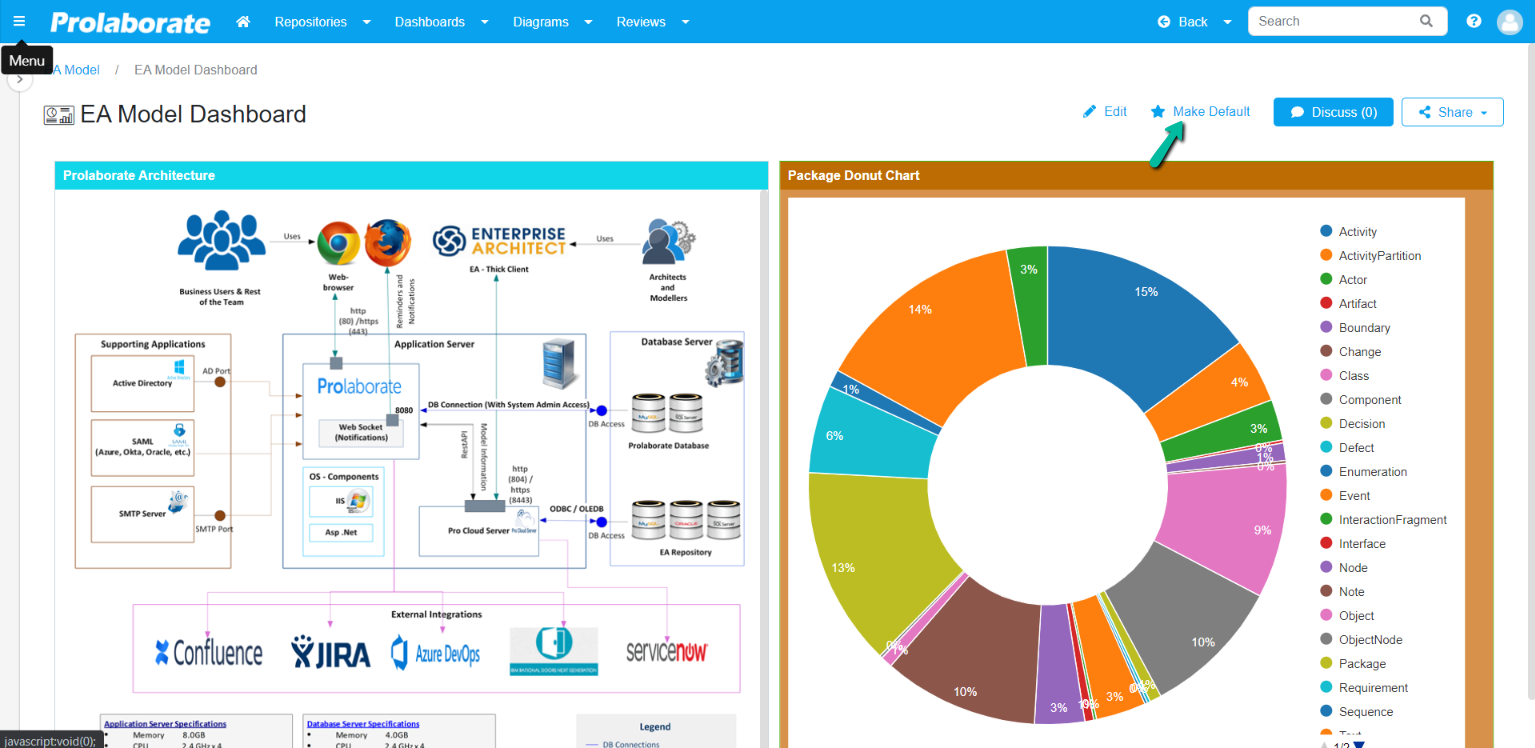
Set Default Dashboard
To make the dashboard default click on More > Make Default OR
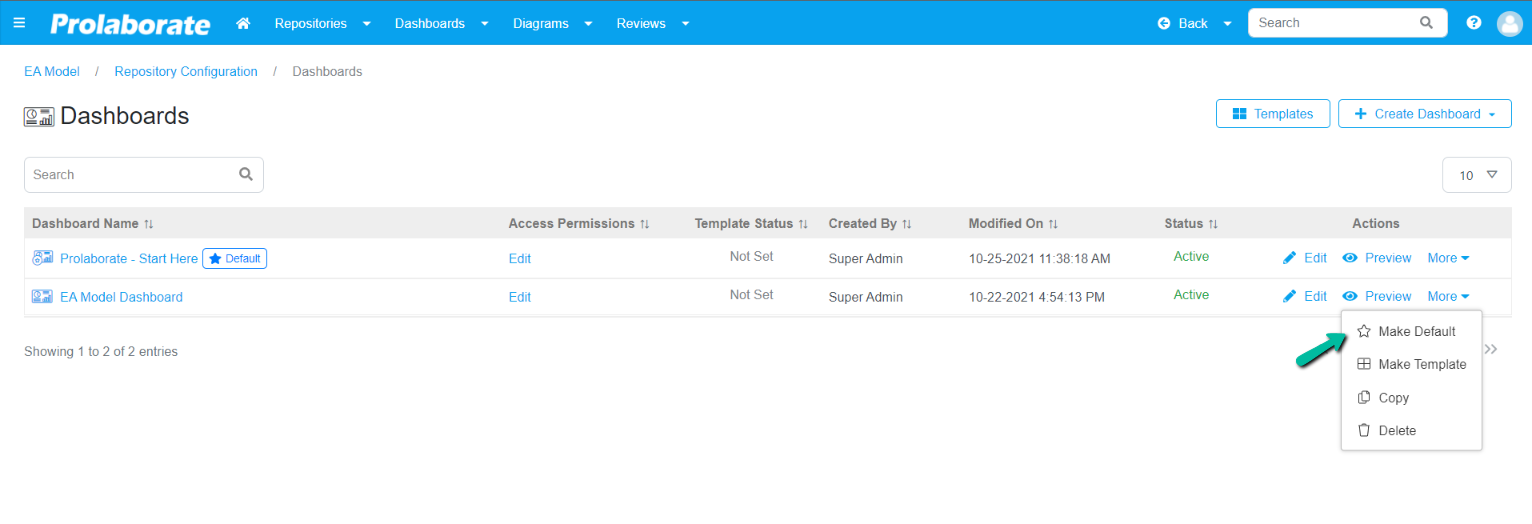
Click on the Make Default on the respective dashboard page.
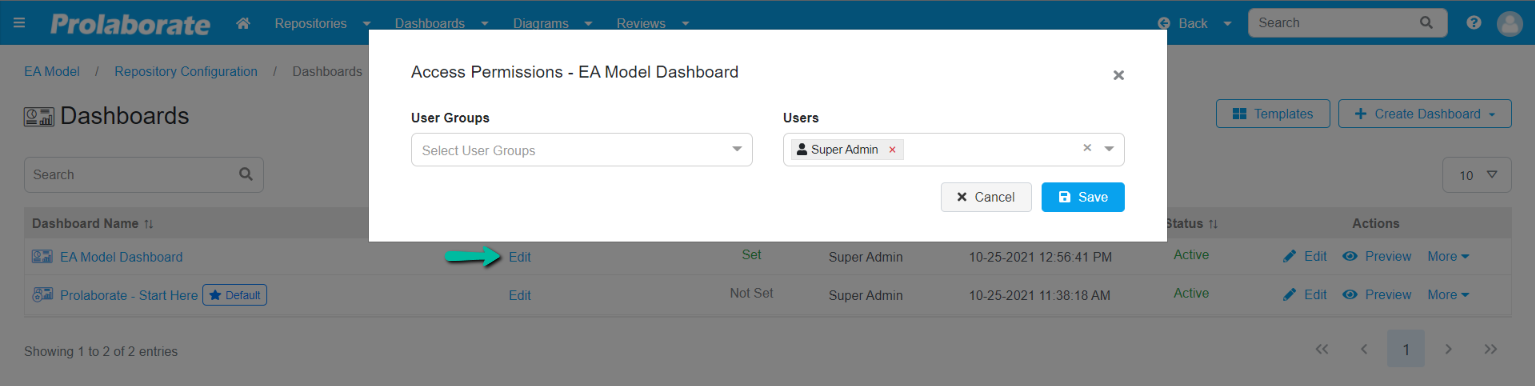
Access Permissions for Dashboard
You can set up the access permission for dashboards at the user level and user groups level. To provide access permission click on Edit and choose the user or user groupsfor whom you want to provide access to the dashboard.
Collaboration
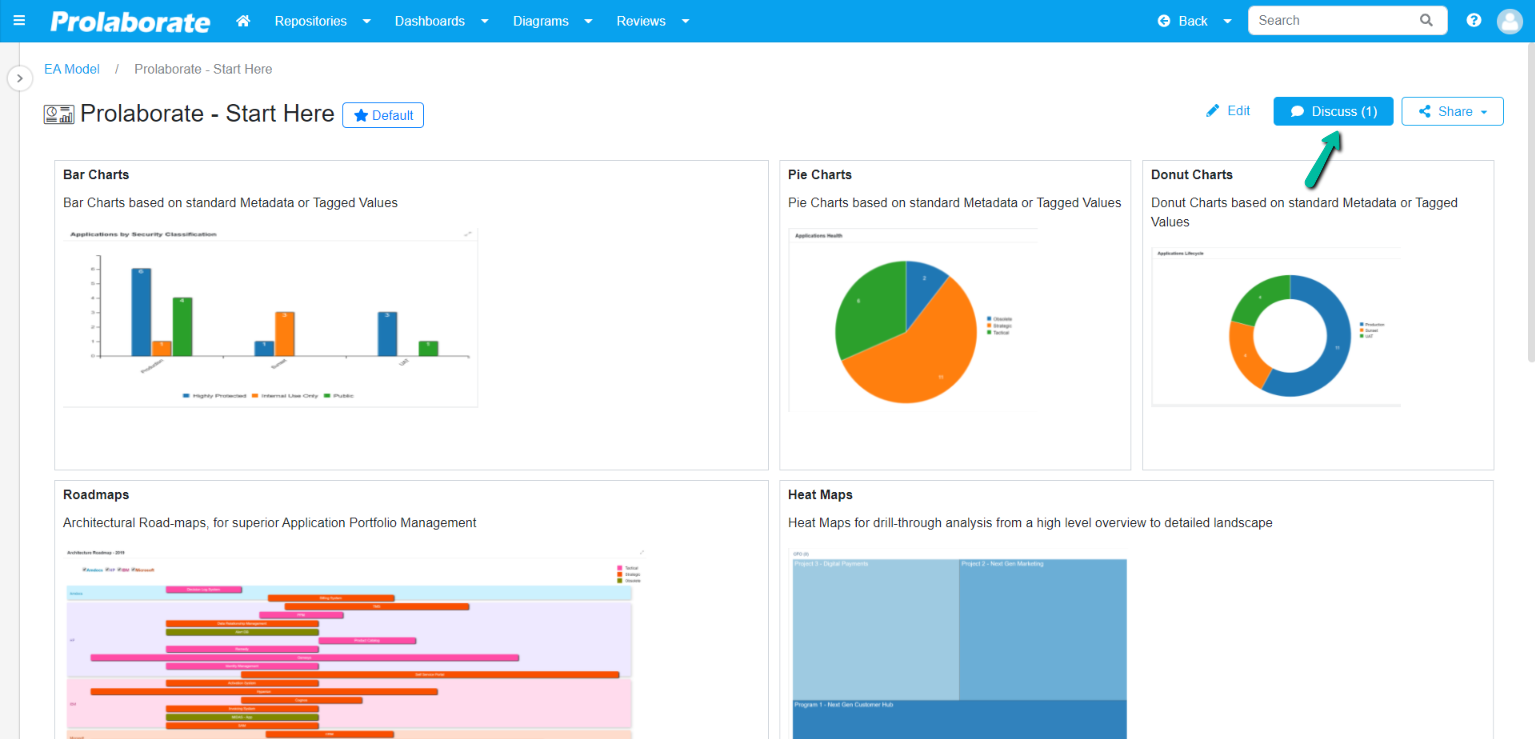
Discuss
Create discussions on the dashboard for users to participate and collaborate. For instance, when you create the dashboard for the first time or when you upgrade your dashboard with a new widget you can communicate and receive feedback from the users about the widget.
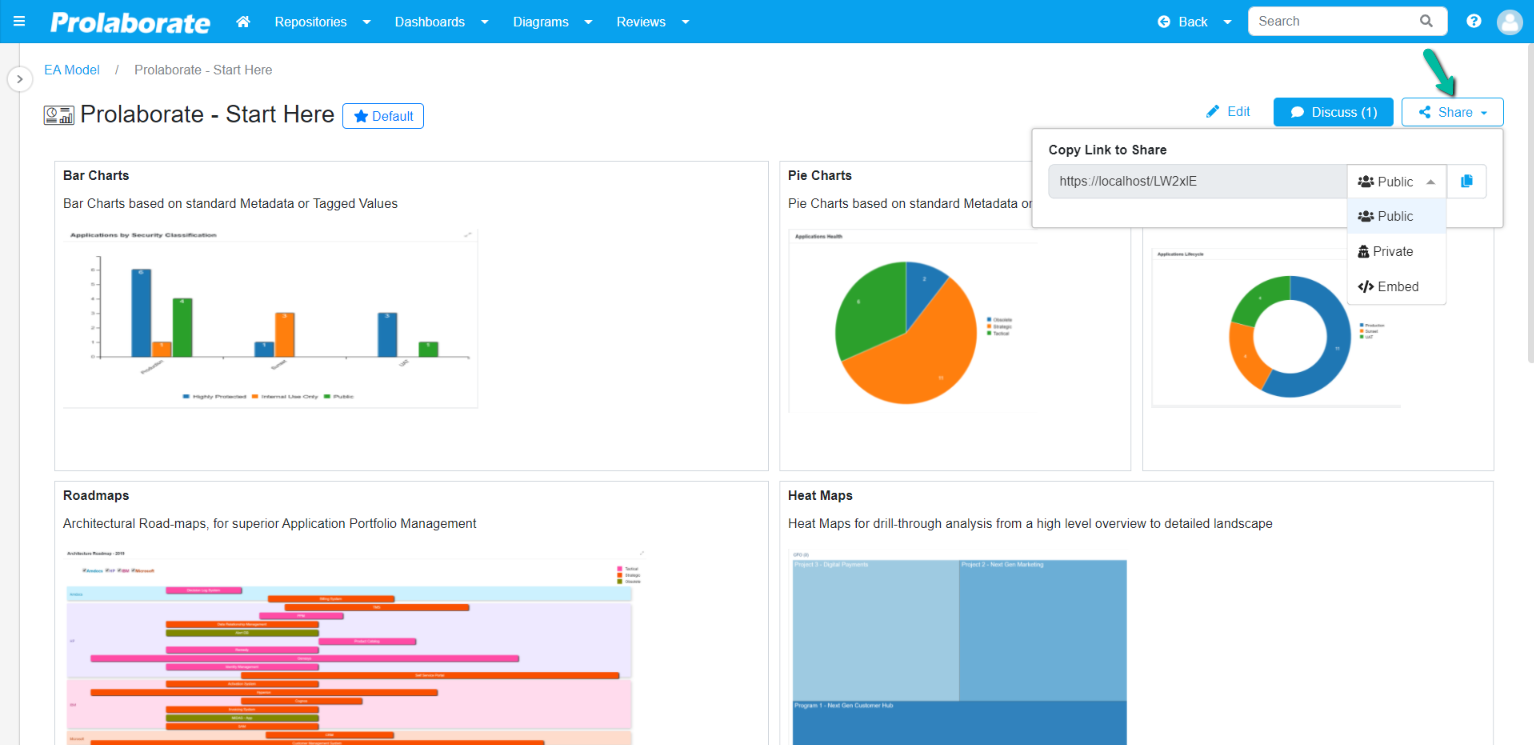
Share
Share your dashboard with your peers with a short URL as shown in the snap below.
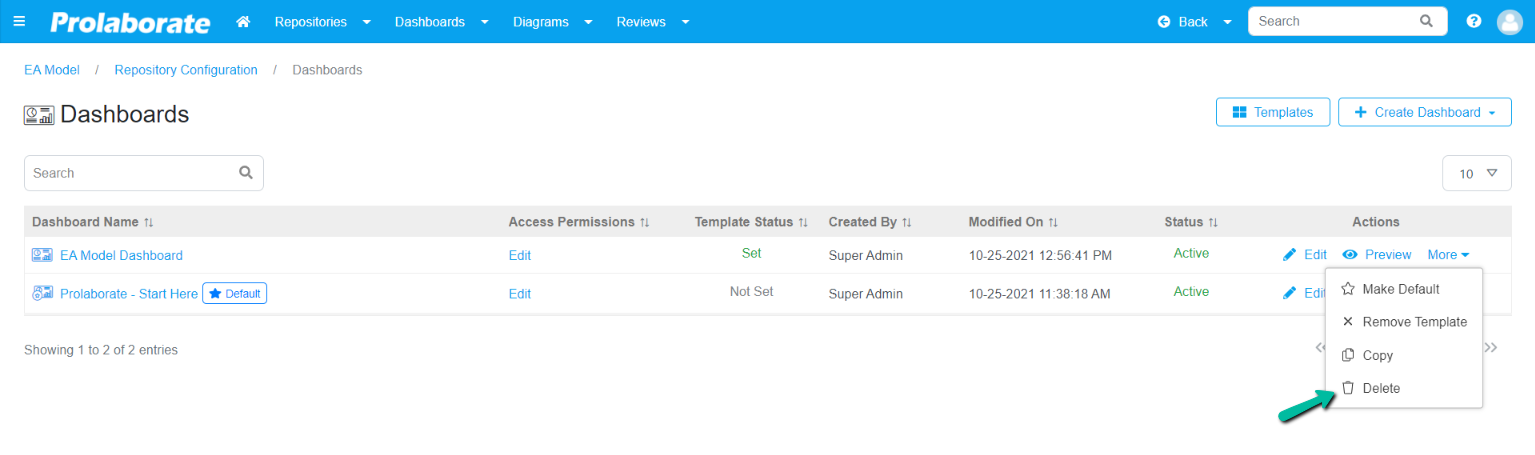
Delete Dashboard
To delete a dashboard, click on More > Delete.
Widgets
Widgets are the building blocks of a dashboard. Based on the requirement, the user adds one or more widgets and publishes them as a dashboard.
Widget Configuration
Widgets works based on the configuration which is set into the widget. Some widgets will be configured automatically by Prolaborate i.e., reviews widget, general feeds widget, etc and certain widgets need manual configuration where input is given by the user itself i.e., text widget, image widget, etc.
Below are the features of the widget that are available in the widget when we edit the dashboard.
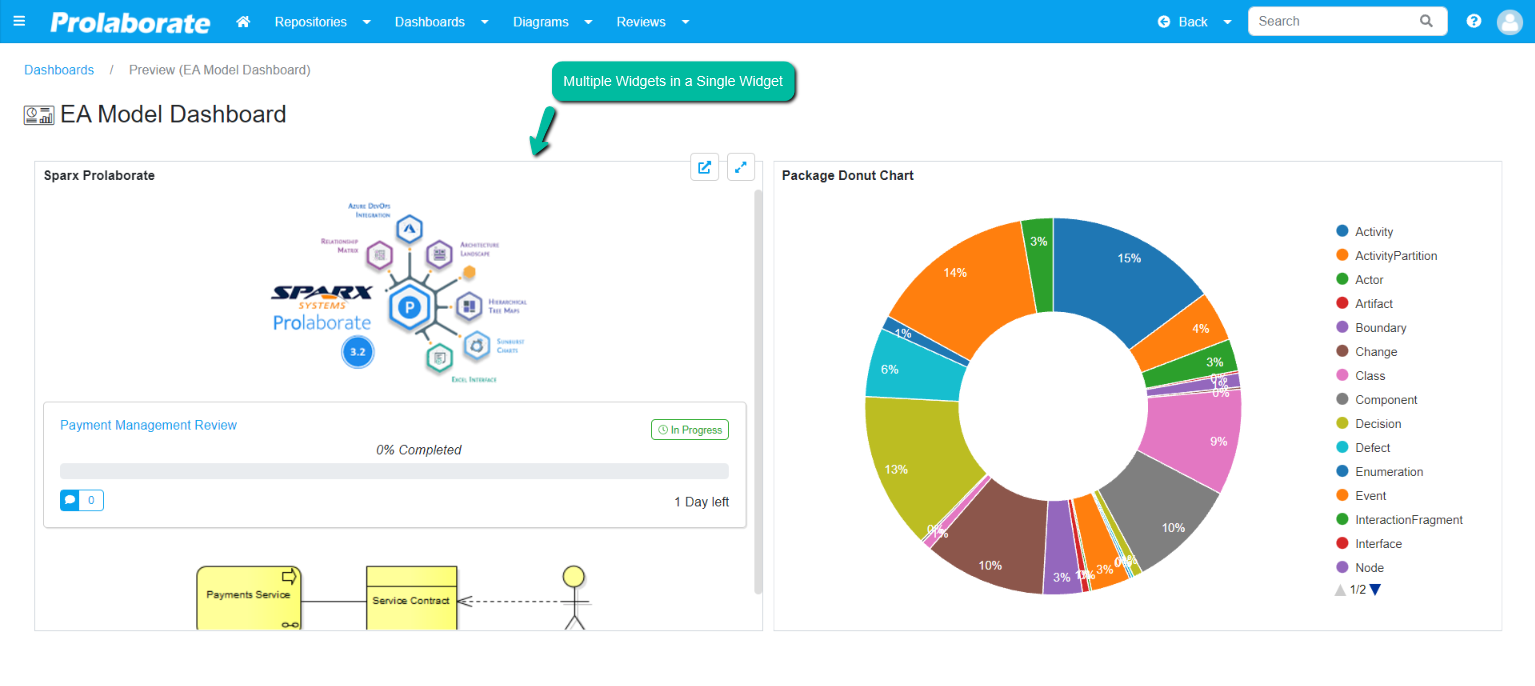
Multiple Widgets in A Single Widget
Multiple widgets can be added to a single widget and they can be moved, re-configure, and deleted.
For instance, to share multiple images or screenshots you can add multiple image widgets within a single image widget, or to share any information which encompasses text information, image sharing, a hyperlink for reference, etc, you can create multiple widgets in a single widget instead of adding individual widgets. Having all required information in a single widget will facilitate users to be in context with the information shared.
To add multiple widgets in a single widget, click on the Edit icon on the dashboard and Plus icon in the widget and click on the Save button.
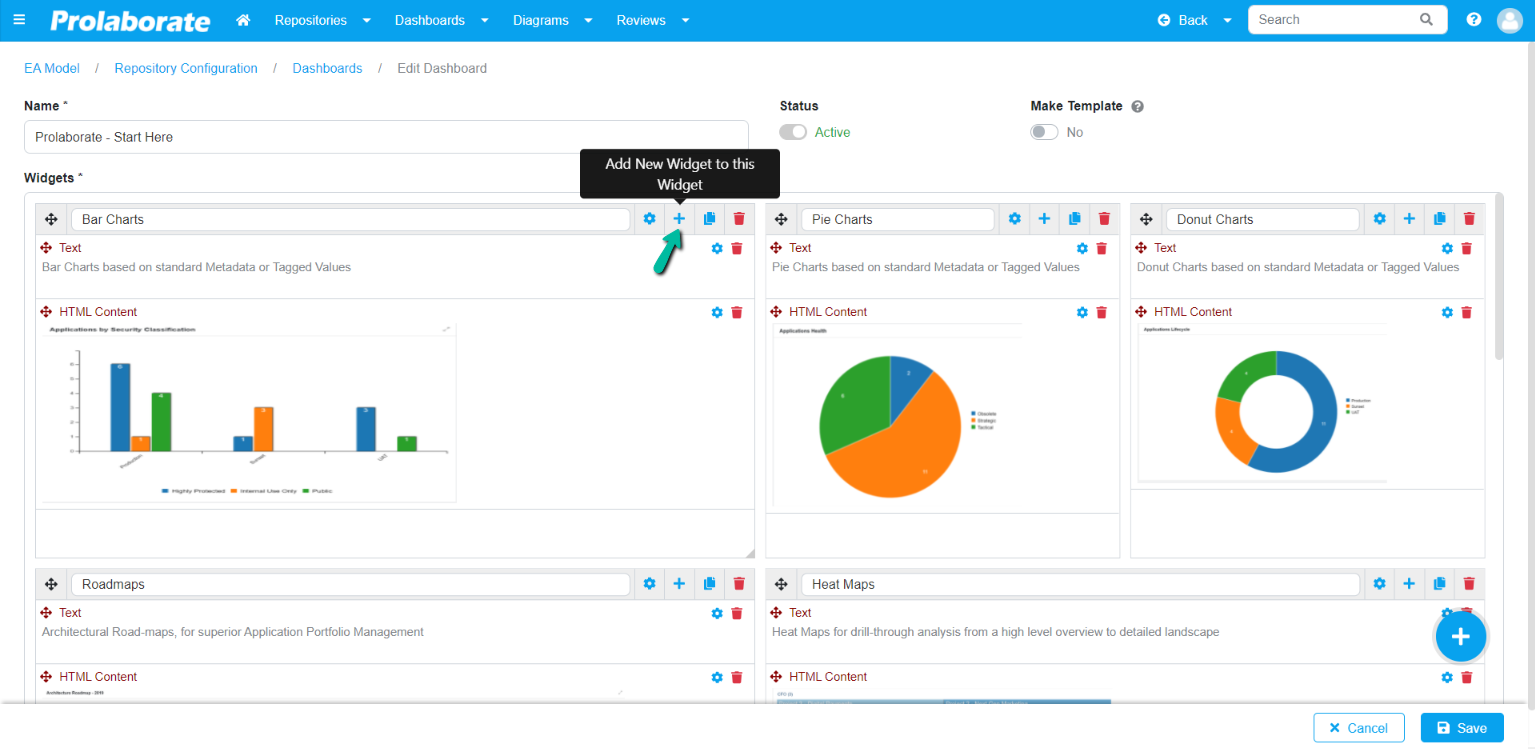
The below screenshot shows multiple widgets added in a single widget.
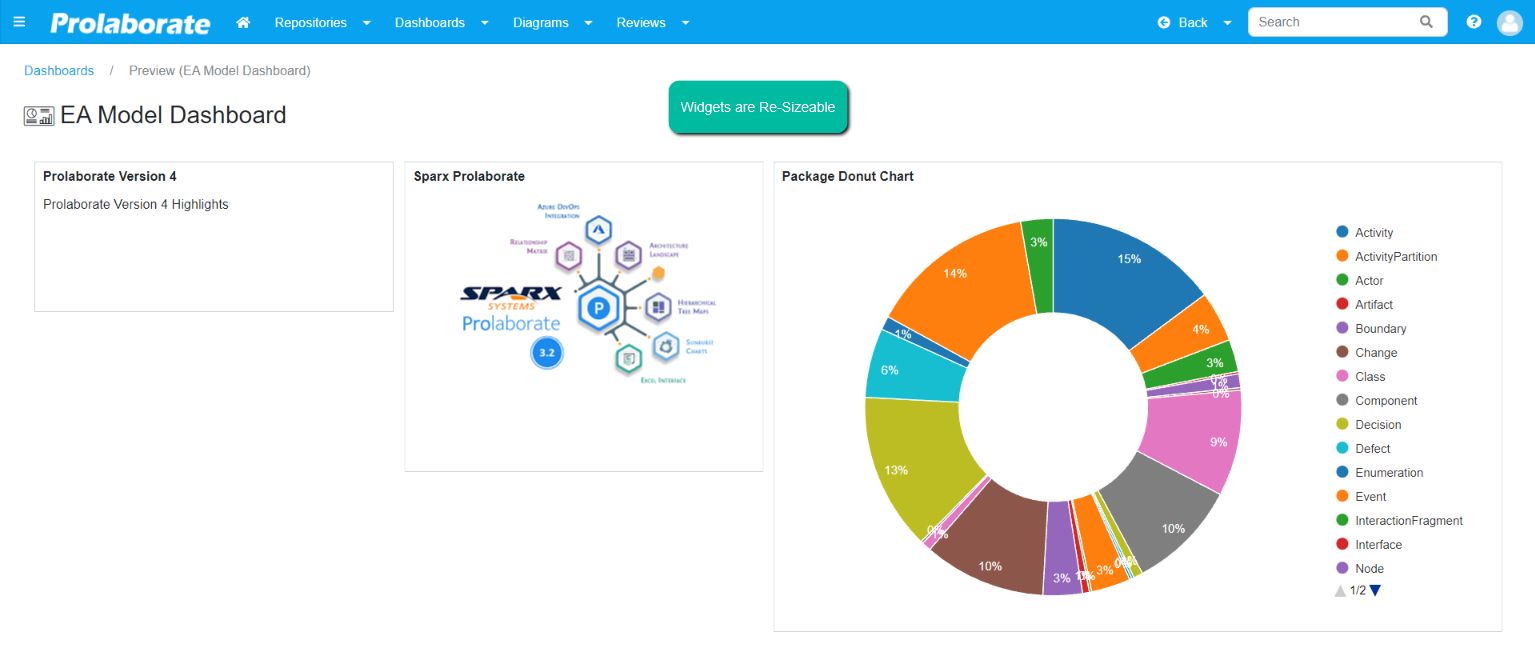
Widgets are Resizable
All the widgets are re-sizeable. Resize it as per the content which is going to appear in the widget. To increase or to reduce the size of the widget place the cursor on the bottom right corner of the widget and with the size reducer expand or reduce the size of the widget.
The below screenshot shows the various size of widgets placed in a dashboard.
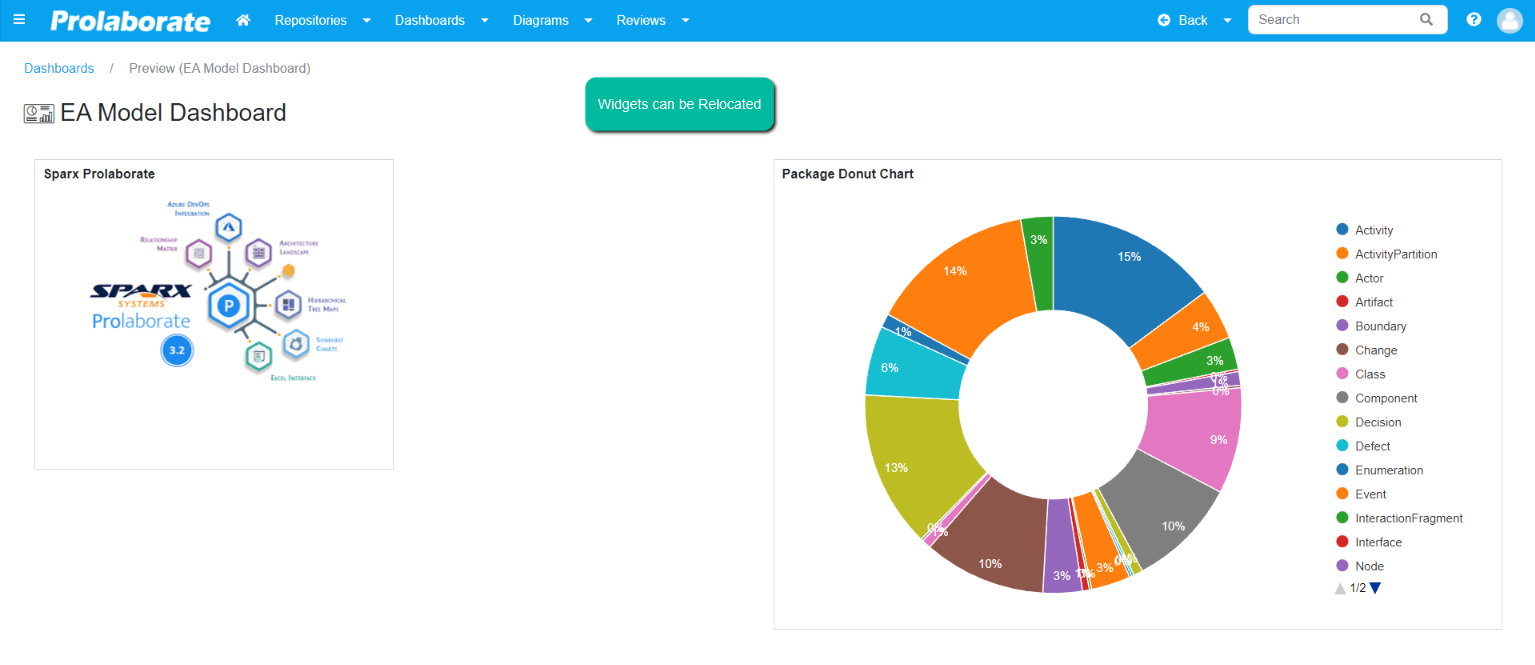
Widgets can be Relocated
Widgets can be placed anywhere in the dashboard space which suits you best for your view. To locate the widget as per your wish, click on Edit and use the Move Icon which is located on the top left corner of the widget to move and relocate the widget as per your wish and click on Save.
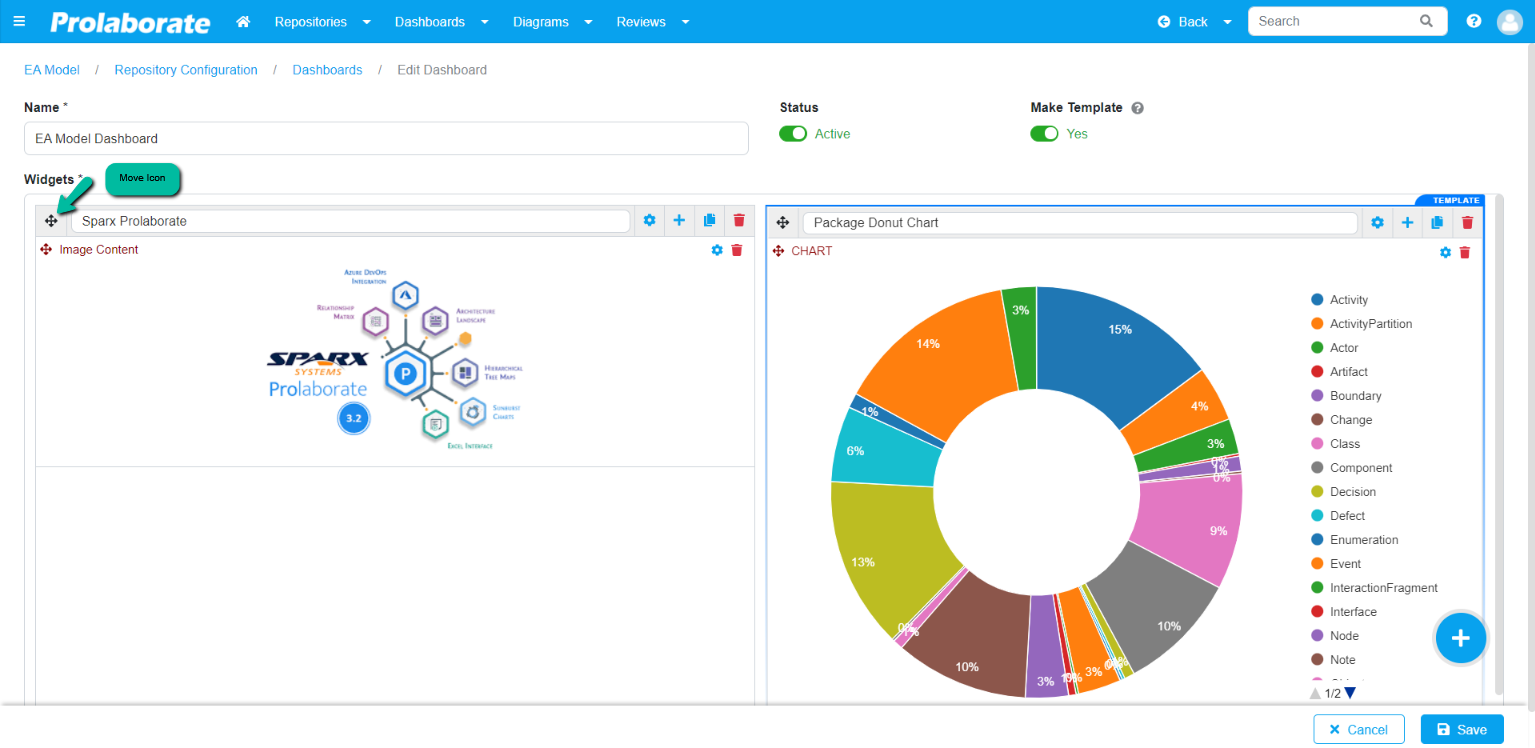
The below screenshot shows the arrangement of widgets.
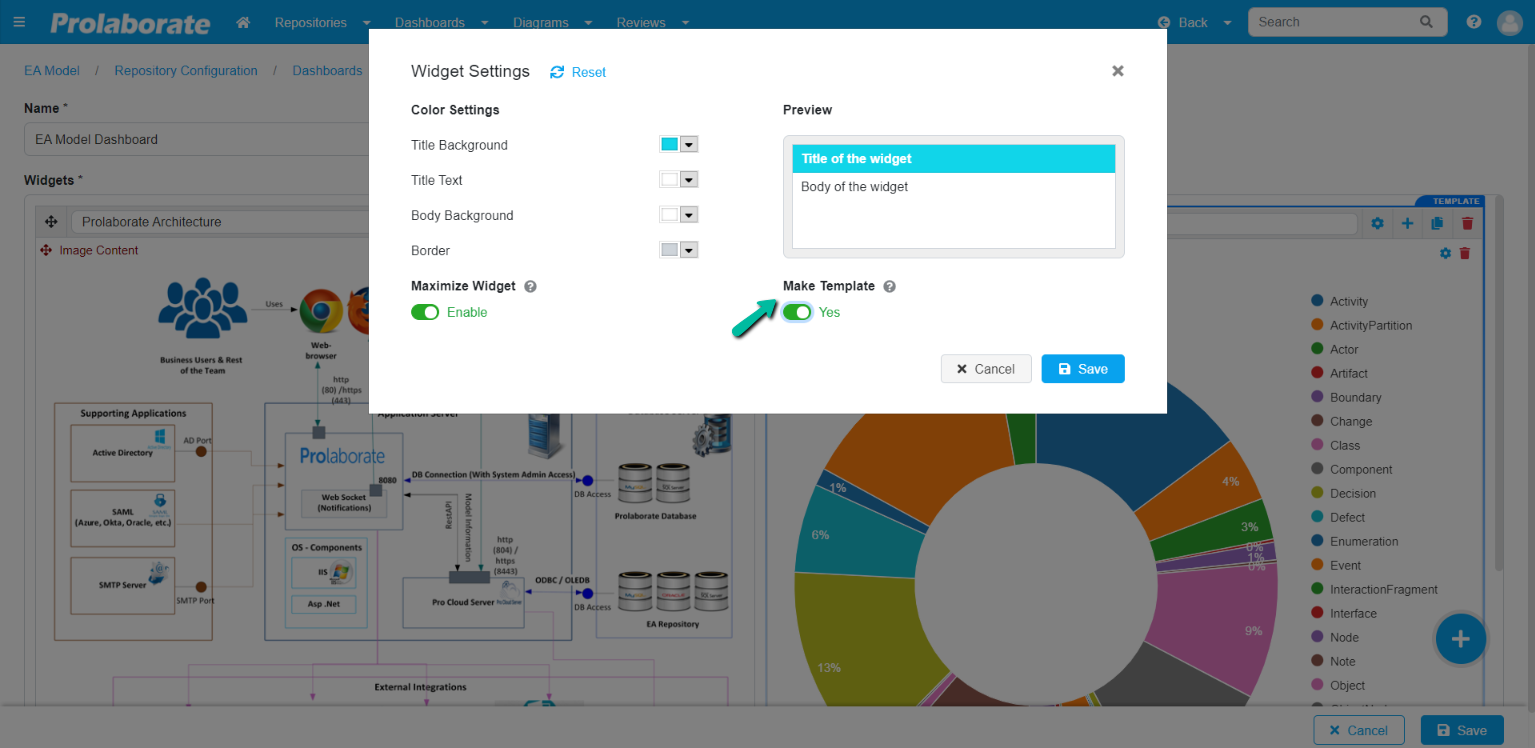
Widgets Color Settings
Set custom color to the title and body of each widget.
To customize the widget color, click on the Edit icon on the dashboard and click on the Gear icon on the widget.
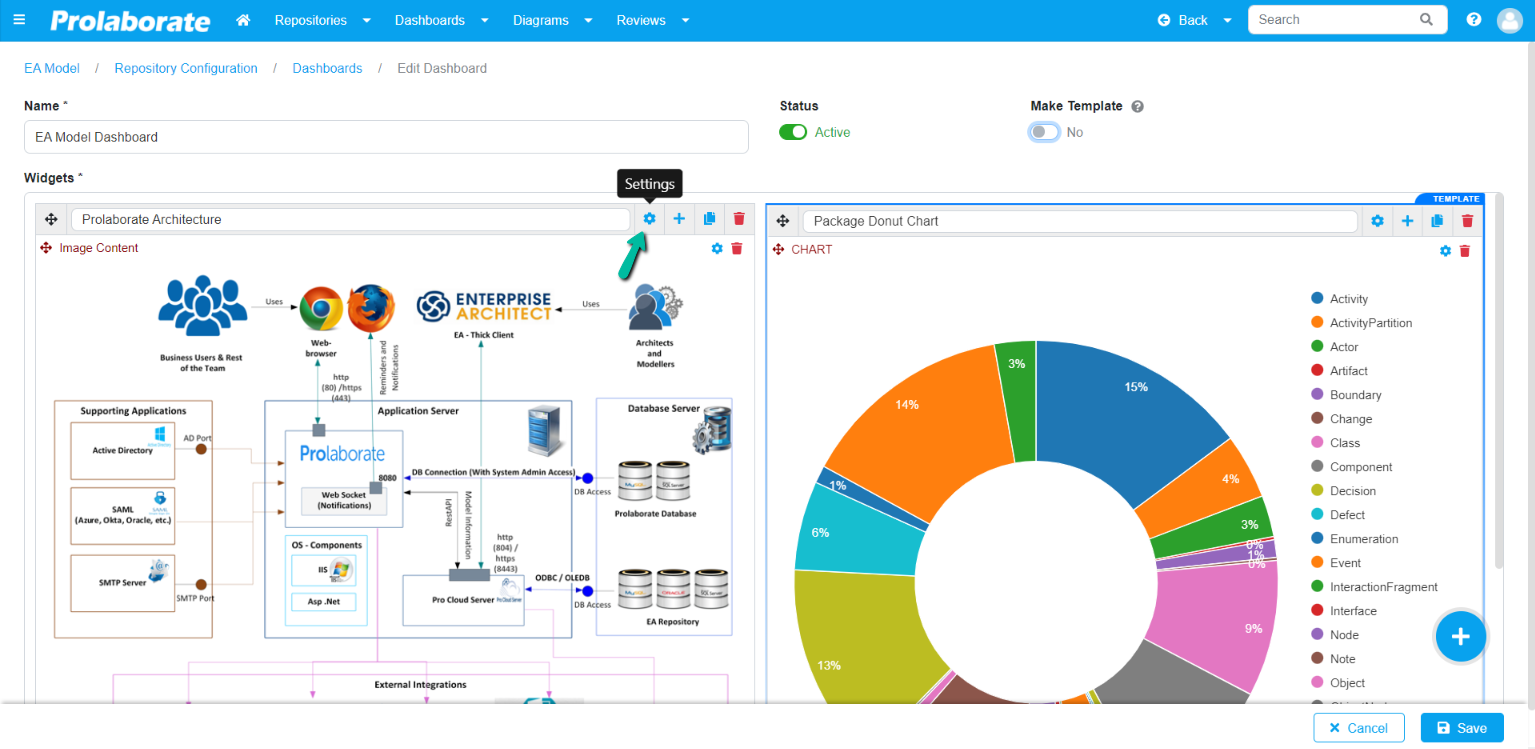
You will now be able to see the widget settings option, see the below screenshot for reference. Customize your widget with the widget settings i.e., adding color to your title, adding color to the widget, etc.

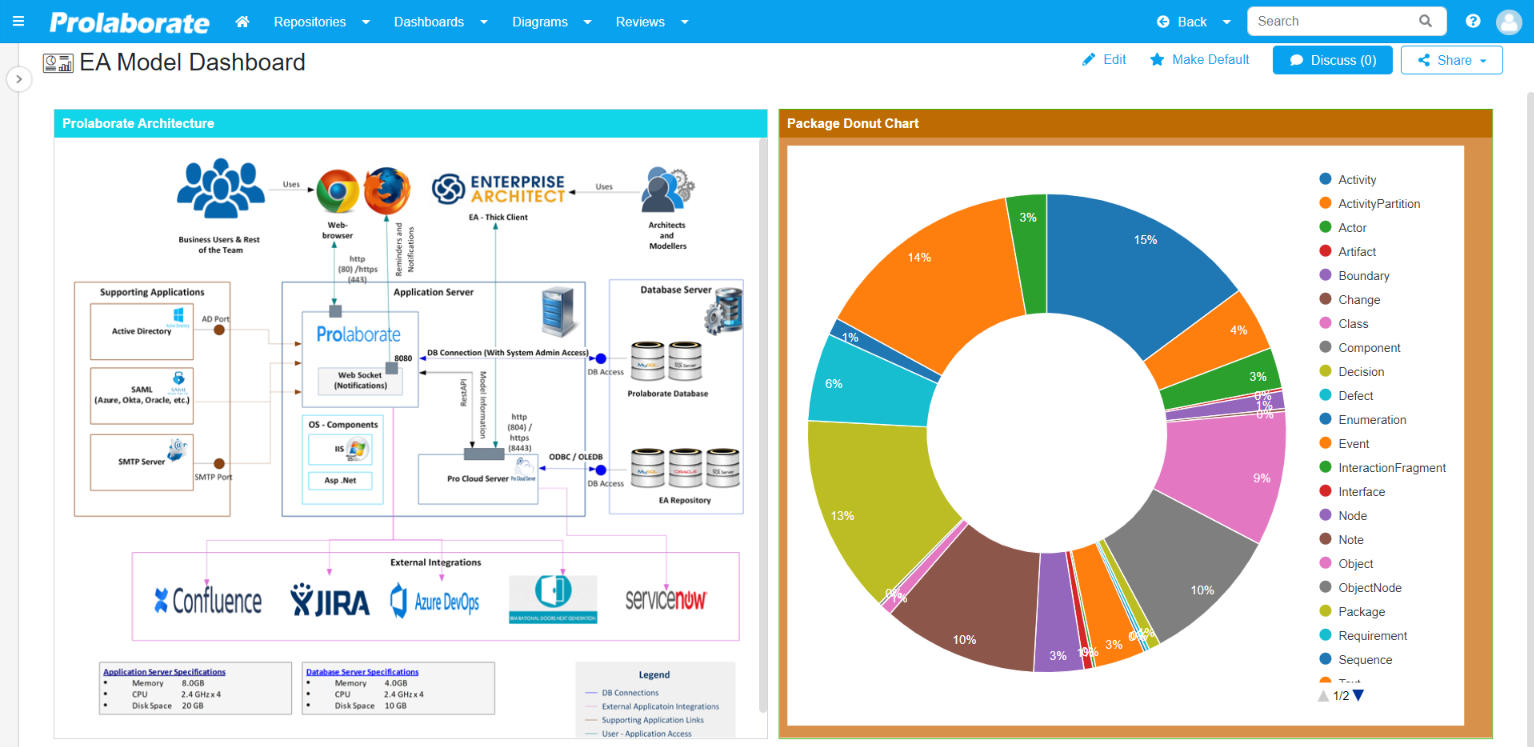
The below screenshot shows formatted widgets in the dashboard.
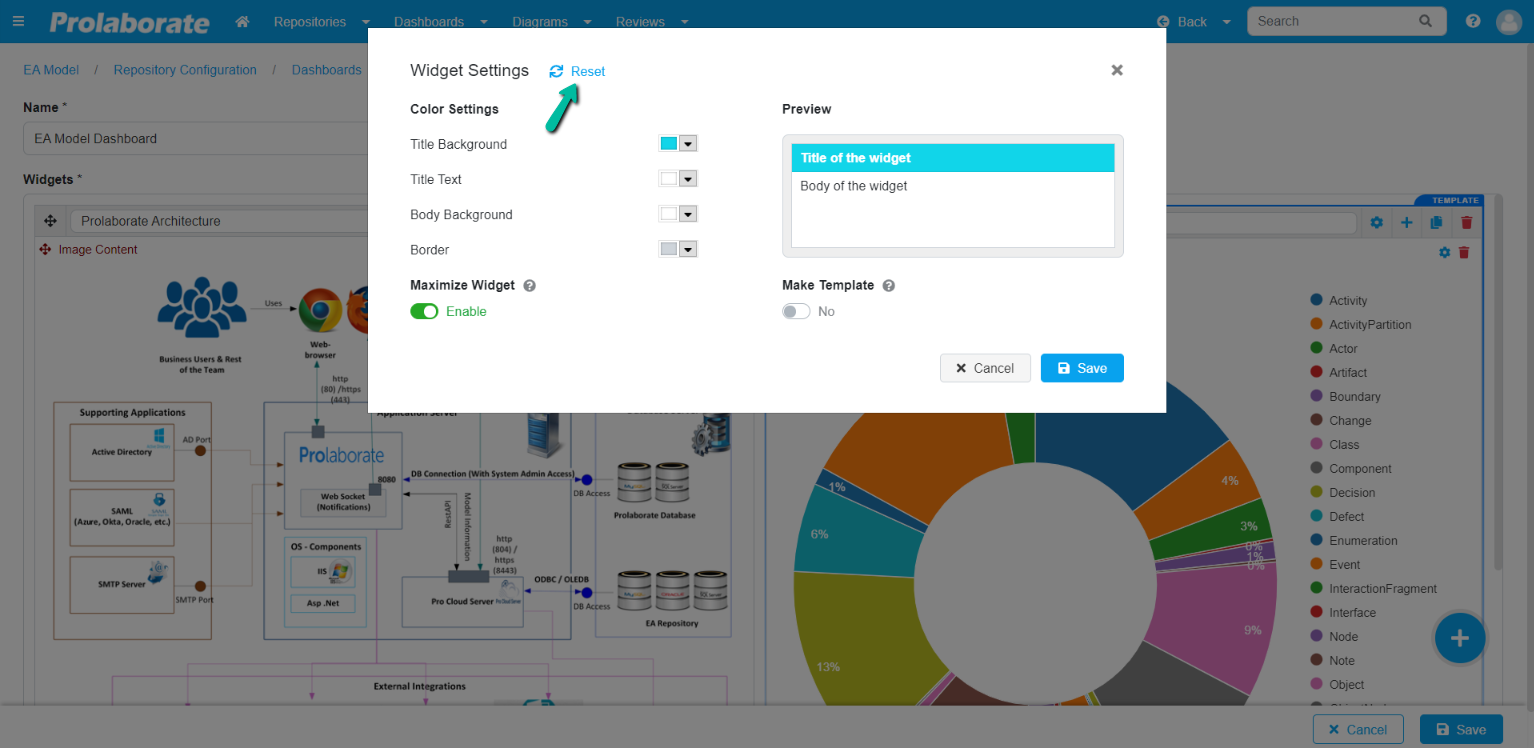
Widgets Settings Reset
This feature will enable you to reset the widget to its original configuration. Resetting the widget which is marked as a template the template will no more be available.
To reset the widget, click on the Edit icon on the dashboard and click on the Gear icon on the widget.
Now click on Reset > Save on the widget settings.
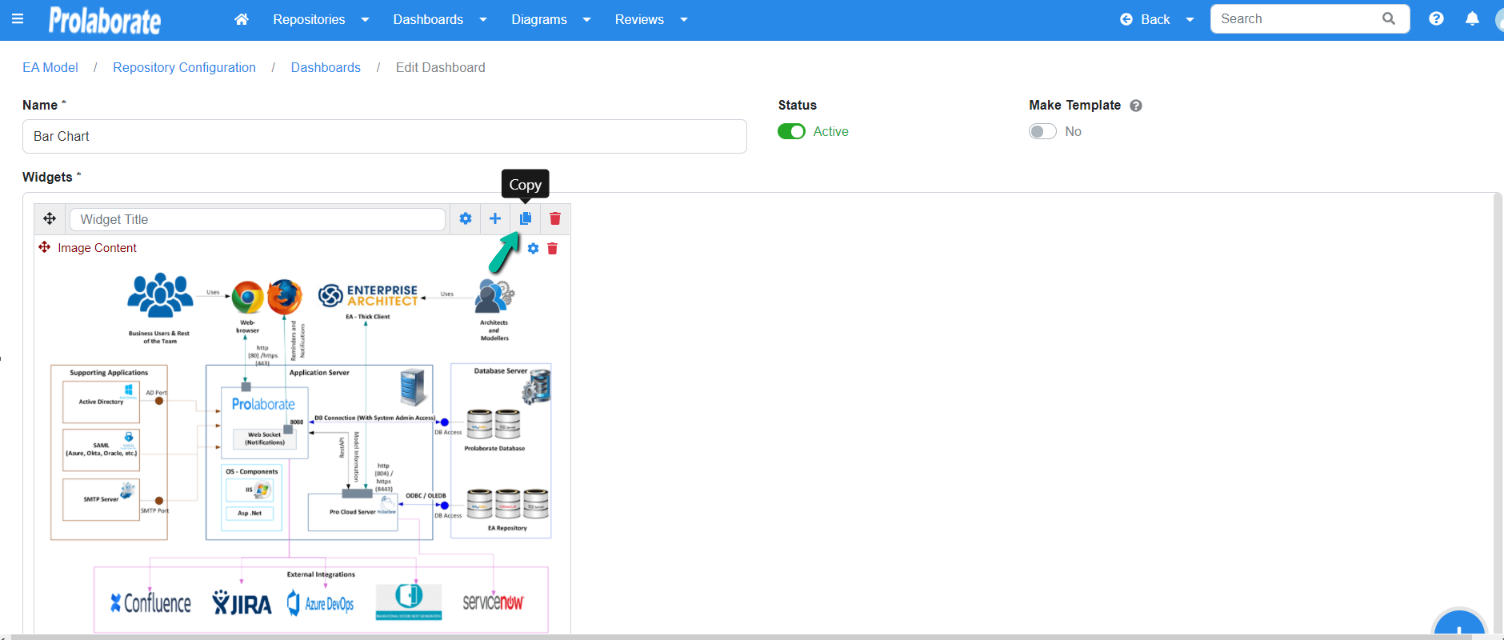
Widgets Copy
To copy a widget, click on the Copy Icon. Upon clicking on the icon, the widget will be recreated immediately within the dashboard and it will be reflected either on the side of the widget or below the widget depending upon the availability of space.
Below is the screenshot which shows the Copy icon in the widget.
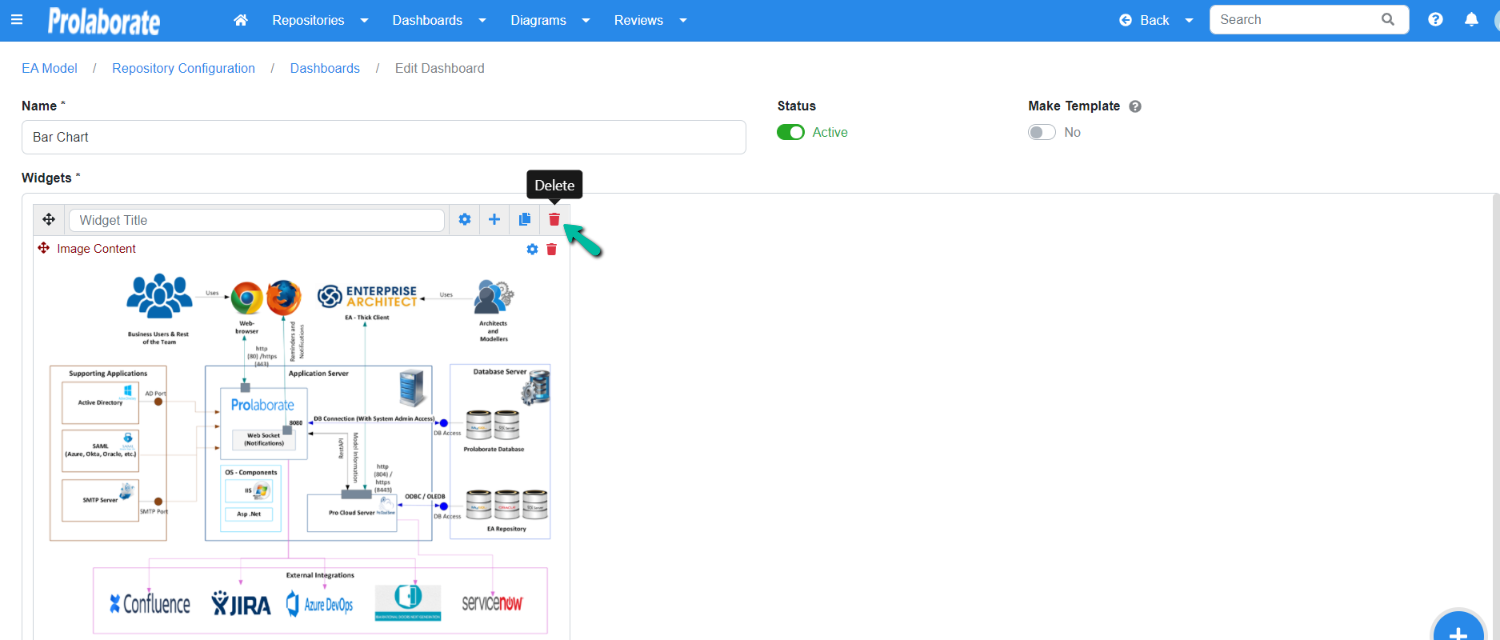
Widget Delete
To delete a widget, click on the Trash icon on the widget.
Below are the features that can be performed when hovering on the widget in the dashboard.
Widget Refresh
To refresh the widget, click on the Refresh icon on the widget.

Widget Share
Share widgets with peers. To share the widget, click on the Share icon on the widget.
For instance, when you have a widget to track the performance of a salesforce, and when there is a significant performance, you can share the widget with your peers.

Widget in Full-Screen View
View every widget in a full-screen view from your dashboard. To view, a widget in full-screen mode hover on the widget and click on the View icon.
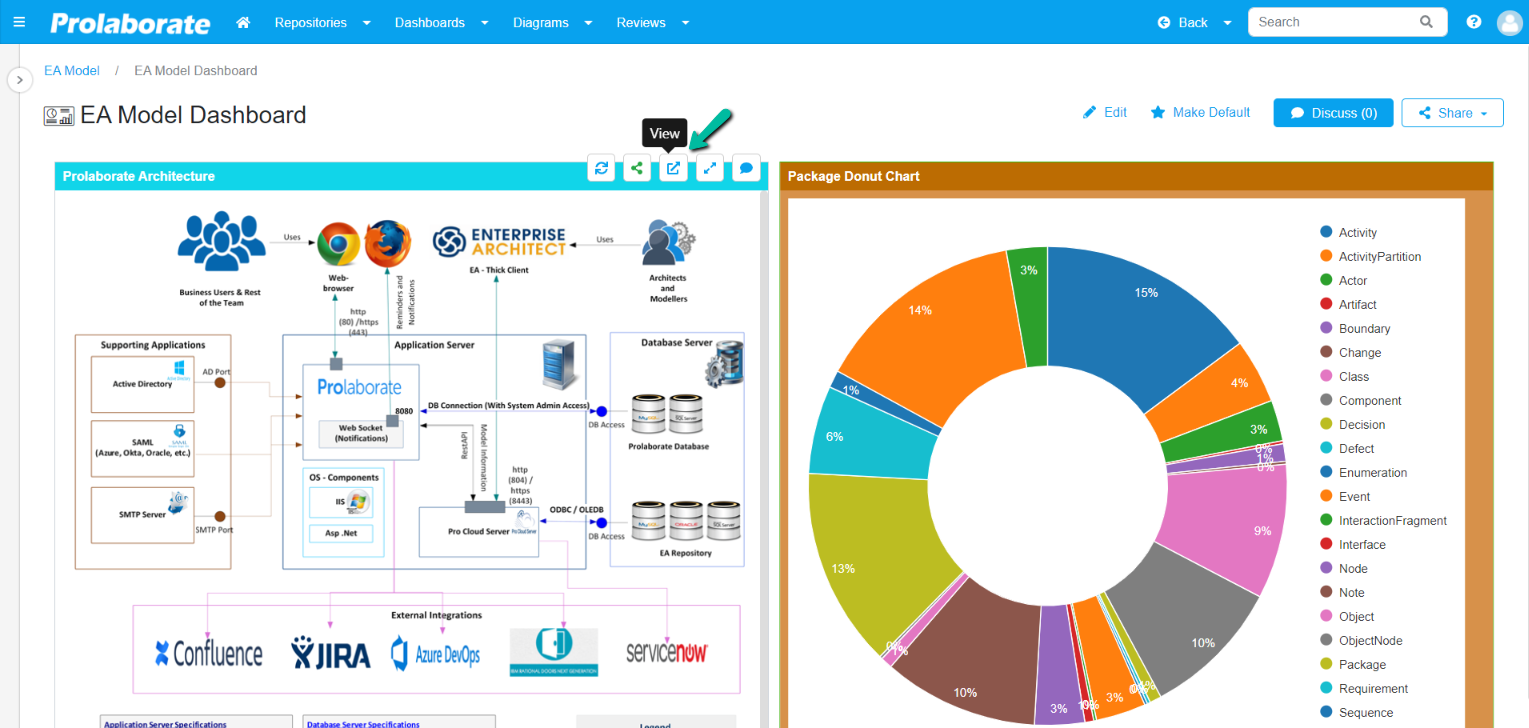
The below screenshot shows the widget in full-screen view.
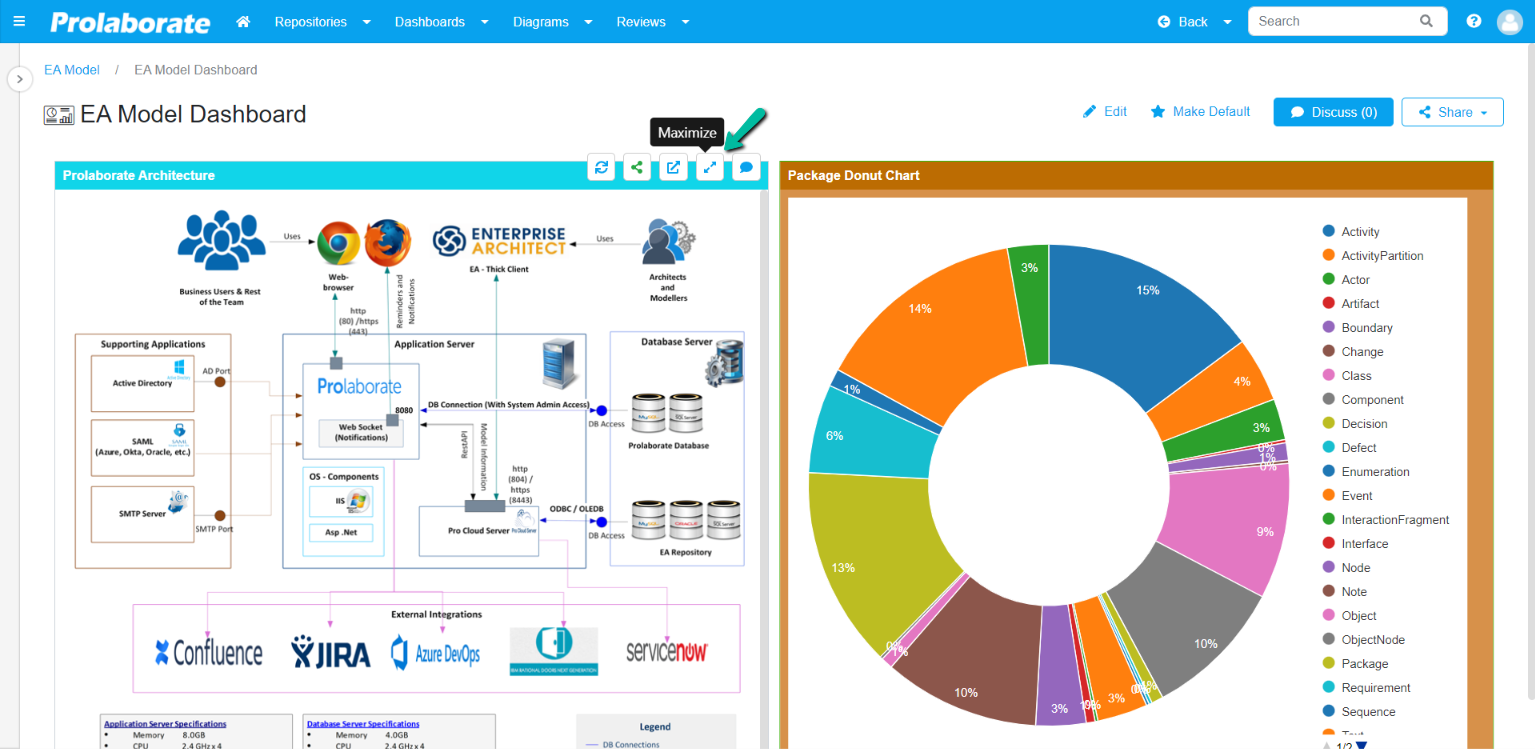
Widget Maximize
Now set an icon to see the widget to maximize the view, enabling this option, maximize icon will be displayed when a user hovers the widget.
To make the maximize widget icon visible click on the Edit icon on the dashboard, click on the widget Gear icon > Maximize Widget > Save.

The below screenshot shows the Maximize icon on hovering the widget.
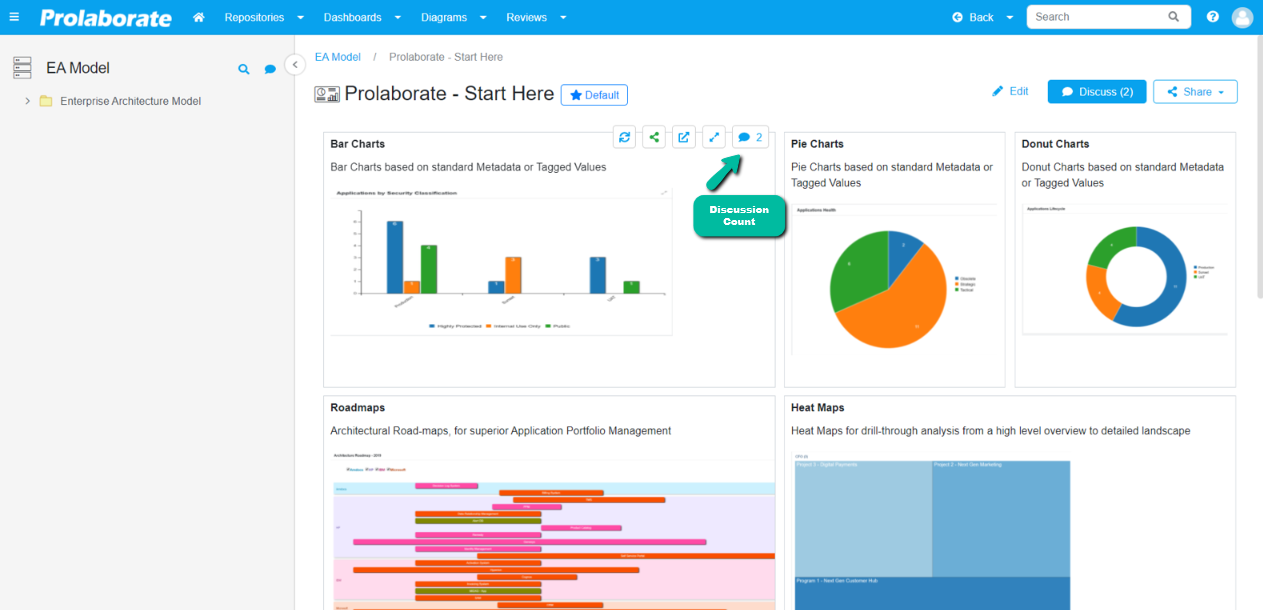
Widget Discussions
Create discussions on widgets to provide feedback and collaboration.
To create a discussion, click on the Discussion’s Icon on the widget.
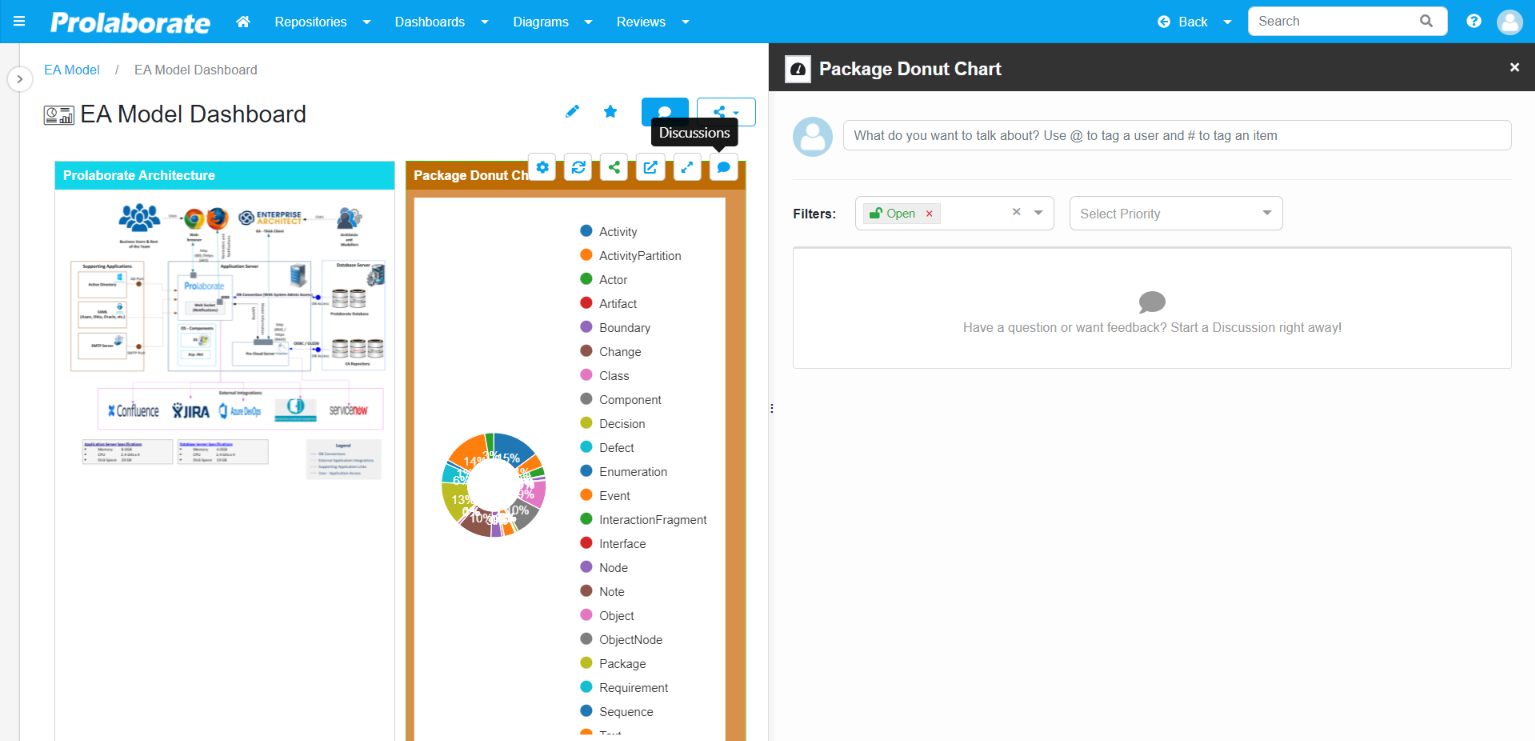
Upon hovering the widget discussion’s count will be shown in the discussion’s icon.
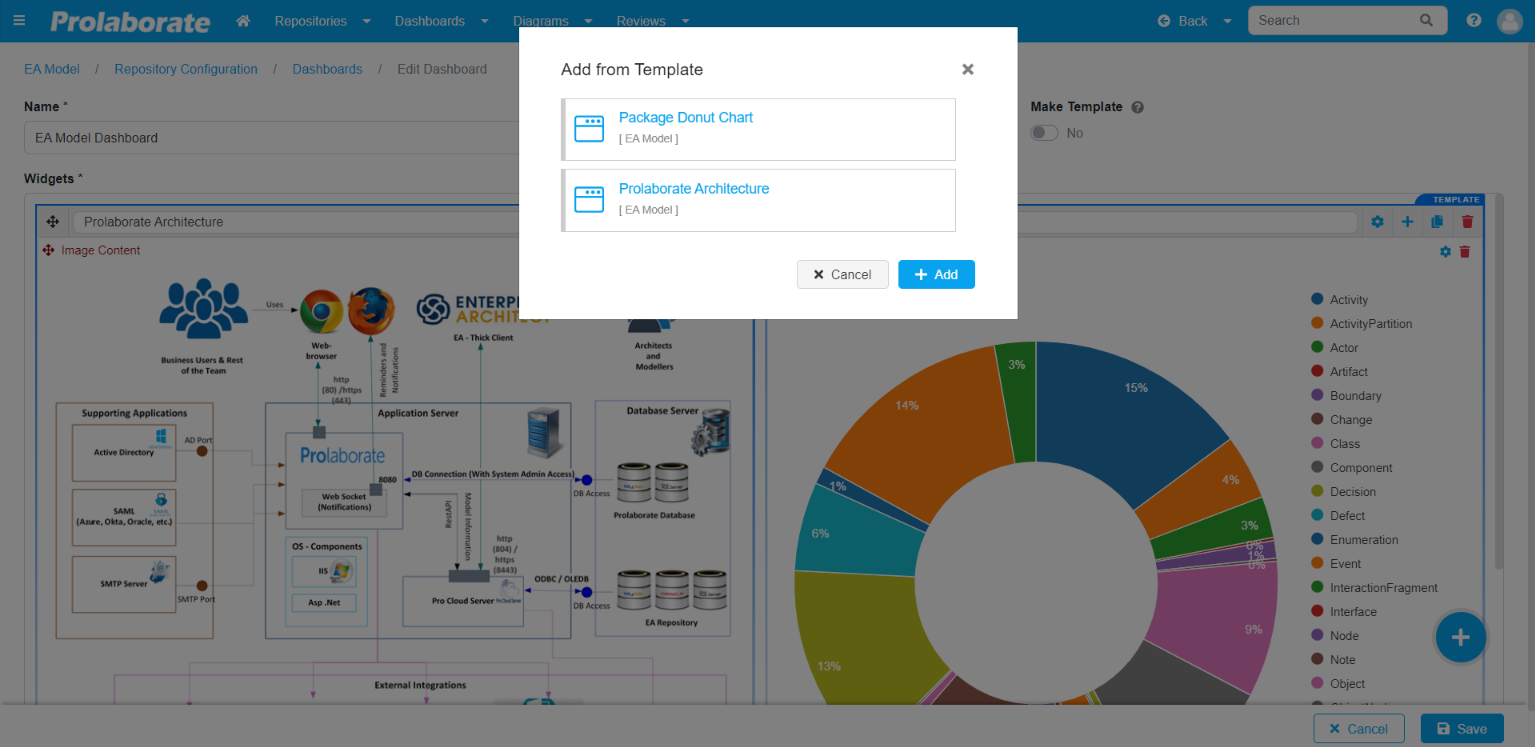
Add Widget From Template
To choose the widget template click on the edit icon on the dashboard, click on Add Button > Add from Template.
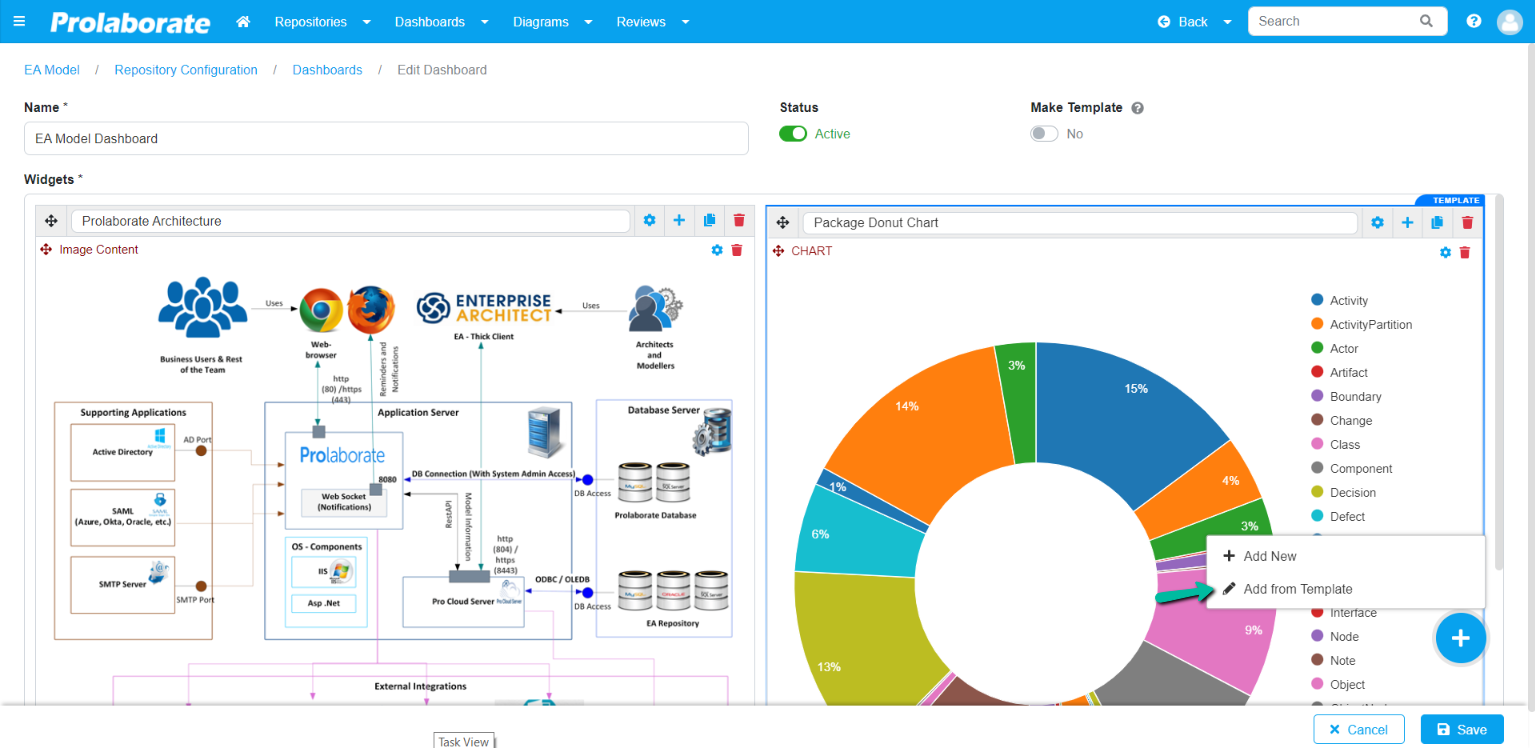
Templates that are added will be listed, choose the template, and click on the Save button. The below screenshot shows the template which is added.
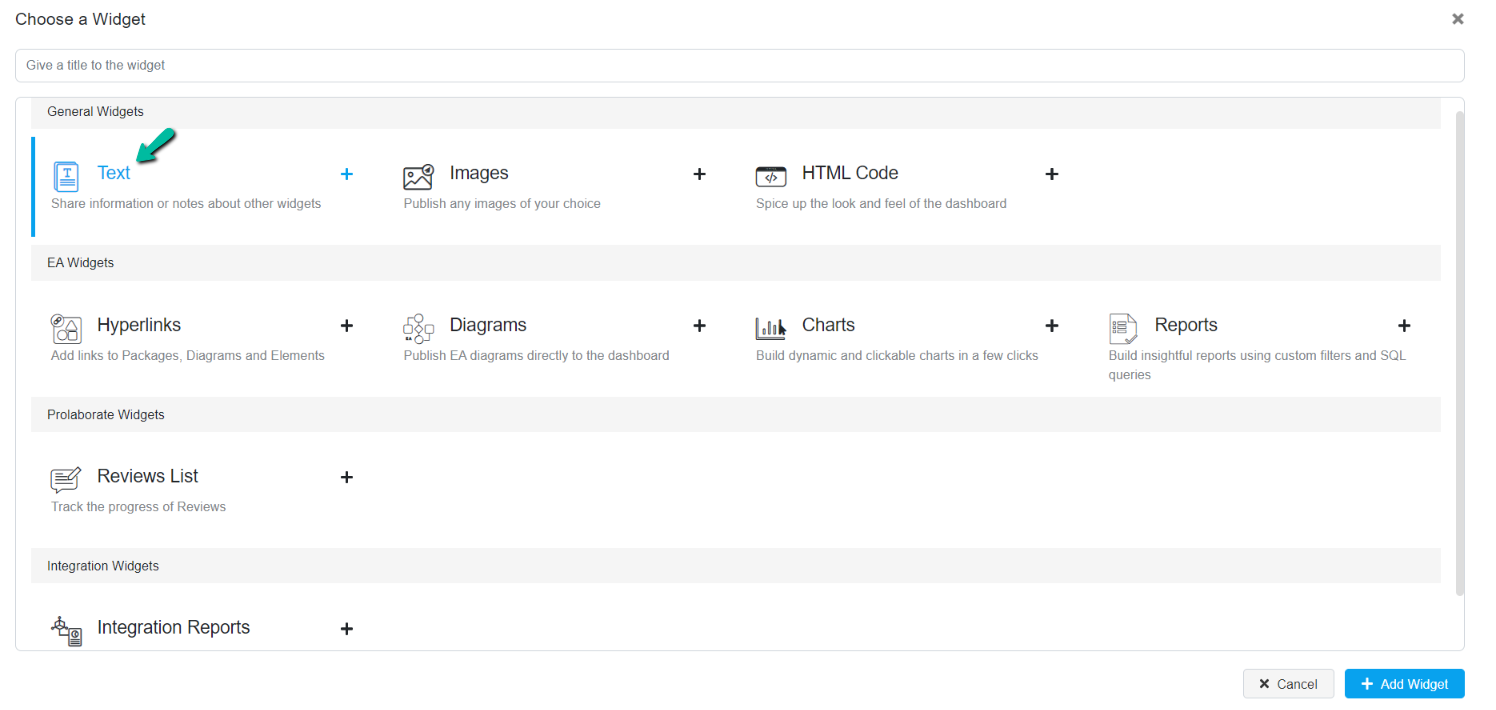
Types of Widgets
General Widgets
Text Widgets
In the text widget, you can add any text content. Format the text content i.e., bold, italics, underline, create a bullet list, insert a hyperlink, etc. Text widgets can be widely used to notify information to the user and user’s group.
To add a text widget, click on the Edit icon on the dashboard and click on Add Widget Button > Add New > Text.
The below screenshot shows a customized text widget.
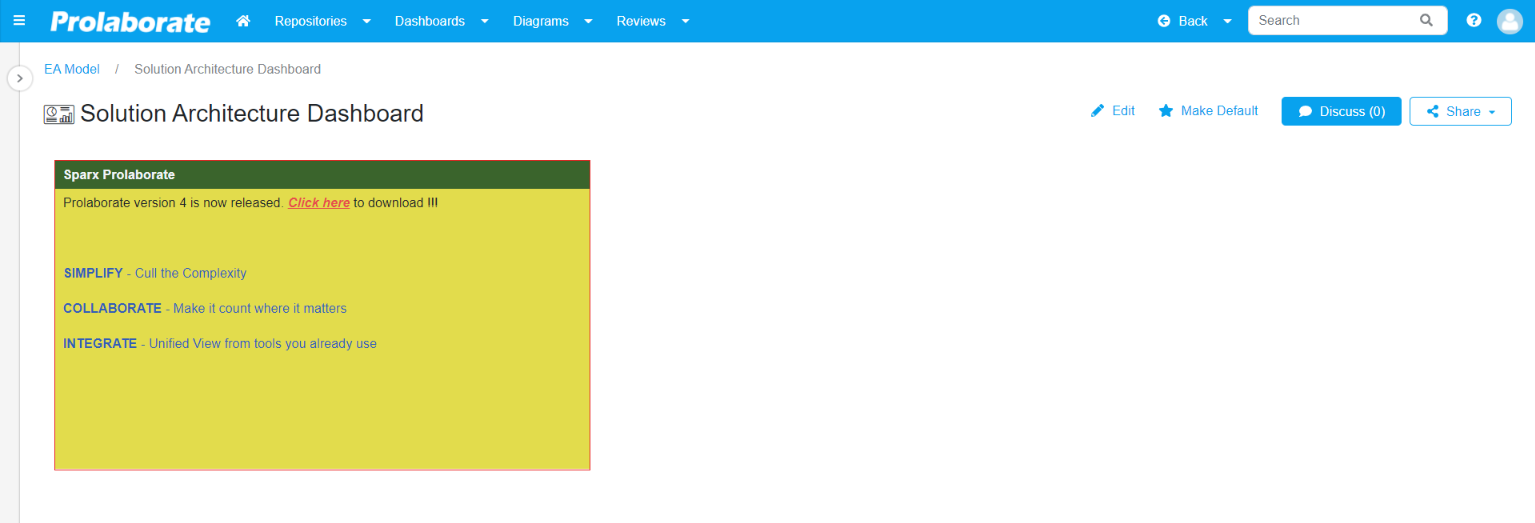
Image Widgets
Image widgets enable you to share any format of images. This widget can be used to share screenshots, error messages, images, pictures with or without the link of the corresponding images for users to discuss and collaborate.
To add an image widget, click on the Edit icon on the dashboard and click on Add Widget Button > Add New > Images.
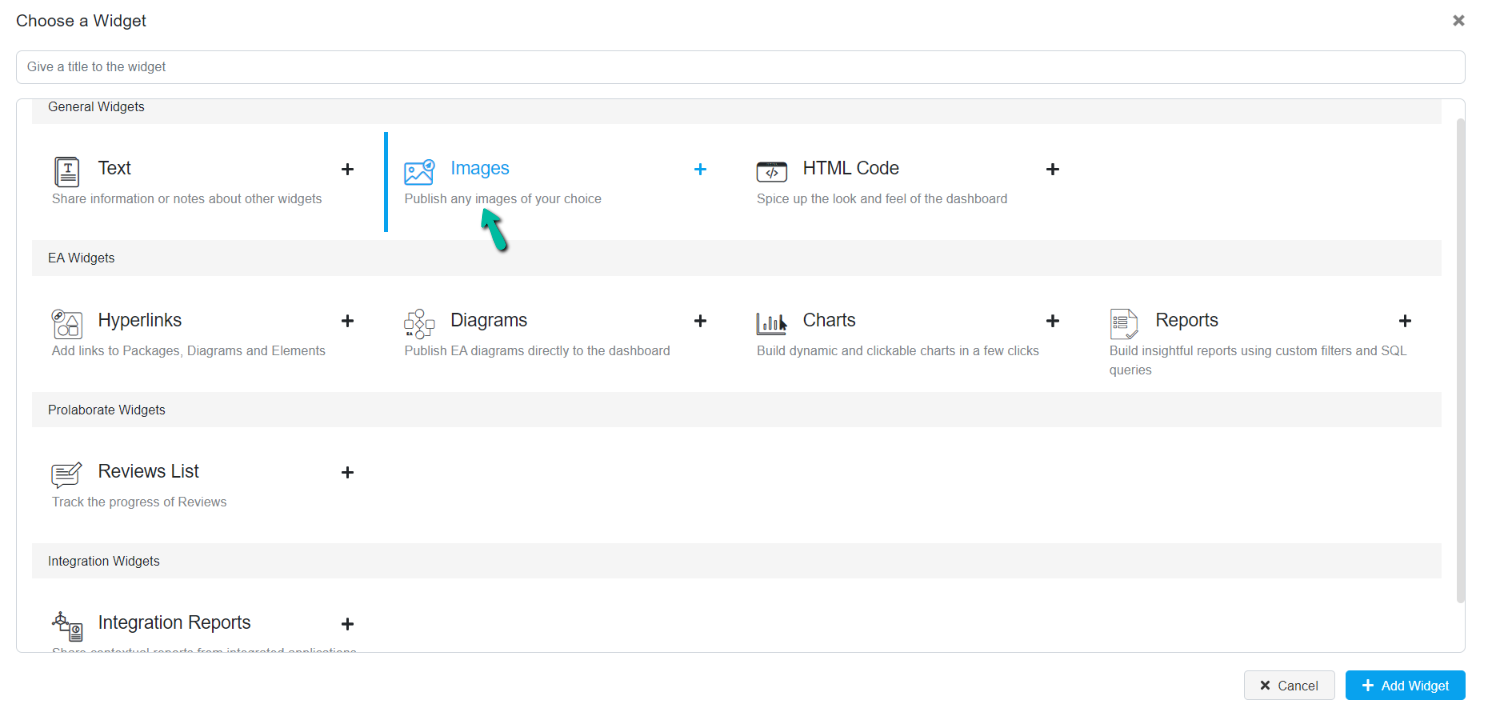
The below screenshot shows an image widget.

HTML Widgets
Add an Rich Text to a widget to display images, paragraphs, lists, links, quotes, etc.
To add an Rich Text widget, click on the Edit icon on the dashboard and click on Add Widget Button > Add New > Rich Text.

The below screenshot shows an Rich Text widget in a dashboard. Click here to learn more on How to build Rich Text.

EA Widgets
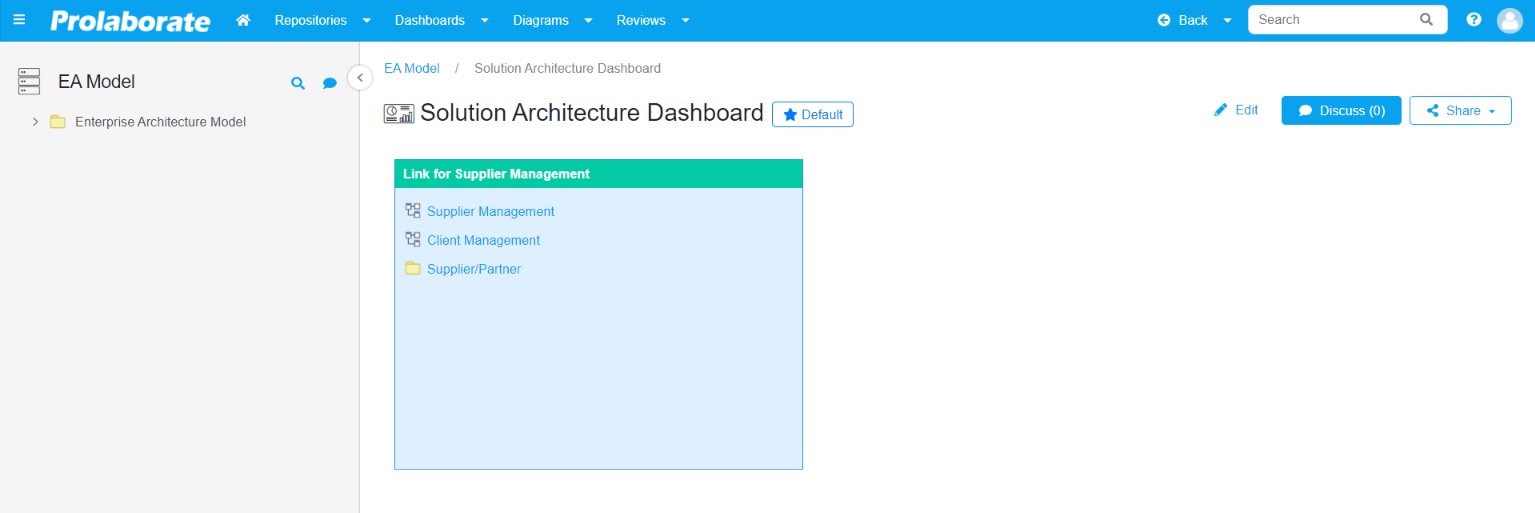
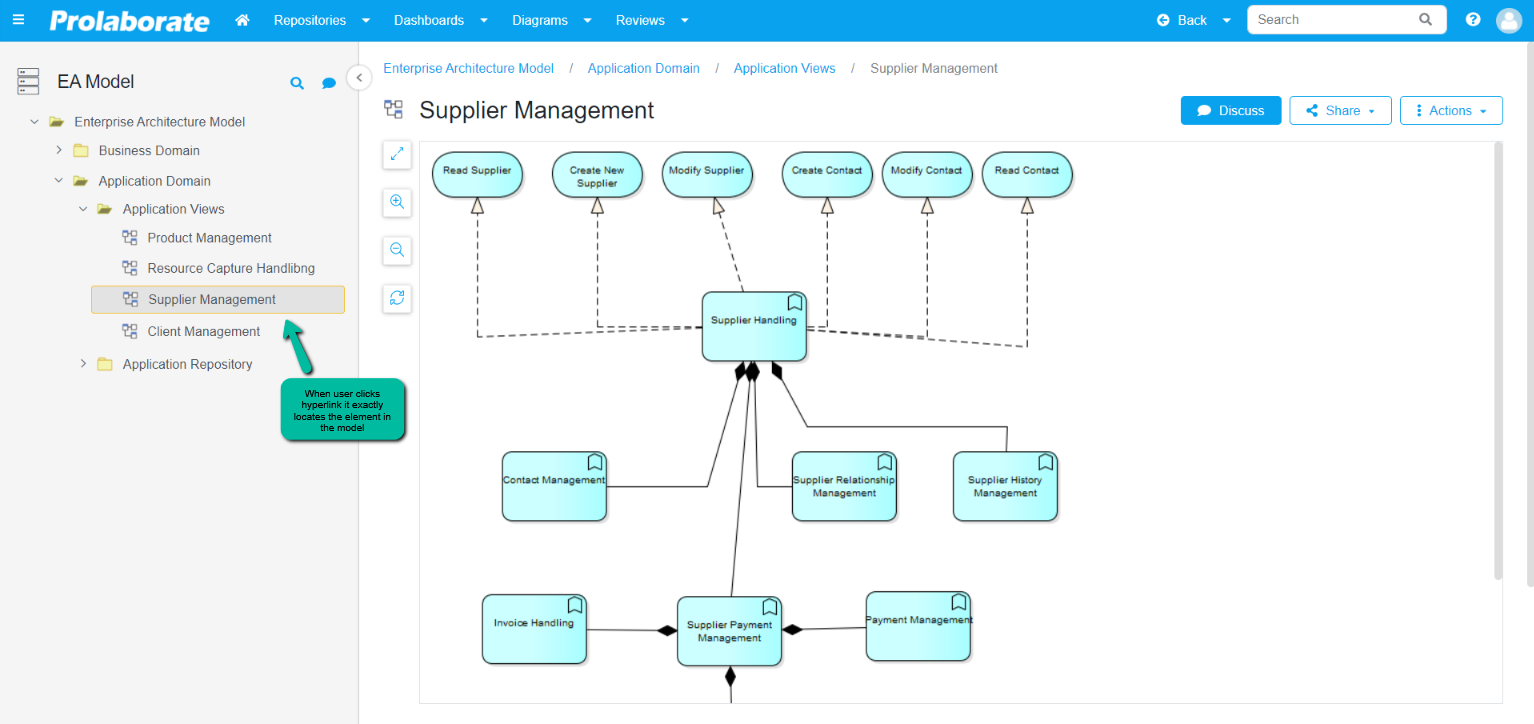
Hyperlinks
Hyperlinks widget enables users or a user group to have easy and quick access to locate or view an Enterprise Model, Package or Element, etc which is shared among users or user groups. You can also select any artifact from your Enterprise Architect model.
To add a hyperlink widget, click on the Edit icon on the dashboard and click on Add Widget Button > Add New > Hyperlinks.
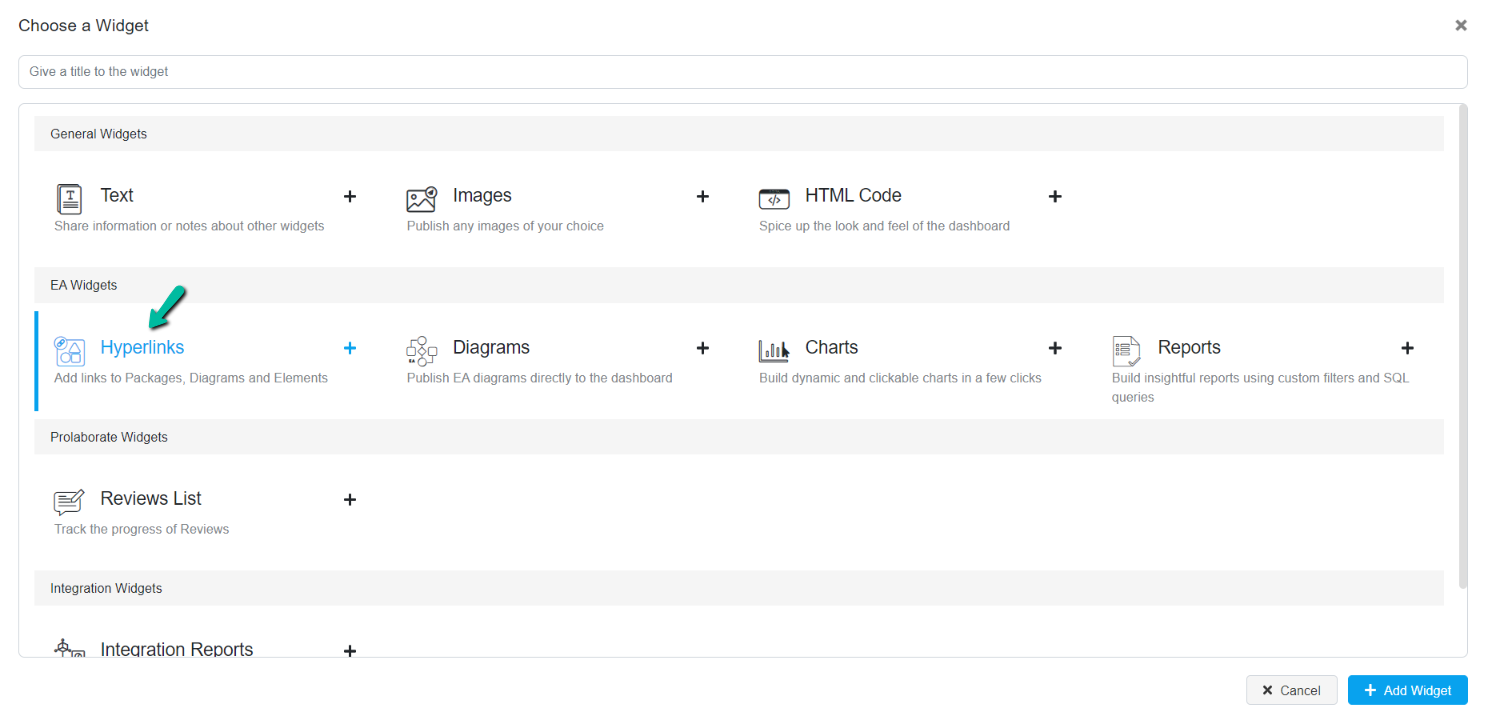
The below screenshot shows a hyperlink widget with multiple hyperlinks. To add multiple hyperlinks, add multiple hyperlink widgets within a single hyperlink widget.
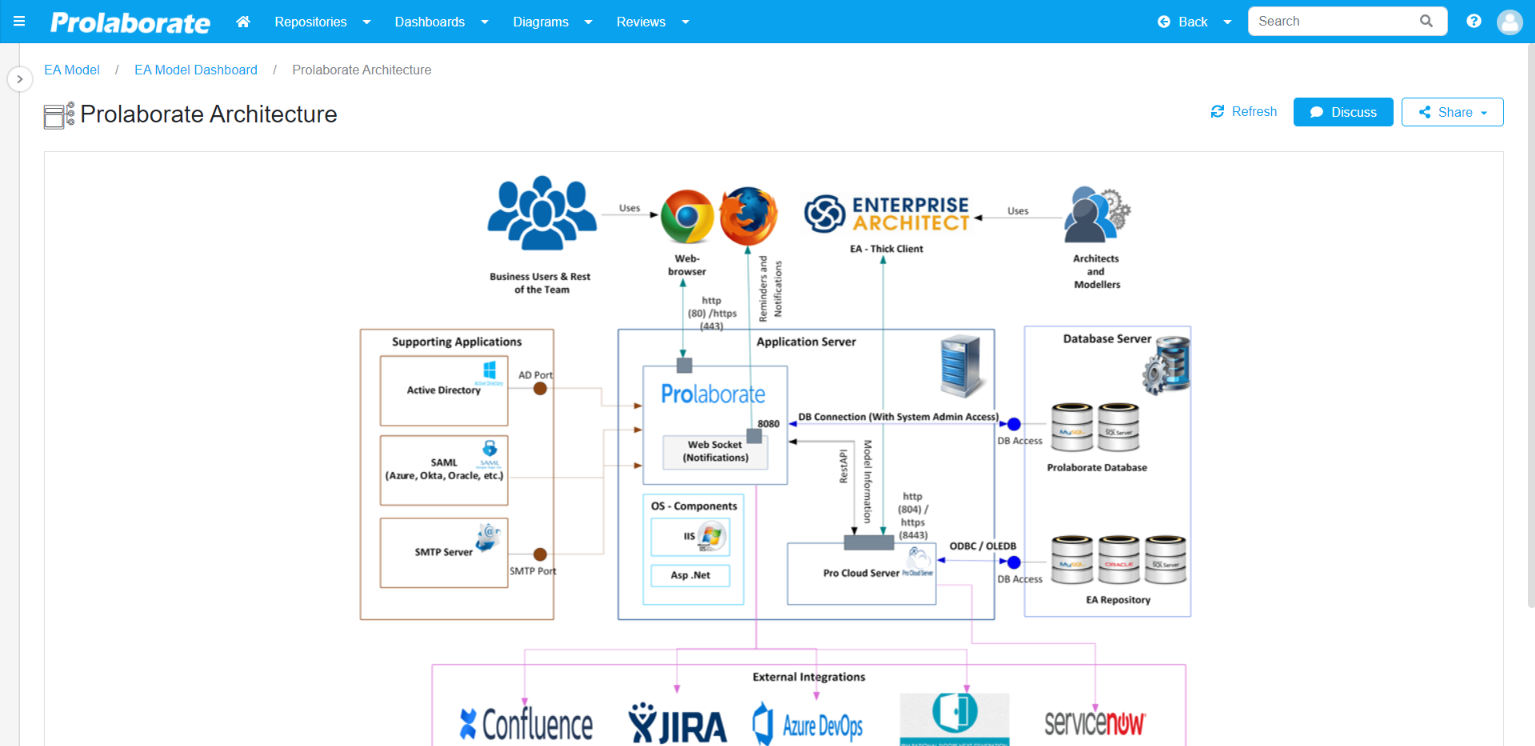
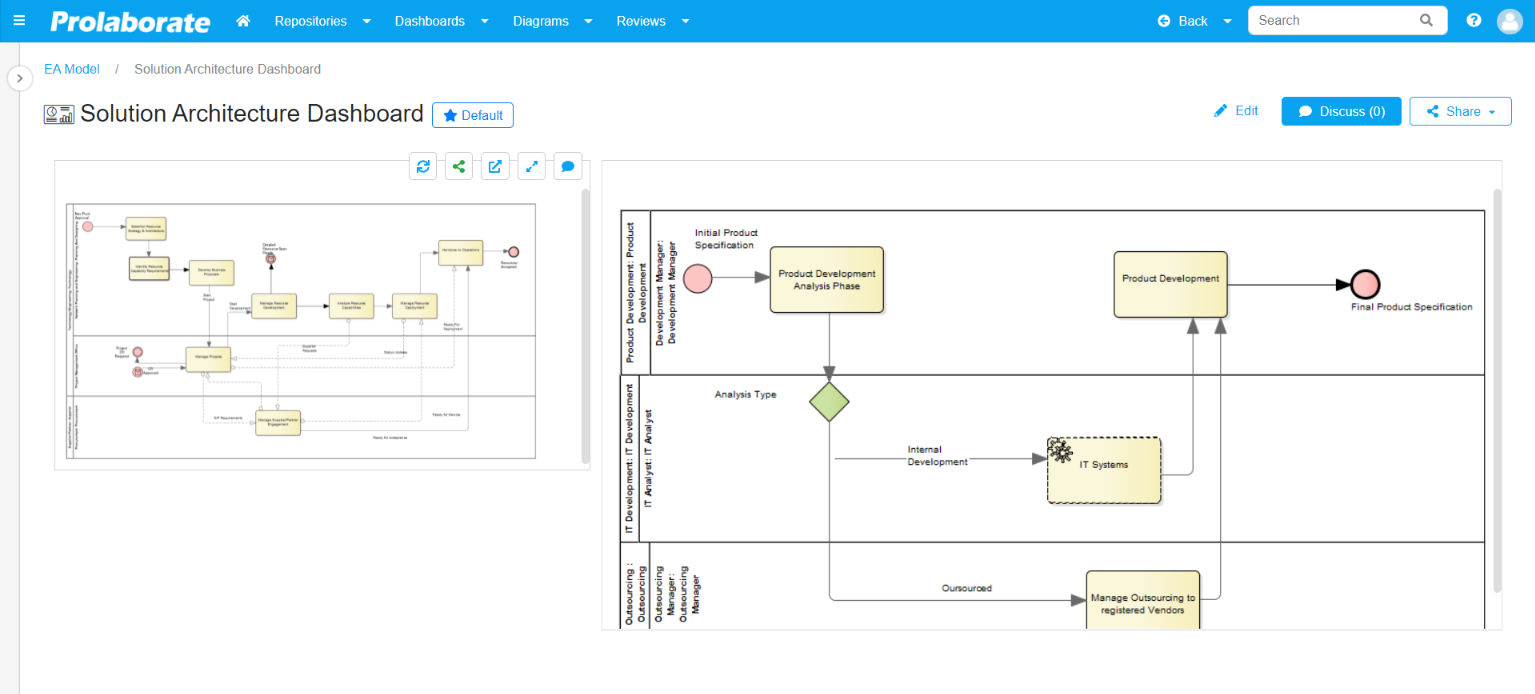
Diagrams
Diagram widget is an exclusive widget that enables you to view an Enterprise Architect Diagram in the dashboard.
To add a diagram widget, click on the Edit icon on the dashboard and click on Add Widget Button > Add New > Diagrams.
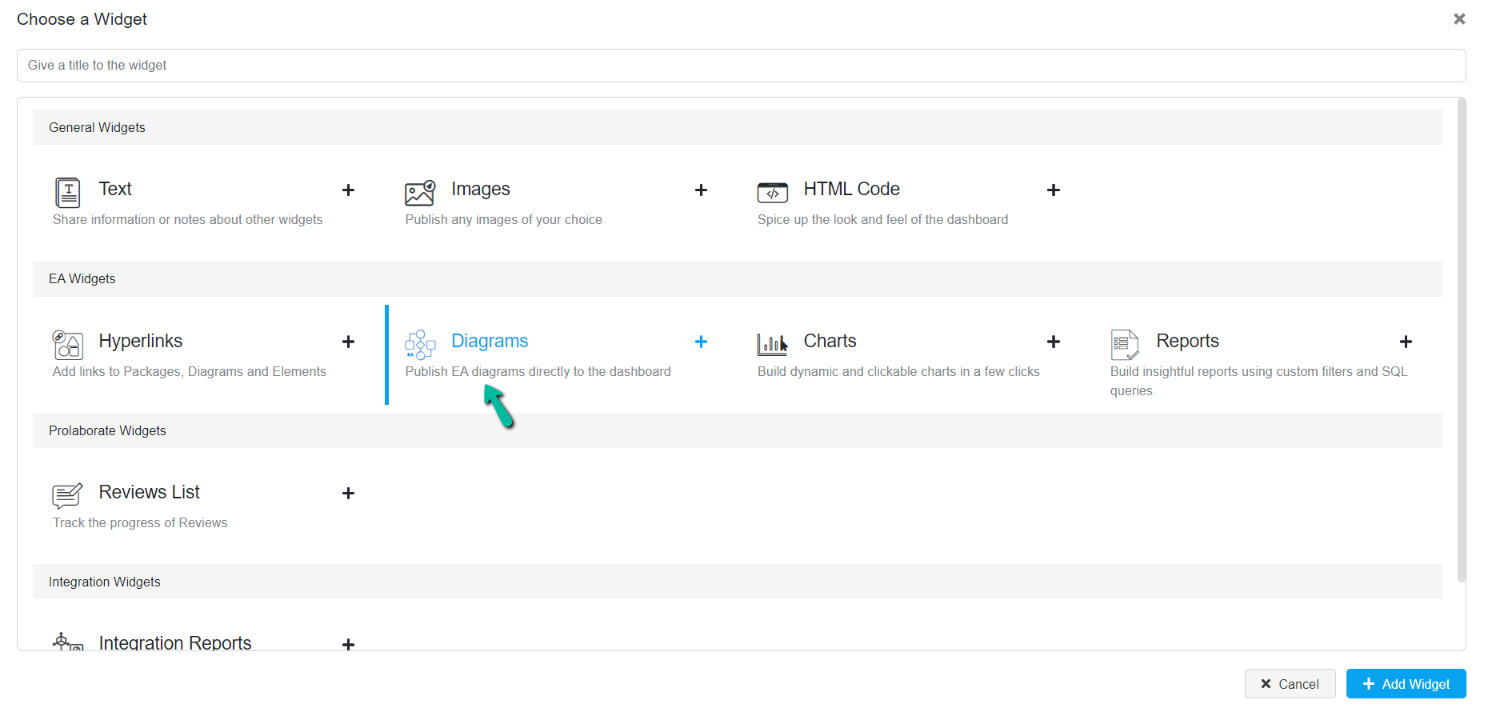
Below is the screenshot of a diagram widget.
Charts
Click here to know about adding a chart widget.
Reports
Click here to know about adding a report.
Prolaborate Widgets
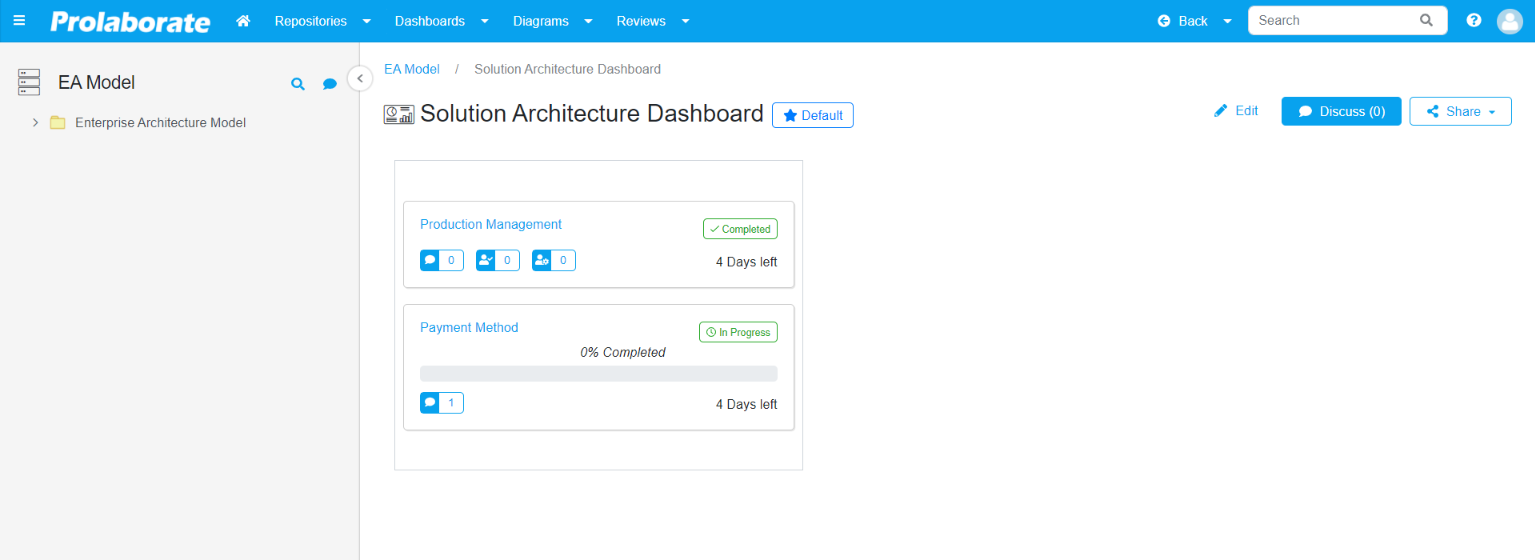
Review List
The review list widget enables monitoring reviews such as reviews created, a list of existing reviews and their progress, and relevant information such as review and approval status, number of discussions on reviews, etc.
To add a review list widget, click on the Edit icon on the dashboard and click on Add Widget Button > Add New > Review List.
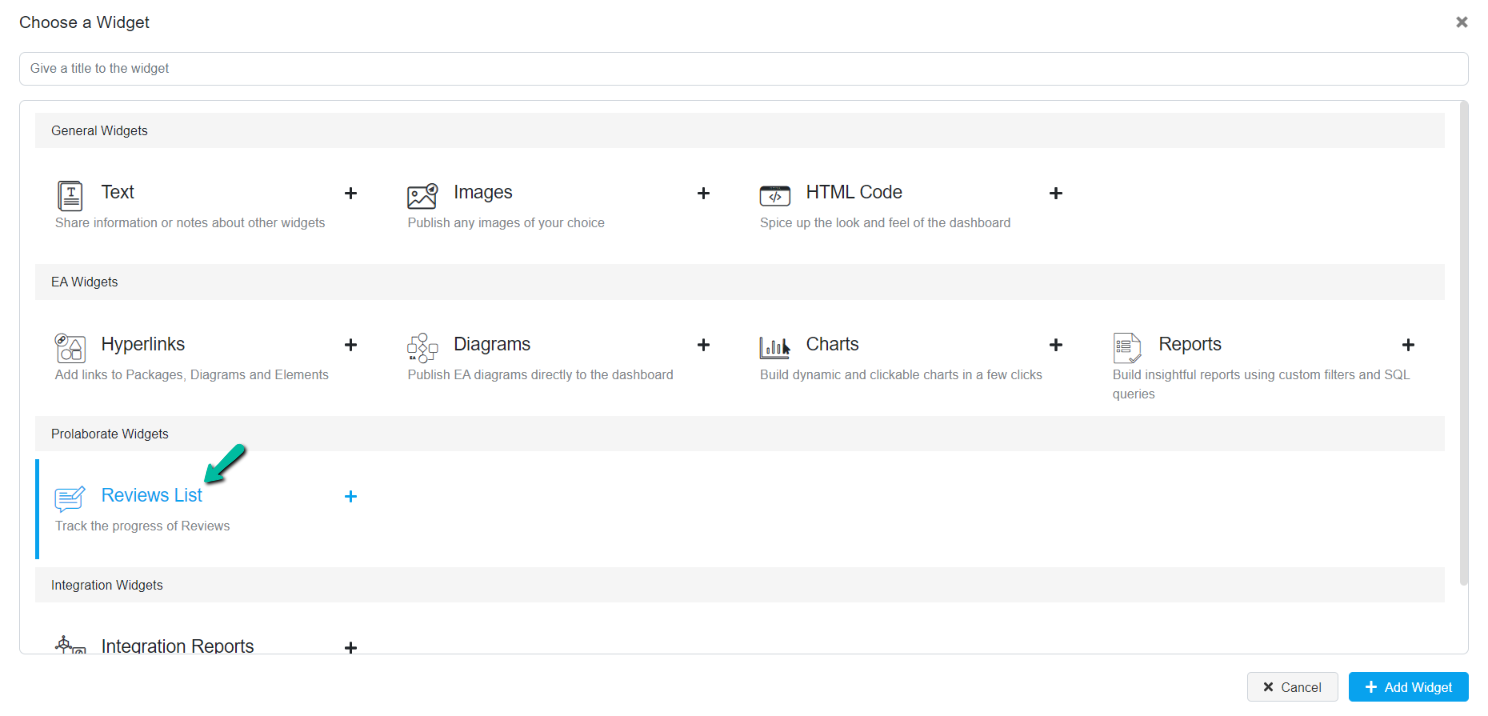
Below is the screenshot of a review widget.
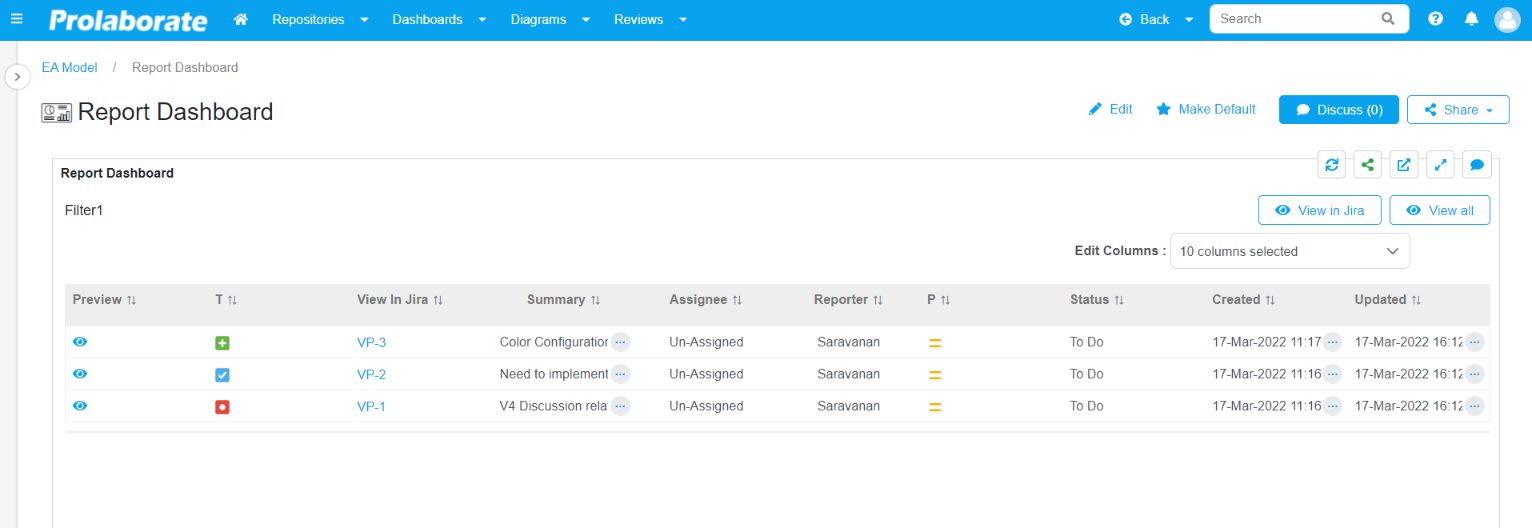
Integration Reports
Integration report widget lets you to view the reports from the application which is integrated with Prolaborate.
To add an integration reports widget, click on the Edit icon on the dashboard and click on Add Widget Button > Add New > Integration Reports > Add Widget
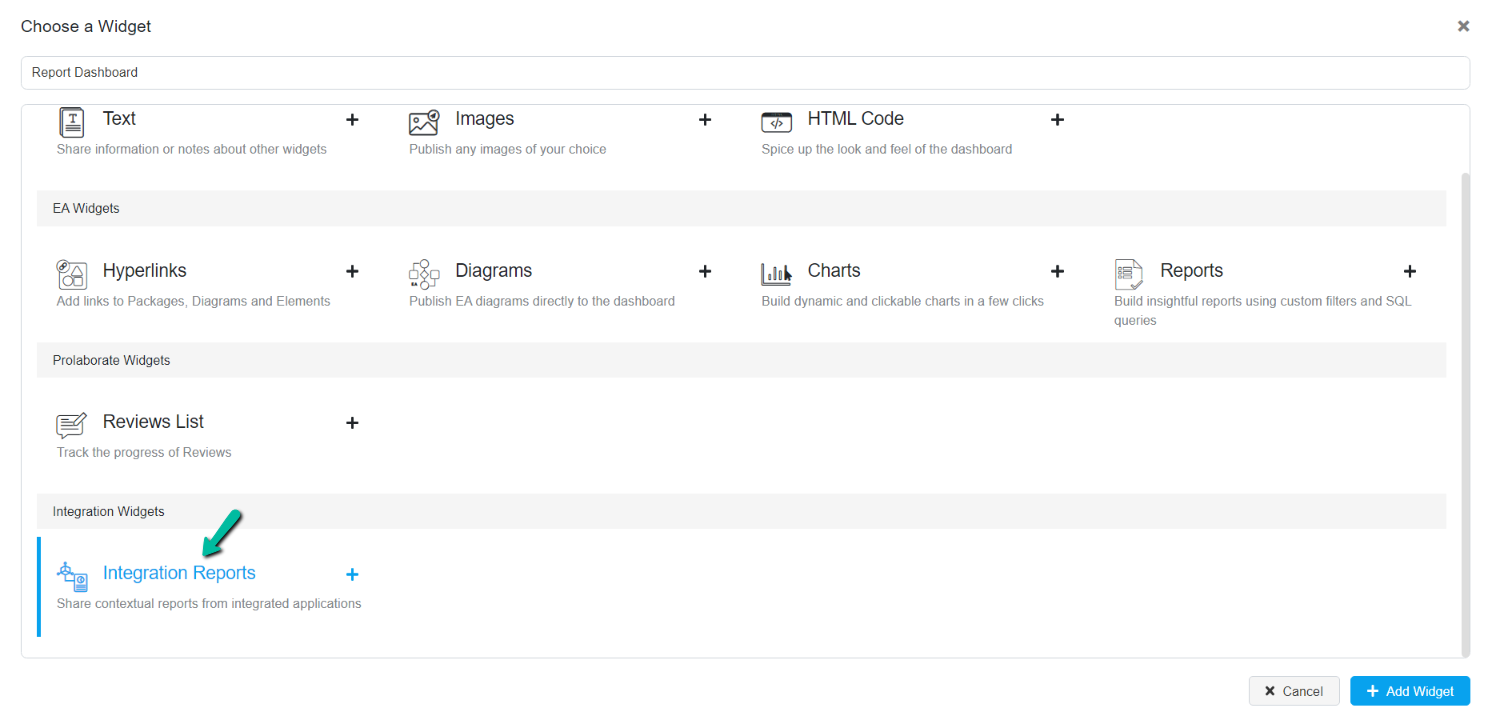
Choose the application from the dropdown from which the report needs to be viewed in the dashboard and click on Save.

Below is the screenshot of an integration report widget.
Templates
Templates is a functionality that provides users with an option to reuse dashboards and widgets. Templates are categorized as Dashboard Templates and Widget Templates. During the creation of the dashboard, a user can make his/her dashboard into a dashboard template.
Create Dashboard Template
At the time of creating a Dashboard you can toggle the Make Template option to make the dashboard as template OR
If the dashboard is created and listed on the Dashboards page click on More > Make Template. Making a widget as template is covered in the later part of the document.
Create Widget Template
Set a widget as a template to re-use it across any dashboards and repositories in Prolaborate.
To make the widget as a template click on the edit icon on the dashboard, click on the widget Gear icon > Make Template > Save.
View Template
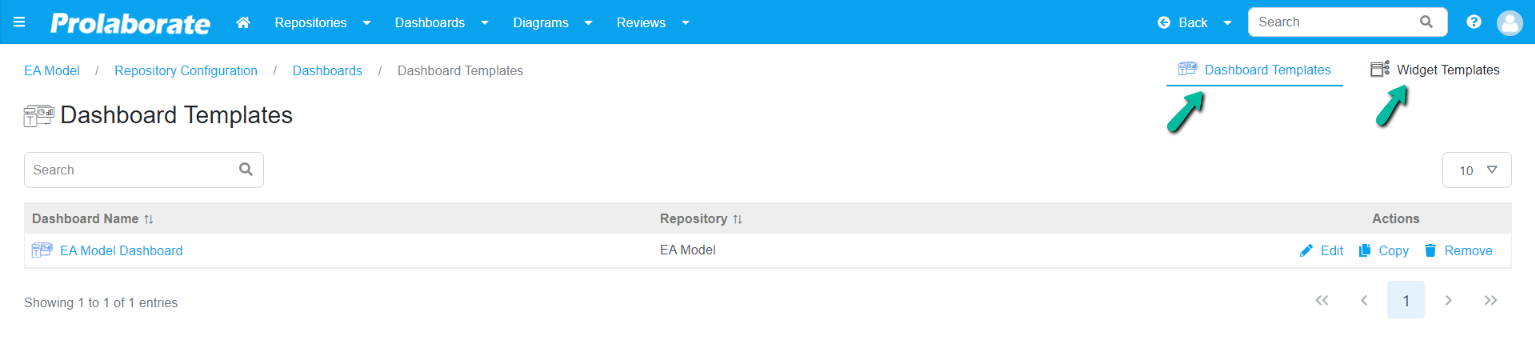
To view the existing Templates, click on Templates on the Dashboards page
Click on the Dashboard Templates to view the dashboard templates and Widget Templates to view the widget templates
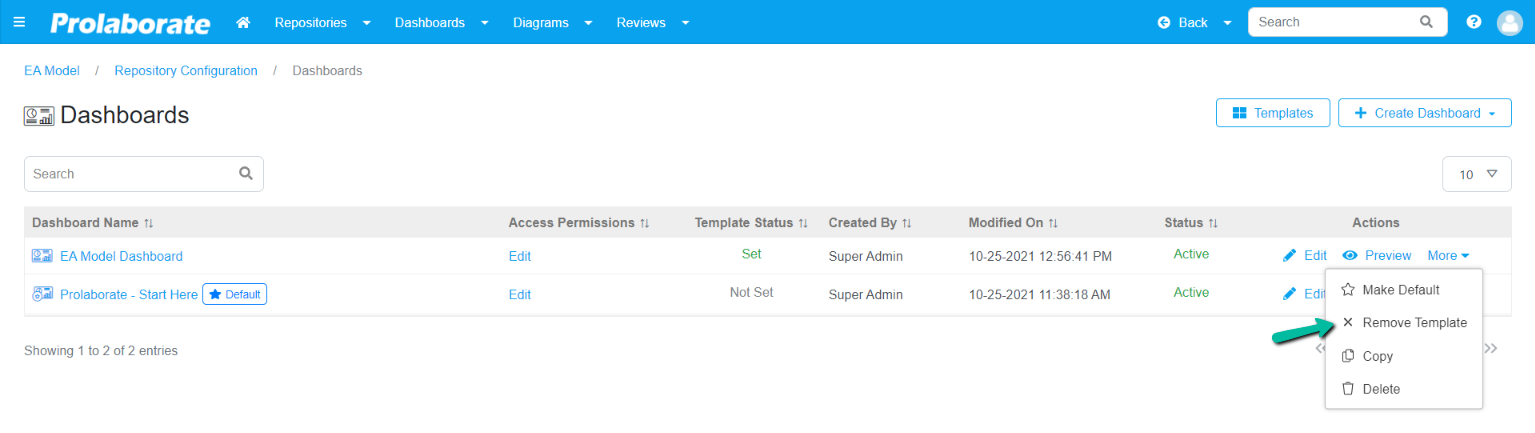
Remove Template
To remove a dashboard template, click on More > Remove Template.