Installation Guide
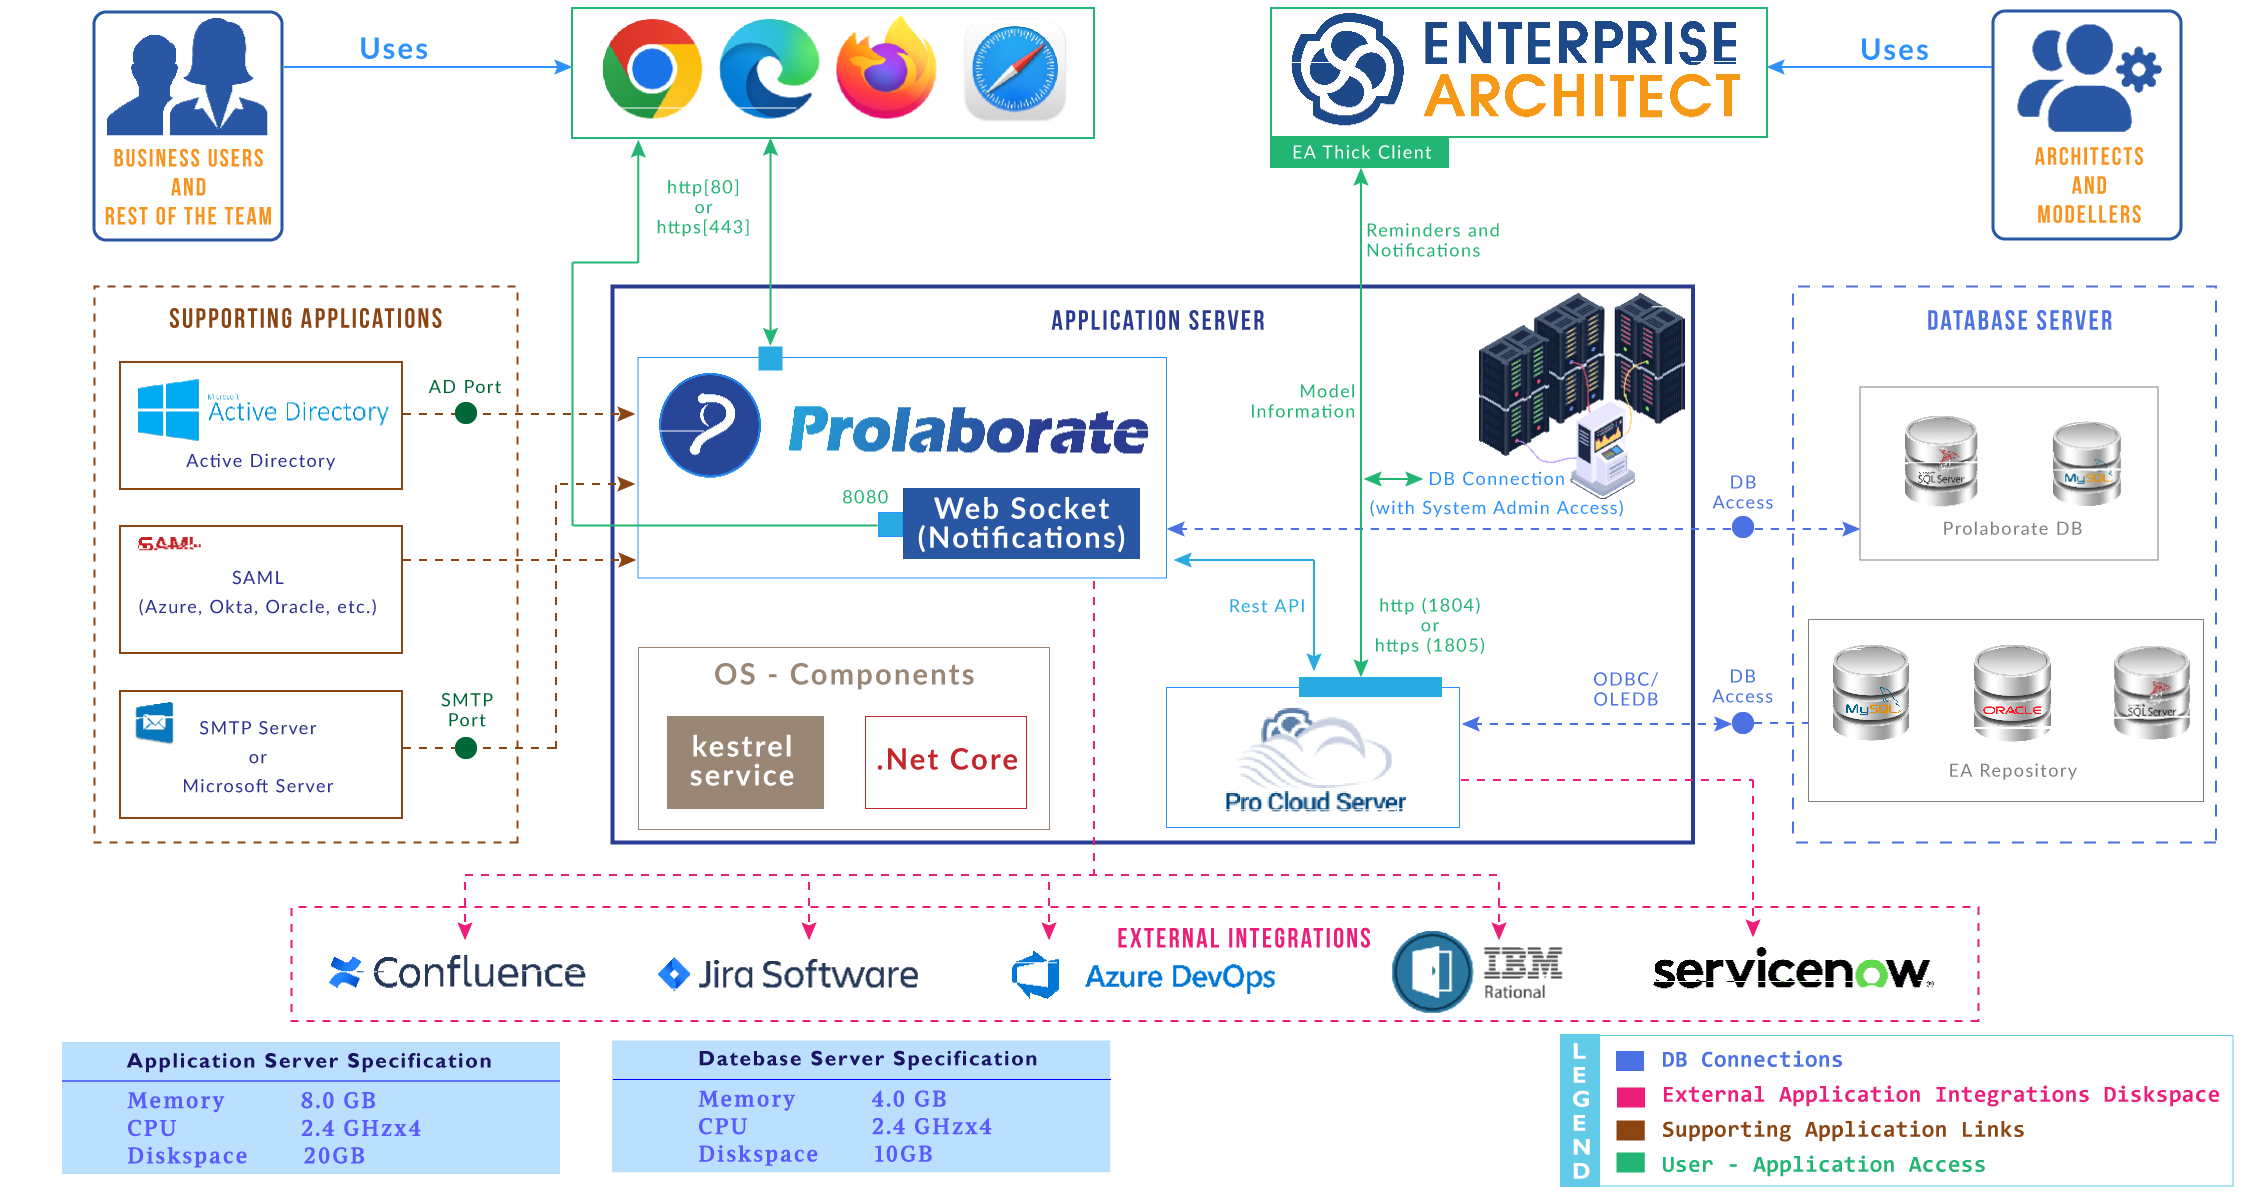
1 Prolaborate Architecture


2 Prerequisites
2.1 App Server Specifications
The following are the minimum requirements for smooth running of Prolaborate. The deployment will depend on usage and other environmental factors.
| Memory | 8.0GB |
| CPU | 2.4 GHz x 4 |
| Disk Space | 20 GB |
If the number of concurrent users will be more than 100, recommended memory and CPU is 16.0 GB and ‘2.4GHz x 8’ respectively.
2.2 Database Server Specifications
The following are the minimum database server specifications.
| Memory | 8.0 GB |
| CPU | 2.4 GHz x 4 |
| Disk Space | 20 GB |
2.3 Supported Operating Systems
- Windows Server 2012
- Windows Server 2012 R2
- Windows Server 2016
- Windows Server 2019
- Windows Server 2022
- Windows 7 – SP1 Required
- Windows 8 +
- Windows 10
- Window 11
Note:
- A user with admin privileges is needed
- Windows Server is recommended for larger organizations
2.4 Supported Enterprise Architect Databases
- SQL Server 2008 R2 and above
- SQL Server Express 2008 R2 and above
- MySQL Server 5.6, 5.7 and 8.0
- MariaDB server
- PostgreSQL Server
- Oracle Server
- SQLite
Note:
- An EA user with appropriate permissions should be present for each EA database. Note that Active Directory credentials cannot be used.
- If you are using Postgres database, run the following query in all the repositories:
create extension hstore
Enterprise Architect database of type Firebird is currently not supported.
2.5 EA Database Drivers
The following driver versions need to be used for optimal performance:
- 32-bit ODBC driver between versions 5.2.4 and 5.3.6 for MySQL databases (Read More)
- V10.00 for Postgres SQL databases (Read More)
- OLE/DB driver for Oracle databases (Read More)
2.6 Pro Cloud Server Configuration
Pro Cloud Server should be upgraded to version 5.1.128, if not done already. For upgrade instructions click here
2.7 Supported Prolaborate Databases
- SQL Server 2008 R2 and above (recommended)
- SQL Server Express 2008 R2 and above
- MySQL Server 5.6, 5.7 and 8.0
Note:
- From Prolaborate v4.4.1 onwards, collation type of database should be mandatorily set as “utf8mb4_general_ci” in MySQL as shown in the image below. This change is applicable only for MySQL Prolaborate database.
- Check your max_allowed_packet size value in MySQL configuration. If it is less than 100, update it to 1024 or higher. Unit of max_allowed_packet is bytes
- Check your sql-mode or sql_mode value in MySQL configuration. If it contains ONLY_FULL_GROUP_BY, remove it. ONLY_FULL_GROUP_BY introduced in MySQL v8 which causes an issue in running custom query in Prolaborate to retrieve data from EA Model DB. Removing it will fix the issue that occurred in running the custom query and will not pose any issues for EA repositories.
This change is applicable only for MySQL Prolaborate database.

The following details of Prolaborate database should be readily available before the installation:
- Server Name/IP Address
- Database name
- Username
- Password
‘SQL Server Authentication’ mode is preferred. Active Directory logins are not supported.
Refer to Appendix to learn about setting up SQL or MySQL servers.
2.8 Firewall / Port Requirements
The following ports should be open:
- Port of EA database(s): Pro Cloud Server (PCS) should be able to access the EA database(s)
- Port of PCS: Prolaborate and Enterprise Architect should be able to connect to PCS. Default port (Http) is 1804
- Port of Prolaborate database: Prolaborate application should be able to connect to its database
- Port of Prolaborate application: End-users should be able to access Prolaborate website. You will be asked for an open a port during installation of Prolaborate
- Port of WebSocket application: End-users should be able to receive real-time in-app notifications from Prolaborate application. You will be asked for to open port during installation of Prolaborate
Note:
- Make sure the specified ports are opened in the firewall. To know how to make a port accessible refer to the Appendix
2.9 Supported Browsers
Prolaborate is compatible with following browsers:
- Chrome 44 or above (recommended)
- Firefox 38 or above
- Safari 9 or above ( from Prolaborate V4.2 onwards)
- Microsoft Edge 75 or above
A minimum screen resolution of 1280×720 is required for the best use of Prolaborate.
2.10 Optional Requirements
- Enable HTTPS in Prolaborate. Read more
- Active Directory (AD): AD server should be accessible from Prolaborate. AD port should be opened Read more
- Mailer Configuration (SMTP/MS Graph): SMTP or MS Graph server should be accessible from Prolaborate. For SMTP, the port should be opened. Read more
- Confluence Integration: Prolaborate application should be accessible from Confluence i.e, it should be whitelisted in your security policies. Read more
- Jira Integration: Prolaborate application should be able to connect with Jira i.e, it should be whitelisted in your security policies Read more
2.11 Prolaborate Version
For a smooth transition from Prolaborate V3, it is recommended to upgrade your current installation of Prolaborate to a base version 3.7 and proceed with the upgrade to Prolaborate V5.2.
Looking for cloud options to eliminate infrastructure woes? Learn more here.
3 Setup – Install and Configure Pro Cloud Server
3.1 Install Pro Cloud Server
The Pro Cloud Server installer is a standard Microsoft Installer. Double click on it to start the installation and follow the onscreen steps. Click here to get the Pro Cloud Server installer.
3.2 Create License Request
Follow these steps to configure the Pro Cloud Server:
- Open Pro Cloud Config Client. The application shortcut can be found in the desktop
- Enter the Server Address as “localhost:1803” and Password as “pcsadm1n” (default password) and click on OK
- Click on Licensing
- Click on Create Request and fill in the details as per this link. Click on OK and save the license request file
- Send the ‘License Request’ file to our Sales Team at sales[at]sparxsystems[dot]com
3.3 Install License
- Our Sales Team will sign your request and return a License Certificate
- Open Pro Cloud Config Client and go to Licensing window
- Click on Add
- Select and Open the License Certificate and the license will be added. Ensure the details are fine
3.4 Configure EA Models in Pro Cloud Server
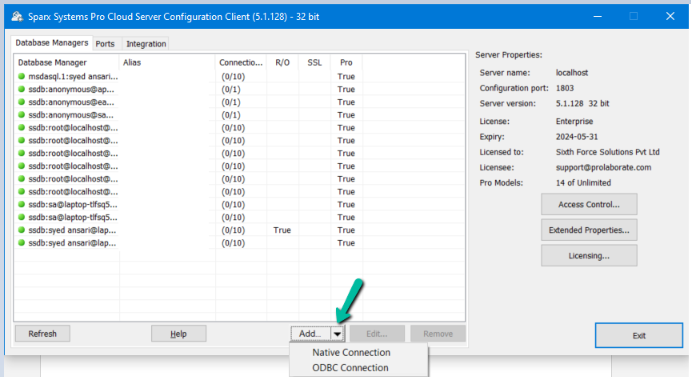
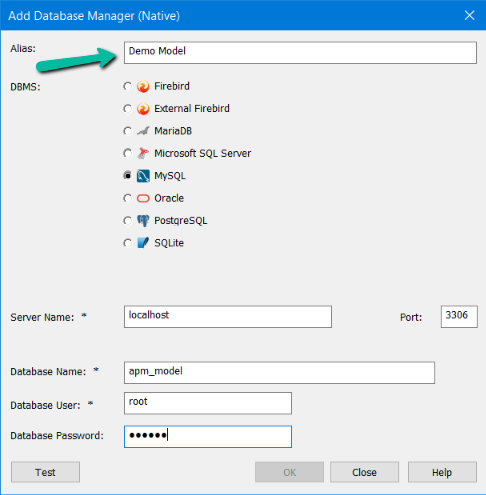
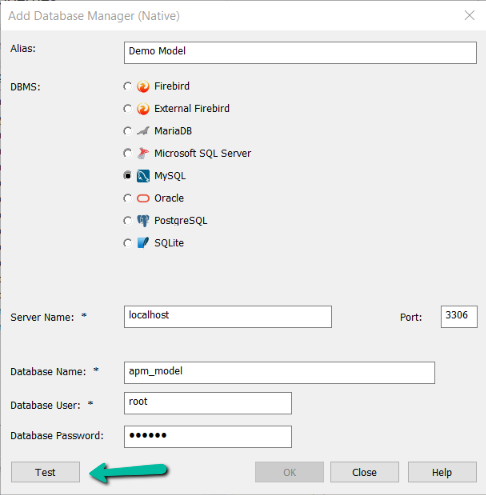
3. For Native Connection, select the EA database type and enter the required database details to complete the configuration. For an ODBC Connection, click on the Browse icon near the Connection String to open the Data Link Properties window. Select an option based on EA database type and complete the configuration. (Refer to the Appendix to read more about the configuration)
4. Give an Alias to the database you have just configured in Add Database Manager window (Enter an appropriate name). You will need this Alias to connect to this EA database from EA and Prolaborate.
5. Click on Test to check if the connection can be established with the database based on the details entered.
6. If the connection is successful, a success popup appears. Click on OK to close the popup.
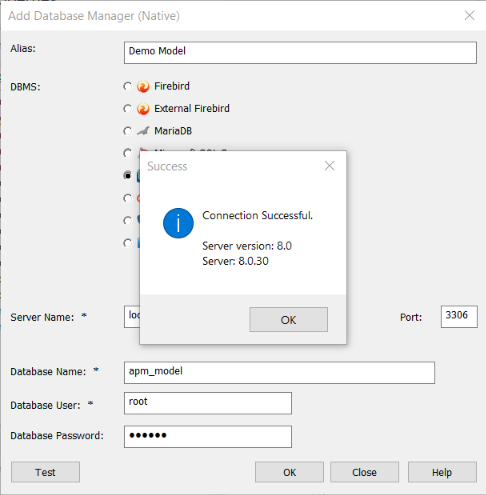
7. Click on OK to add the database.
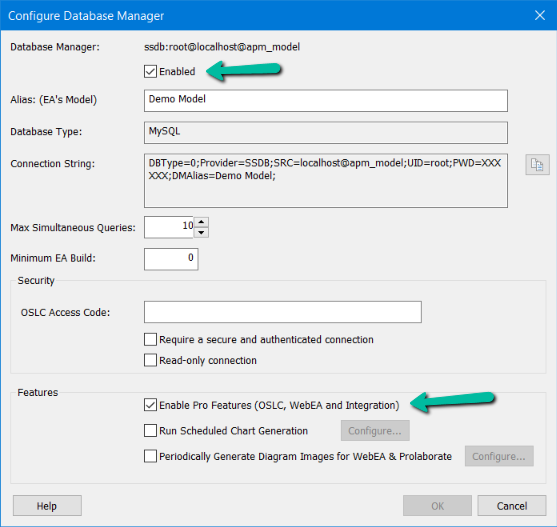
8. Click on the Database Manager just created and then click Edit
9. Enable the checkbox Enabled and Enable Pro Features in the Configure Database Manager
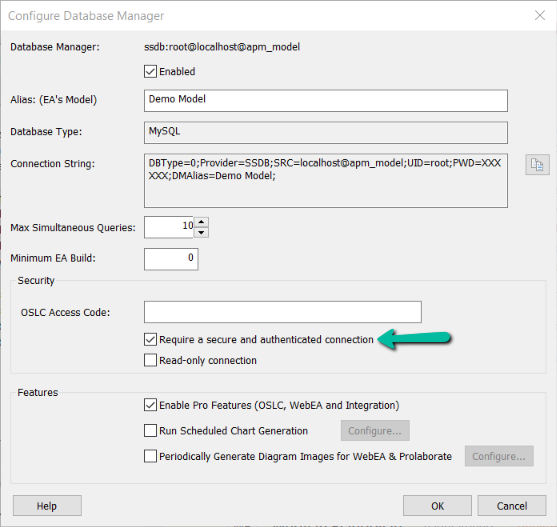
10. Enable Require a secure and authenticated connection if SSL is enabled for your EA models. Leave it
unchecked if not. Click on OK.
.pfx file from your SSL certificate provider with its password and OpenSSL utility
3.5 Connect with EA Models over HTTPS
To connect to your models over secured HTTPS connection, do the following:
- Place .pfx file in the bin folder (Typically located at C:\OpenSSL-Win32\bin\)
- From the same bin folder, run OpenSSL.exe with administrative privileges and execute the following command:
pkcs12 -in [certificate].pfx -out server.pem -nodes
[certificate] refers to the name of your .pfx file. - Enter password of the .pfx file when prompted
- server.pem will be generated in the same folder location
- Copy the server.pem file and paste it in this folder
C:\Program Files (x86)\Sparx Systems\Pro Cloud Server\Service - Open SSProCloud.config file from the above mentioned path with edit privileges and update the second occurrence of SERVER_PORT from 805 to 443 (Standard port number of HTTPS connection) and REQUIRE_SSL to 1. If you want to disable HTTP connections, comment the first occurrence of SERVER_PORT by adding # at the start of the line
- Restart Sparx Systems Professional Cloud service from the Task manager
4 Install Prolaborate
4.1 Fresh Installation
In this, will look at the at the steps involved in setting up Prolaborate version 5.2 in a fresh environment.
4.1.1 Prerequisites
Ensure the previous prerequisites are met and the Prolaborate installation file is downloaded.
4.1.2 Run the Installer
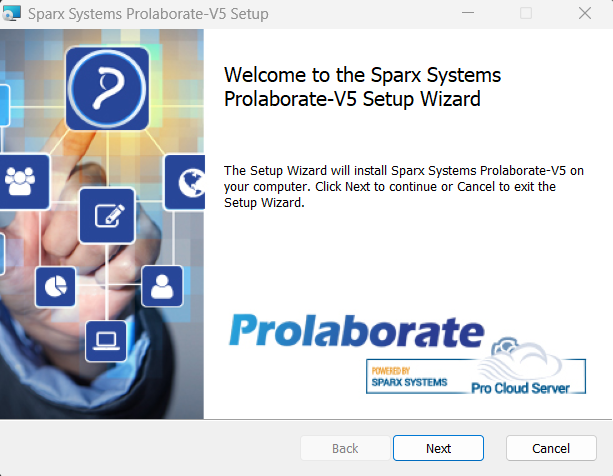
Once the file is downloaded, extract it contents in a folder. Run the Setup.exe as administrator.
Click on Next.

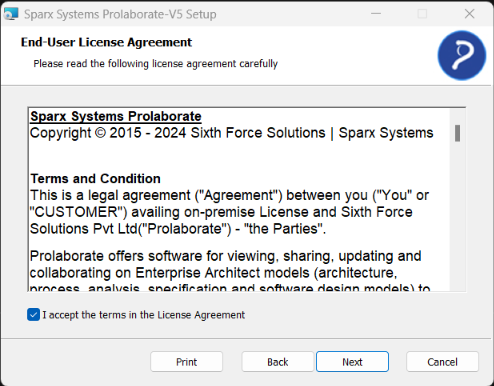
4.1.3 Accept EULA
Check the box to accept the terms and click Next
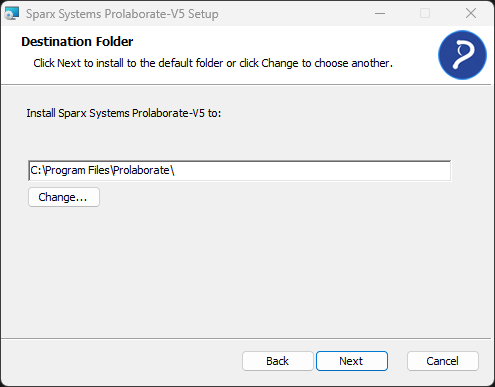
4.1.4 Select Installation Path
Select a file path to install Prolaborate.
4.1.5 Select Database Server
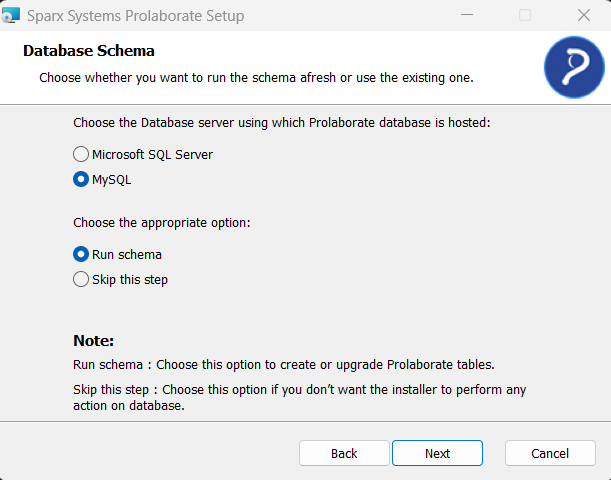
Choose the Database server (MySQL or MSSQL) in which the Prolaborate database is hosted and then choose Run Schema.
Skip this step option should not be used for fresh installations.

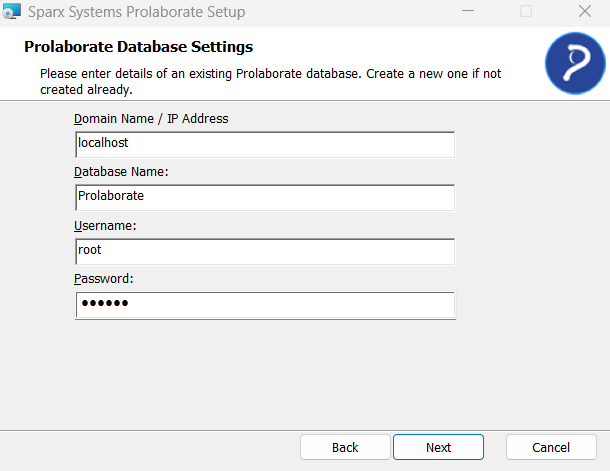
4.1.6 Provide Database Details
Fill in the Prolaborate database details in the given fields.

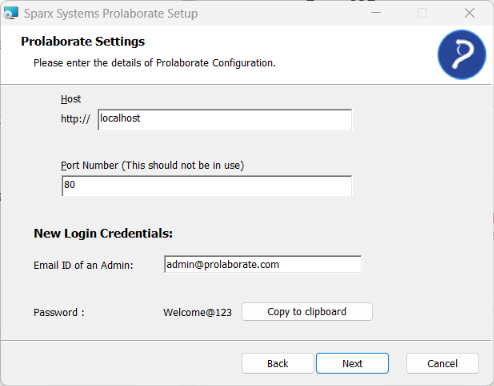
4.1.7 Configure Prolaborate
Enter the Prolaborate server details in the given fields.
| Field | Description |
|---|---|
| Host | Enter Domain Name or IP Address (E.g., localhost) |
| Port Number | Enter a Port Number that is not used. The port should be opened in the Firewall |
| Email ID of an Admin | Enter an Email ID. This user will be made the Super Admin of Prolaborate |

4.1.8 Configure Push Notification
Enter the details in the given fields to configure Push Notification in Prolaborate.
| Field | Description |
|---|---|
| IP Address / Host Name | The Domain Name or IP Address entered in the previous step is displayed automatically |
| Port Number | Enter a Port Number that is not used. The port should be opened in the Firewall. Default port number is 8080. |

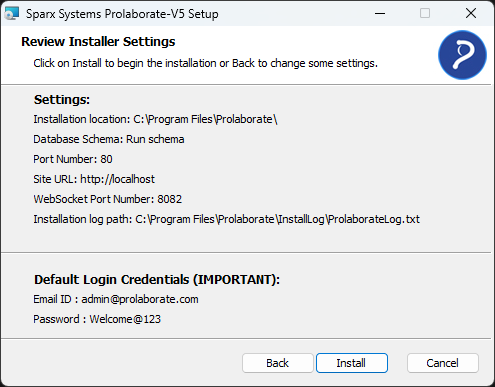
4.1.9 Install Prolaborate
Review the information given in the previous steps and click Install to begin the installation process.
Note:
- Write down the credentials or take a screenshot of this page for future reference.

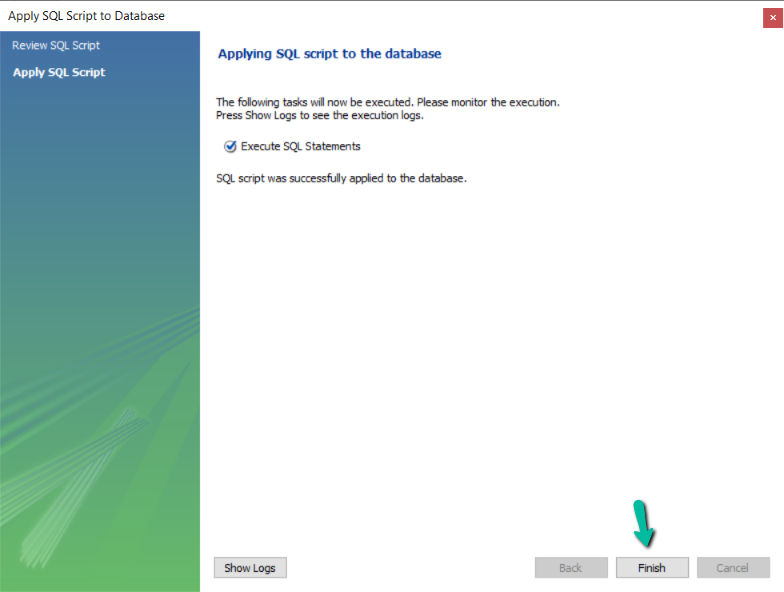
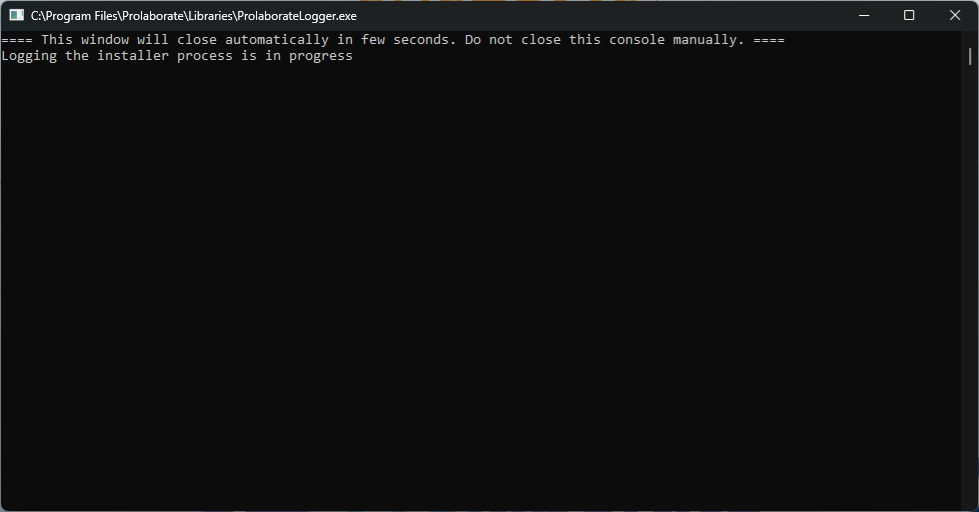
Once the setup is complete, a command prompt will appear, like the one in the figure below. The command window will close automatically.
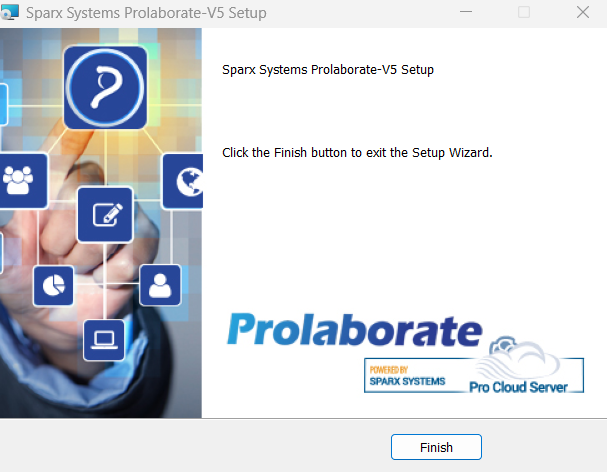
Click Finish once the installation is completed successfully.
4.1.10 Protocol Update
If you want to change the domain name and protocol details.
Follow the mentioned steps from this link
4.1.11 How to access Prolaborate
Launch your preferred web browser (e.g., Google Chrome, Mozilla Firefox, Microsoft Edge).
Enter the Protocol: Enter the HTTP or HTTPS protocol specified in your Prolaborate management settings in your browser’s address bar.
For example:
If Prolaborate is configured to use HTTPS, type “https://” followed by the domain name.
Enter the Domain or IP Address: Enter the correct domain name or IP address configured for Prolaborate access. It should match the domain or IP address in Prolaborate management.
For example:
If your Prolaborate domain name is “prolaborate,” enter ” https://prolaborate” after the protocol.
Specify the Port Number: Specify the port number as specified in your Prolaborate management settings.
For Example:
If the port number is 443, add “https:// prolaborate:443” after the domain name.
After entering the correct URL and pressing Enter, your web browser will load the Prolaborate application interface. You will be prompted to log in using your credentials.
Upon successful login, you will be redirected to the license page. Click here to know more on license management.
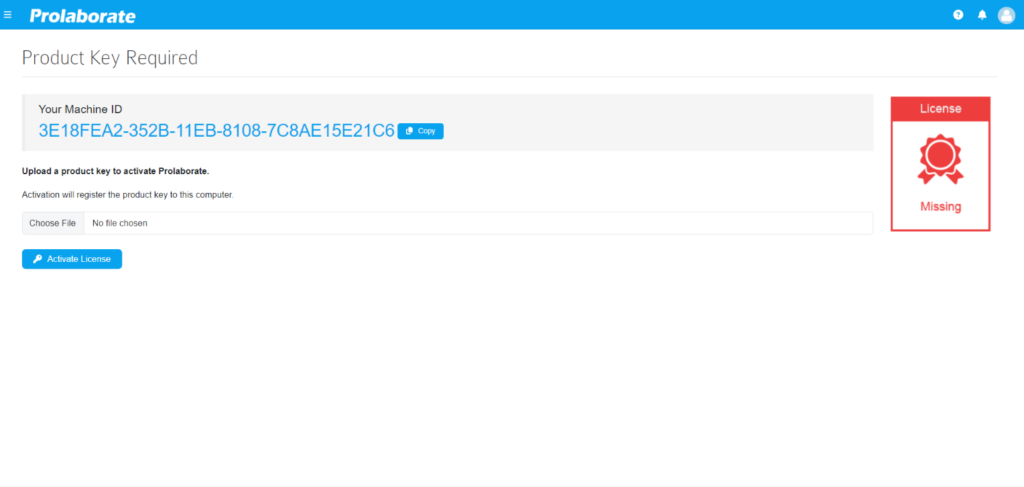
After uploading a valid license, you will gain access to explore the full features and functionalities of Prolaborate based on your license type, permissions, and user role. If you encounter any issues or have questions about specific features, refer to the Prolaborate documentation.
4.2 Parallel Installation
In this, we will look at the steps involved in setting up Prolaborate V5 as a parallel installation to your current installation of version 3.x. This will help you check and try out Prolaborate V5 without impacting your current usage.
If in case you want to upgrade your current installation of Prolaborate V3 to V5, check out this Upgrade guide.
4.2.1 Prerequisites
Ensure the previous prerequisites are met and the Prolaborate installation file is downloaded.
4.2.2 Create New Database
Create a new database for Prolaborate V5.
4.2.3 Copy Database
Export the contents of the existing Prolaborate database and import it in the newly created database.
4.2.4 Run the Installer
Download the Prolaborate Installer file. Once the file is downloaded, extract it contents in a folder.
Run Setup.exe as administrator.
Click on Next
4.2.5 Accept EULA
Check the box to accept the terms and click Next.
4.2.6 Select Installation Path
Select a file path to install Prolaborate.

4.2.7 Select Database Server
Choose the Database server (MySQL or MSSQL) in which the Prolaborate database is hosted and then choose Run Schema.
4.2.8 Provide Database Details
Fill in the Prolaborate database details in the given fields.
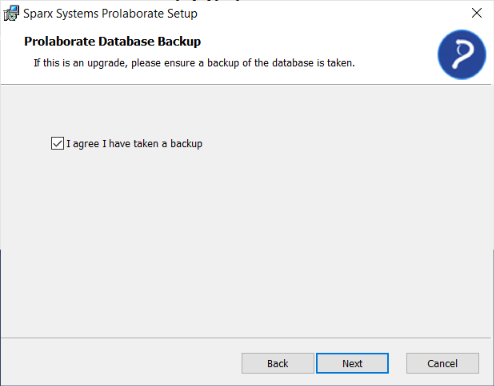
4.2.9 Prolaborate Database Backup
Ensure the database is taken as a backup. Enable the checkbox and click Next to continue the installation process.
4.2.10 Configure Prolaborate
Enter the Prolaborate server details in the given fields.
| Field | Description |
|---|---|
| Host | Enter Domain Name or IP Address (E.g., localhost) |
| Port Number | Enter a Port Number that is not used. The port should be opened in the Firewall |
| Email ID of an Admin | Enter an Email ID. This user will be made the Super Admin of Prolaborate |
4.2.11 Configure Push Notification
Enter the details in the given fields to configure Push Notification in Prolaborate.
| Field | Description |
|---|---|
| IP Address / Host Name | The Domain Name or IP Address entered in the previous step is displayed automatically |
| Port Number | Enter a Port Number that is not used. The port should be opened in the Firewall. Default port number is 8080 |

4.2.12 Install Prolaborate
Review the information given in the previous steps and click Install to being the installation process.
Note:
- Write down the credentials or take a screenshot of this page for future reference.
Click Finish once the installation is completed successfully.

4.2.13 Run Data Migrator
Data Migrator helps in migrating the data from V3 to V5. Existing configurations include dashboards, chart widgets, report widgets, discussions, reviews, users, modeling languages, etc can be transferred with the help of Data Migrator.
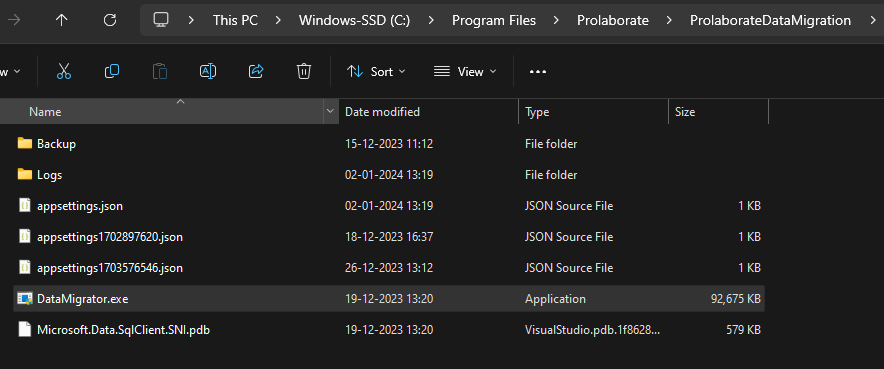
To initiate the migration process, go to the Prolaborate installation folder (For example, C:\Program Files\Prolaborate\ProlaborateDataMigration) Right click on “DataMigrator.exe” and choose ‘Run as Administrator’.
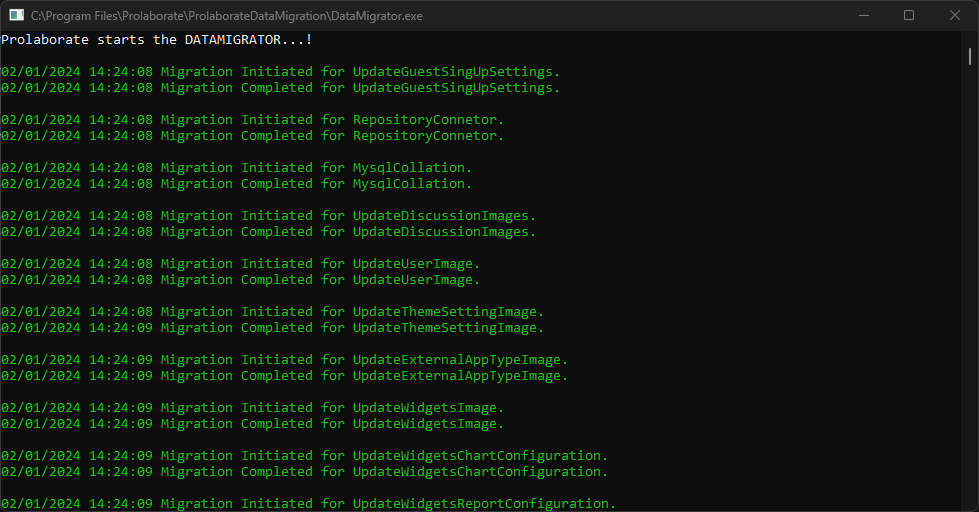
Data Migrator initiates the command prompt window to show the migrated file name and its status. After the migration is completed, press any key to close the window.
4.2.14 Post Installation Steps
Internet Information Service (IIS) Support
The V5 application does not require an IIS manager to perform in Version 5. We upgraded the Config file, and it completed all of the manual work that required manual installation of IIS, and the user may access the web application through the domain that was specified during the installation phase when configuring Prolaborate.
Note:
- Please enter the Domain name in the URL
For example: http://sparx.prolaborate.com [or] https://sparx.prolaborate.com
Depending on your need you can choose either ‘http’ or ‘https’ Protocol.
Update Password
After upgrading from v3 to the latest version (v5), the admin should reset the registered user’s password. There are multiple ways the password reset can be achieved.
- If the users are fewer, the admin can set a Temporary password from the Users and License Management page. The users can then use the temporary password and reset their password.
- If the users are more, you can inform the users to use the Forgot Password option in the login screen to reset the password. Mailer should be configured to use this option and it is not applicable for SSO and AD users.
- Admin can reset password of all Prolaborate users from the Prolaborate Management application. When resetting the password in Prolaborate Management, the updated password will not be emailed automatically; it must be sent manually. This is not applicable for SSO and AD users.
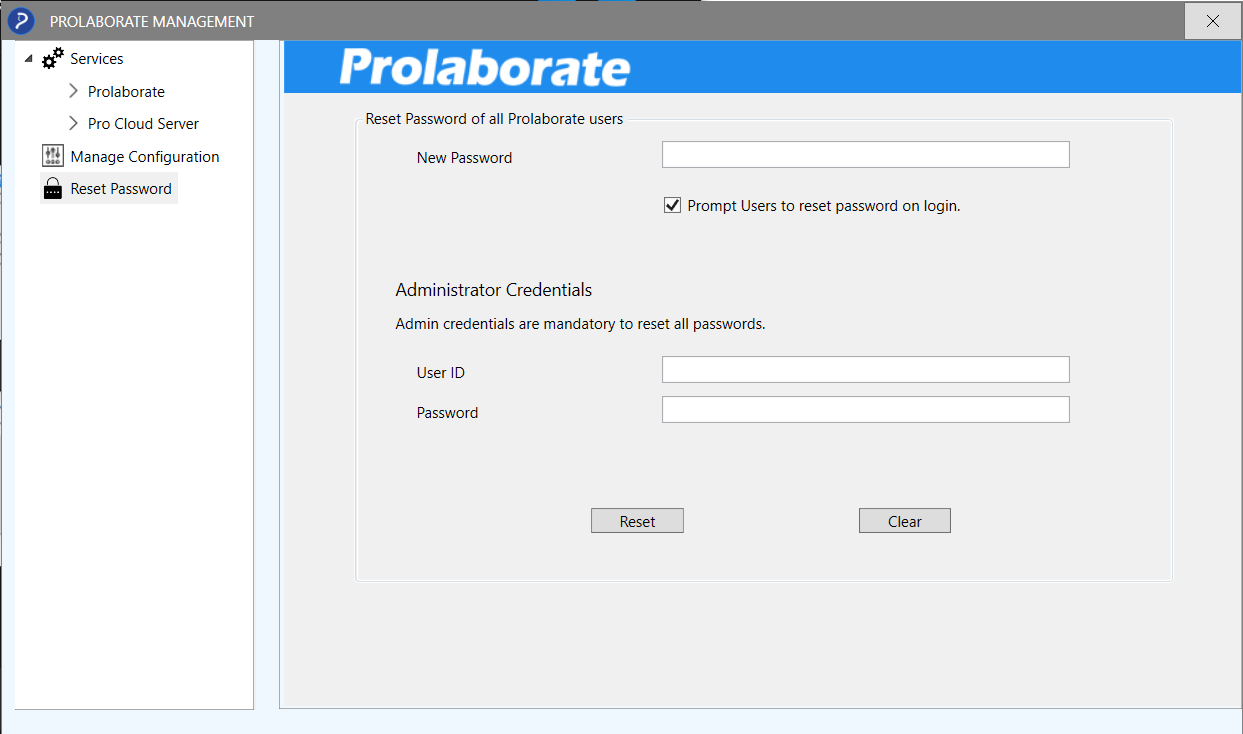
Note:
- Admin must enter the credentials to reset the password of all registered users.
Protocol Update
Update WebApp
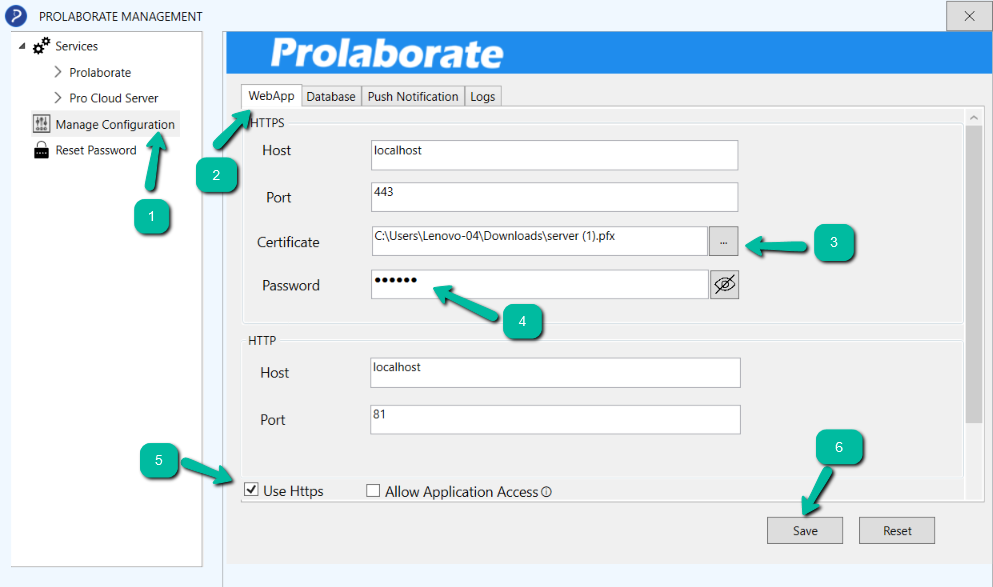
Users who want to run their application using HTTPS protocol in the sense have to do the following steps manually in Prolaborate Management.
Open Prolaborate Management from the installed folder (C:\Program Files\Prolaborate\ProlaborateManagement) and run Prolaborate Management as administrator.
- Click Manage Configuration
- Open WebApp section
- Choose SSL certificate using browse icon
- Enter the respective password for the certificate.
- Enable Use Https check box.
- Click Save.
- Restart all the Prolaborate services once the action is successful
Update Push Notification
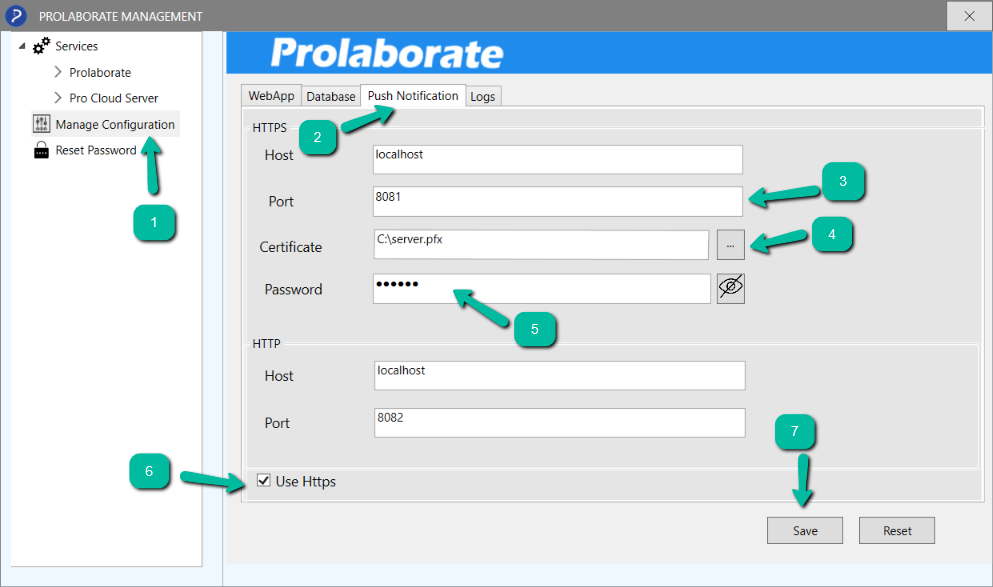
Update WebSocket or Push Notification protocol from Http to Https from Prolaborate Management if required.
Open Prolaborate Management from the installed folder (C:\Program Files\Prolaborate\ProlaborateManagement) and run Prolaborate Management as administrator.
- Click Manage Configuration
- Open Push Notification section
- Enter Port Number that is opened and not in use
- Choose an SSL certificate using browse icon
- Enter the respective password for the certificate.
- Enable Use Https check box.
- Click Save.
- Restart all the Prolaborate services once the action is successful
Note:
- Ensure that any changes made to WebApp details align with corresponding adjustments in push notification settings
OIDC Update
After installing Prolaborate, admin must do the following steps in order to access the Application over HTTPS.
Open the application by entering the admin login credentials at the URL listed below.
Note:
- Enter the Domain name in the URL
http://(domainname)/Applications/Admin
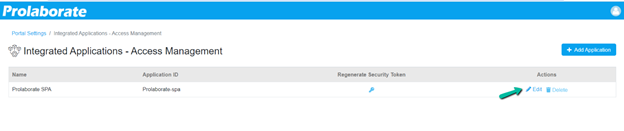
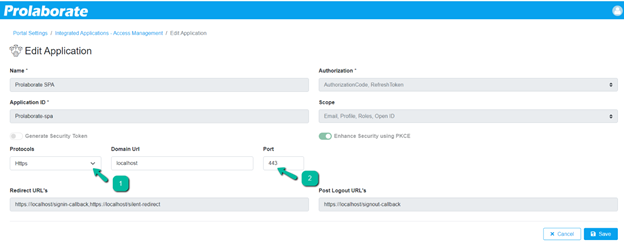
Change the protocol into HTTPS and change the Respective Port number. Click Save button after changing the details.
Once saved, the information is automatically updated in the OIDC table of the Prolaborate database.
Configure SAML SSO
Following the upgrade, Application Base URL and Assertion Consumer URL of Prolaborate V5 will be different from Prolaborate V3. Admin must change or modify the Prolaborate V5 Service Provider configuration details in the current SAML application of your SAML provider to ensure smooth transition.
Service Provider configuration
Copy the Service Provider configuration details from Prolaborate and paste in the respective fields at the SAML application as described in the image below.
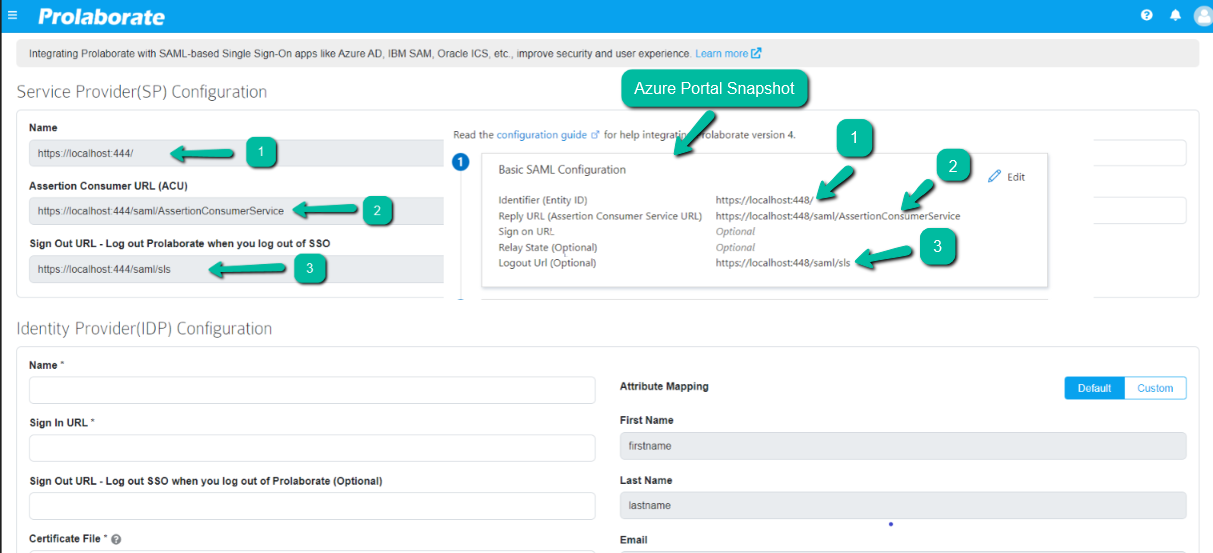
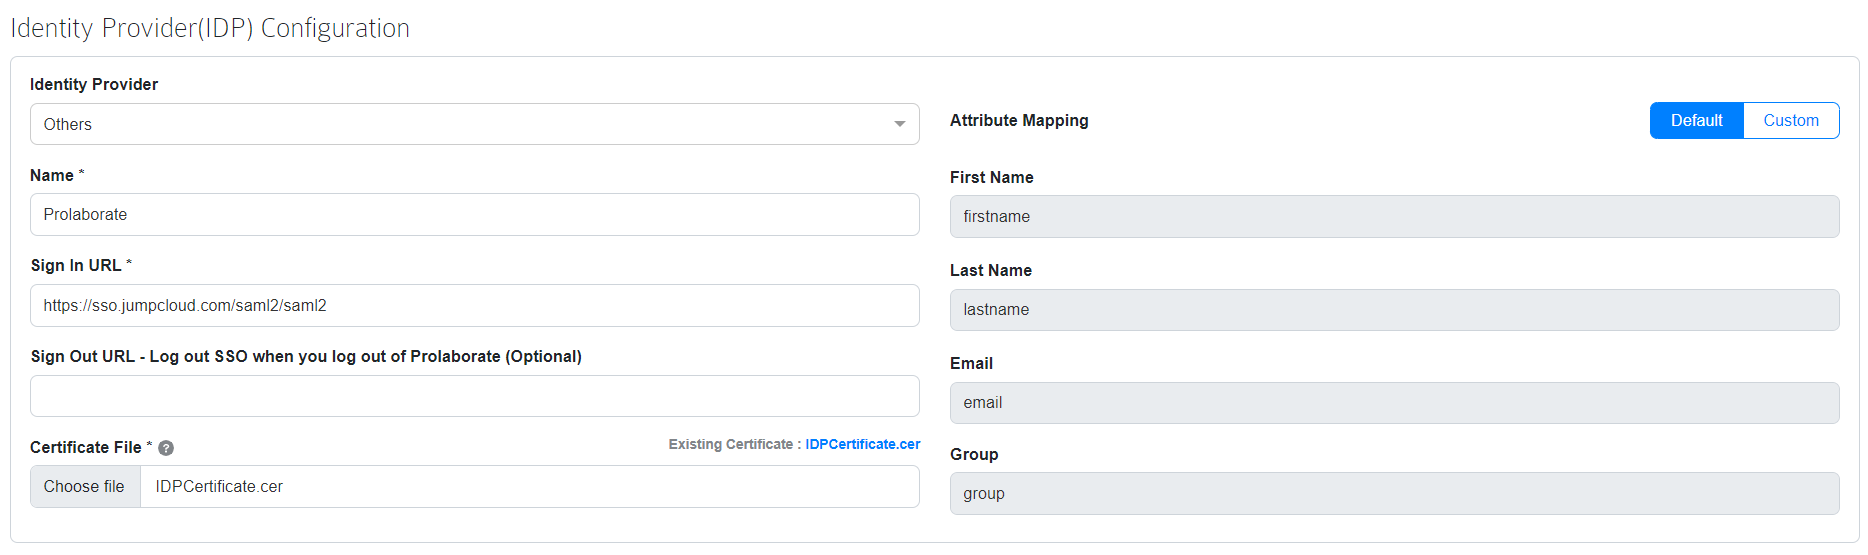
Identity Provider Configuration
Now, parallelly update the Identity Provider details in Prolaborate. Copy the Name, Sign-In URL and Sign-Out URL from SAML provider and paste it in Prolaborate.
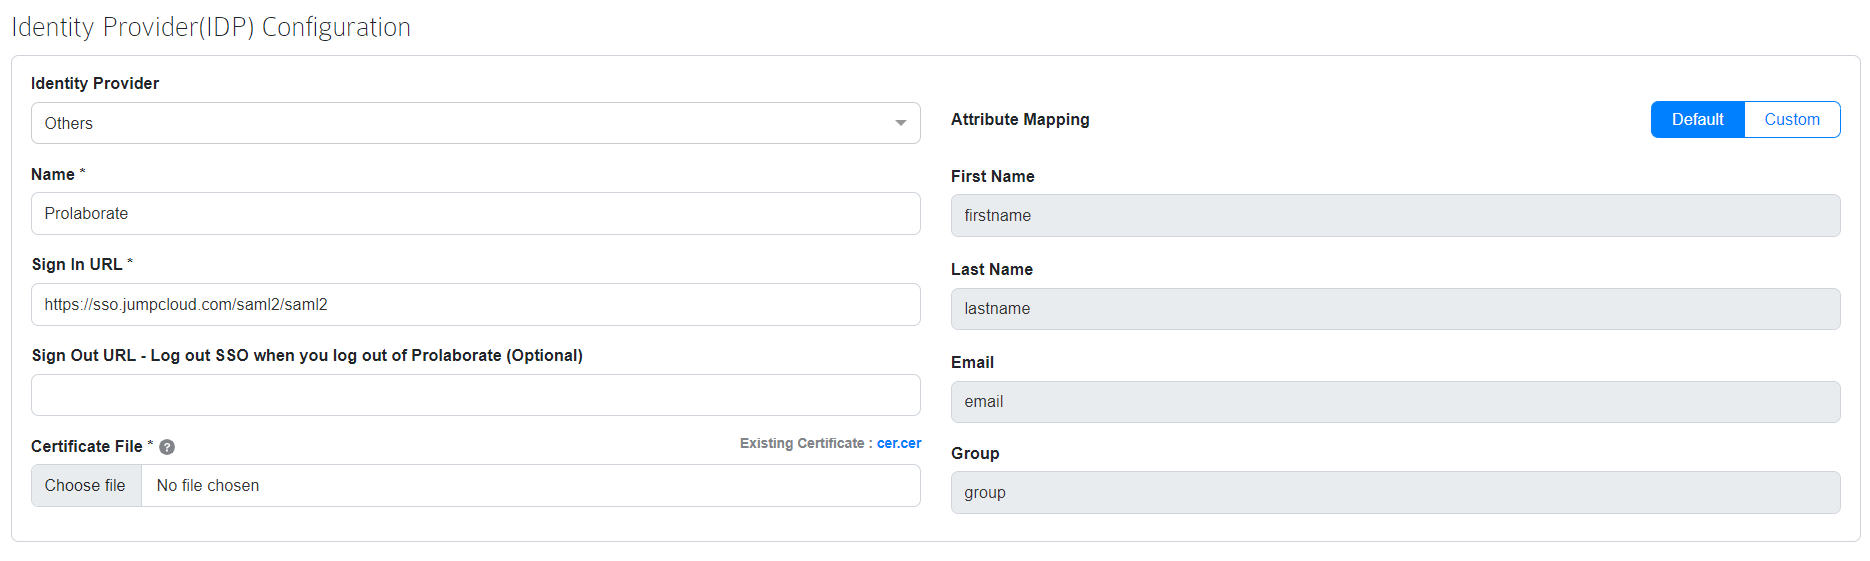
In V5, we made it easier to map the attributes from the Prolaborate UI. Choose Active Directory Federation Services if your service provider is ADFS or Others for other service provider (OKTA, Jump Cloud, etc.,)
Map the attributes from the SAML SSO settings page, upload the SSL certificate and save the changes.
Attribute Mapping will be pre-filled with default values in SAML Single Sign-On page and they cannot be edited.
If required, users can change the values by clicking the toggle button from Default to Custom. Then copy the Attributes & Claims values from the SAML Application and paste them in Prolaborate Attributes Mapping.
- firstname
- lastname
- group
Migrate Prolaborate Content in Confluence
When upgrading from V3 to the latest version, you may encounter accessibility issues with Confluence details if you are using Confluence cloud. To resolve this, follow the steps in this guide to retrieve your configuration details and Confluence data from V3 to the latest version of Prolaborate in Confluence Cloud.
Support
In case of any questions, feel free to reach out to prolaborate[at]support[dot]com
4.3 Upgrade Installation
Introduction
In this guide, we will look at the steps involved in upgrading your current installation of Prolaborate version 3.x to latest version
Use the points in the Decision Gate section to decide whether you are ready to go ahead with Prolaborate latest version
Once you are ready, check out the suggested Upgrade Plan section and plan your upgrade as per your processes and our suggestions. On the day of the Upgrade, follow the Installation and post-Installation steps. Click here to know more.
4.4 Troubleshoot Installation
Refer to this guide to troubleshoot issues with the installation
5 Generate Data Cache
Enabling and generating Data Cache is an one-time activity. Prolaborate relies on this data cache to show live diagrams and linked documents to its users.
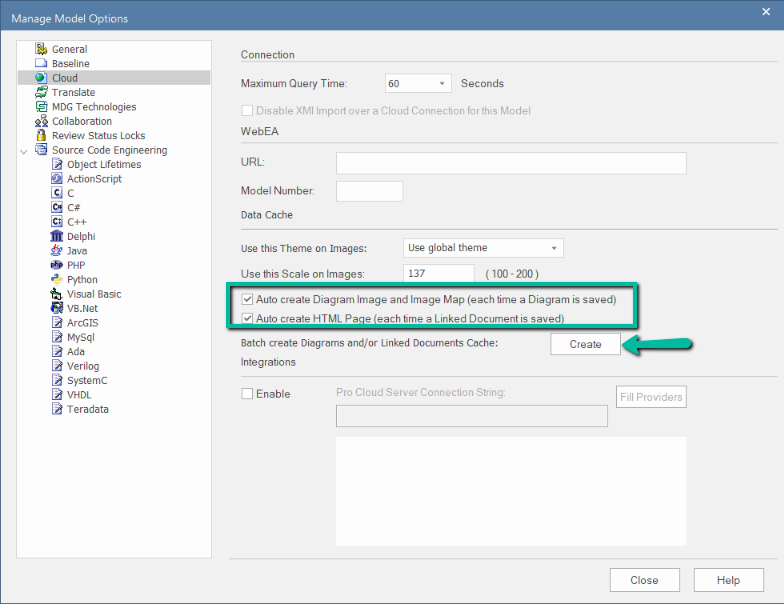
To create generate data cache in Enterprise Architect V16, follow the below steps:
- Open the model in Enterprise Architect
- Click on Setting menu in the ribbon and choose Options
- Navigate to Cloud section and enable the two checkboxes under Data Cache
- Click Create to generate data cache
To generate cache periodically,
- Open Pro Cloud Config Client
- Double click on a Database Manager to edit
- Enable Periodically Generate Diagram Images for WebEA & Prolaborate option
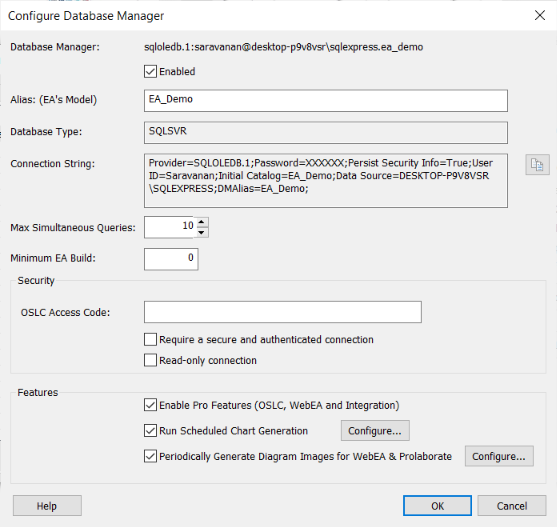
Click on Configure and enter the following information.
| Port | Select the Port which you are using to connect to this EA repository |
| Model User | Enter a valid repository user. Ignore if model security is not enabled |
| Model Password | Enter the password for the repository user. Ignore if model security is not enabled |
| Interval (seconds) | Set the default value is 30 seconds |
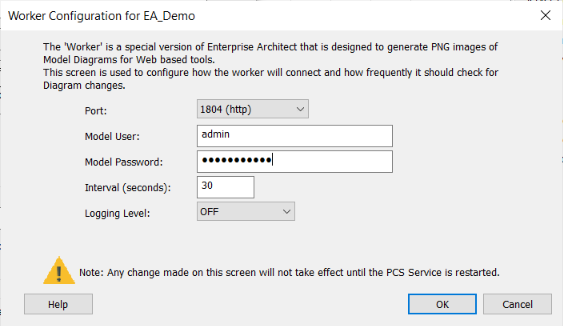
Click OK and restart the Sparx Systems Professional Cloud service from the task manager.
6 Getting Started with Prolaborate
To get started with Prolaborate, follow the below guides.
Install License – You will need to have the right licenses installed, for your users to have complete access to the application.
Add Repositories – A repository is the first thing you see once you login to your account. Prolaborate users can only manage repositories which they have access to; New Repositories can be created by the Prolaborate administrator only.
Configure Sections – You will need to define which packages from the EA are to be accessed through Prolaborate.
Set up Access Permissions –An admin can use this feature to give controlled access to users or groups in Prolaborate, the web platform for Enterprise Architecture.
Set up Guest Access – The guest sign-up feature allows anybody to quickly sign up and gain a read-only access to the application.
Configure SMTP – Emails for Activations, Notifications, Reviews, etc. are sent out from Prolaborate through the SMTP server. Thus, to receive emails without any issues, SMTP should be properly configured.
Setup Active Directory – The Active Directory feature enables the users, configured in your Active Directory, to login to Prolaborate with the same credentials.
Add Users- Users are the participants working together in a particular repository. Users can view and configure the repository as per their individual access rights provided by the Prolaborate administrator.
7 Appendix
7.1 How to Open a Port
Make sure the firewall is enabled by confirming that “Firewall state” is set to ‘On’ and not to ‘Off’.
Step 1: Open windows defender Firewall with Advanced Security
Step 2: In the left-hand side of the navigation bar, click Inbound Rules
Step 3: From the right side of the Inbound Rules tab click on ‘New Rule’. The new rule wizard launches.
Step 4: Select ‘PORT’ and click ‘Next’.
Step 5: Select ‘TCP’ and in the Specific local ports section, enter the Port number which needs to be opened and click on ‘Next’
Step 6: Select ‘Allow the connection’ and click ‘Next’.
Step 7: Make sure all Domains, Private and Public are checked and click ‘Next’.
Step 8: Specify the Name and Description for the port and click ‘Finish’.
7.2 Setup SQL Server
7.2.1 Enable SQL Server Authentication
‘SQL server authentication’ must be enabled and an admin account must be created. The following settings must be accomplished
Step 1: Create a new Database called Prolaborate
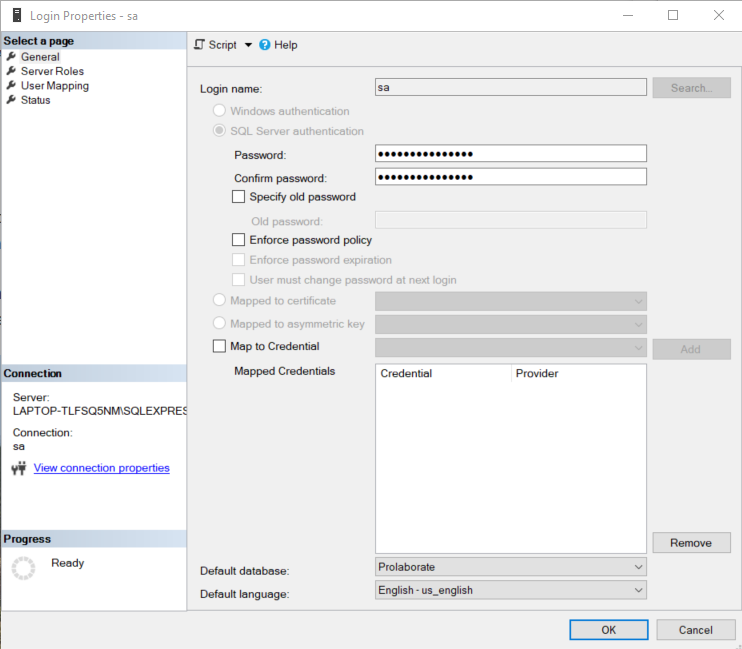
Step 2: Create a new user by using the ‘New Login’ option under Security -> Login section
Step 3: Uncheck ‘Enforce password policy’
Step 4: Set the default database to ‘Prolaborate’
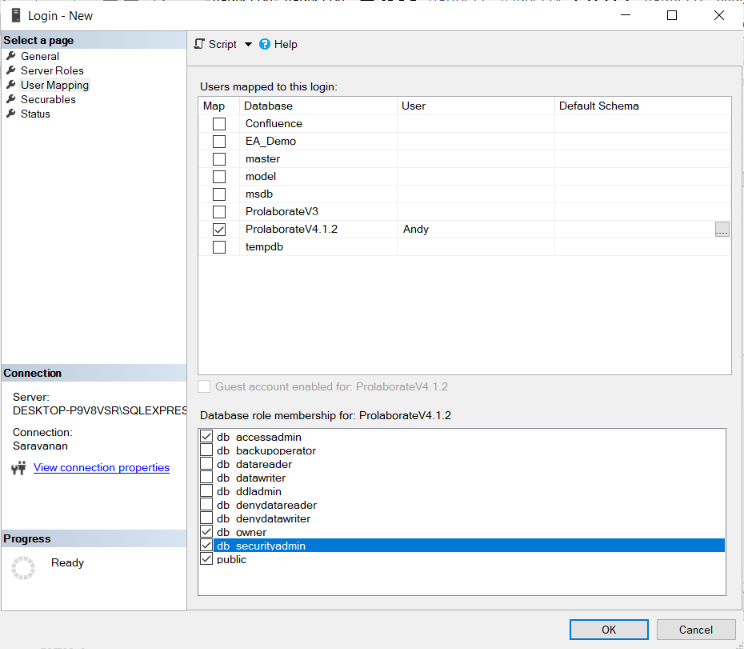
Step 5: Configure ‘Server Roles’, grant access to all admin privileges.

Step 6: ‘User Mapping’, maps the Prolaborate database to the new user.
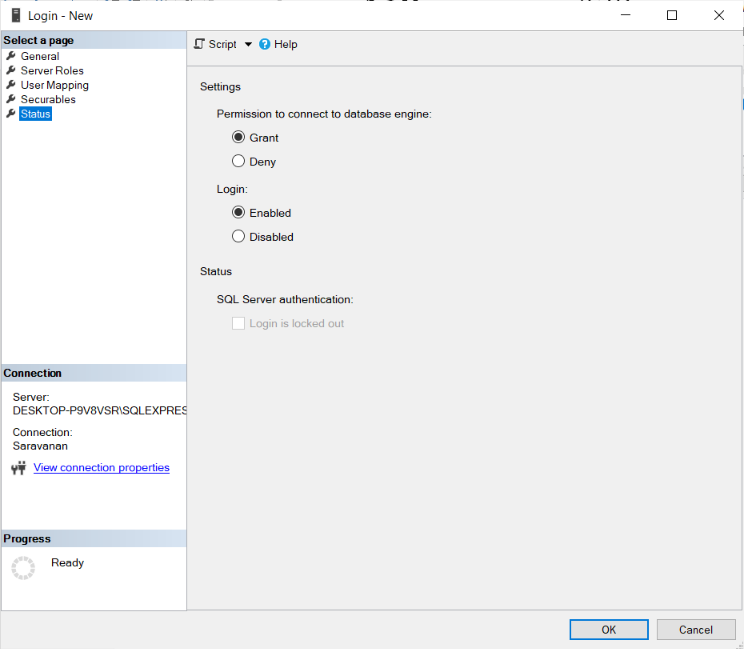
Step 7: Configure ‘Status’ as shown below:
7.3 Setup MySQL Server
7.3.1 Update MySQL Configuration Values
Post installing MySQL server, check and update the max_allowed_packet size and sql-mode or sql_mode values in MySQL configuration file by following the steps below,
- Press Win + R key
- Enter %programdata% and click Ok.
- Open the my.ini file located at “C:\ProgramData\MySQL\ MySQL Server [your server version]”. (E.g., “C:\ProgramData\MySQL\MySQL Server 5.7”) in Notepad
- Check your max_allowed_packet size value in MySQL configuration. If it is less than 100, update it to 1024 or higher. Unit of max_allowed_packet is bytes.
- Check your sql-mode or sql_mode value in MySQL configuration. If it contains ONLY_FULL_GROUP_BY, remove it. ONLY_FULL_GROUP_BY introduced in MySQL v8 which causes an issue in running custom query in Prolaborate to retrieve data from EA Model DB. Removing it will fix the issue that occurred in running the custom query and will not pose any issues for EA repositories.
- Once the changes are done, save the file.
7.3.2 Create Prolaborate Database
To create a new Prolaborate database, follow the steps below,
Step 1.Open MySQL Workbench and create a new connection
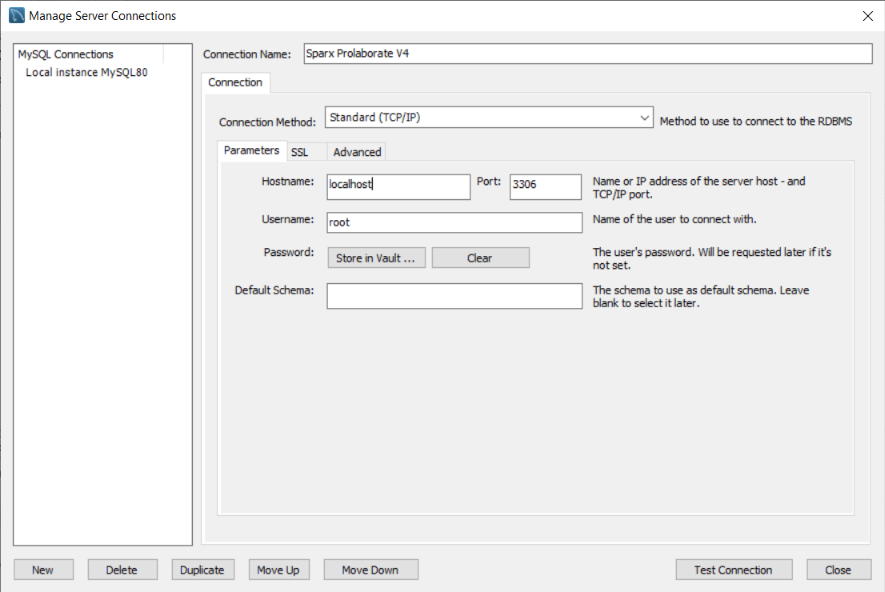
Step 2.Open the new connection
Step 3.Create new database called Prolaborate with charset ‘utf8mb4’ and collation ‘utf8mb4_general_ci’ and click on Apply
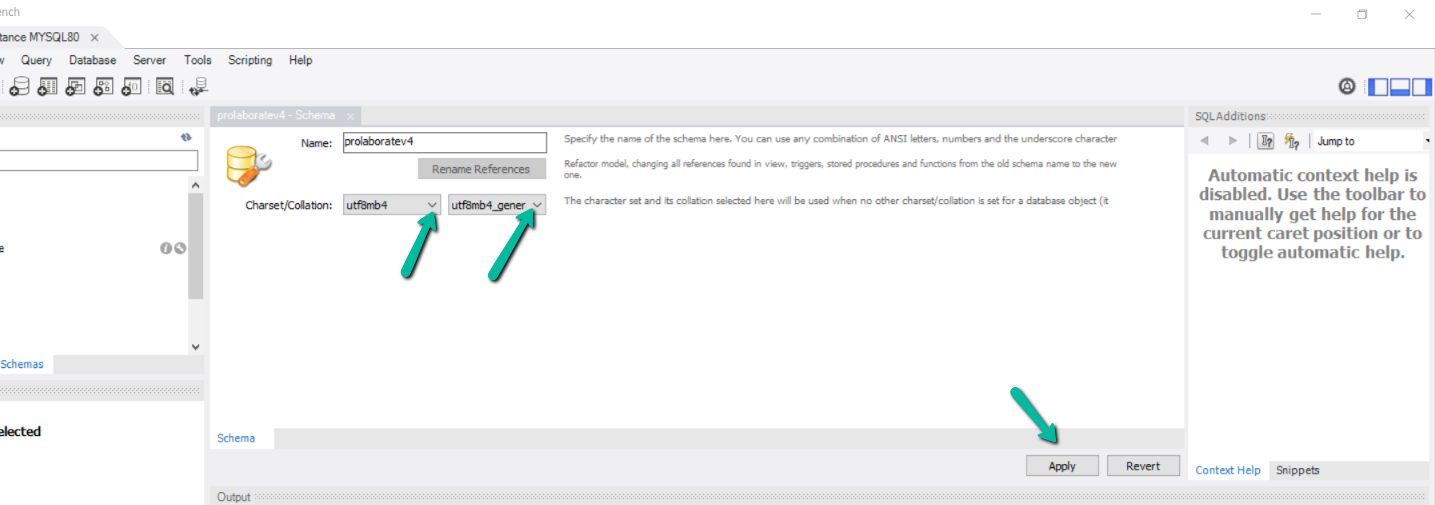
Step 4.Click on Apply

Step 5.Click on Finish