
Configure Active Directory with Prolaborate
Integration with Active directory lets the admin be at ease in managing the users in Prolaborate and for users, it’s a seamless experience in logging in to Prolaborate.
Click here to know about the best practices of Active Directory.
Steps to Add Active Directory Domain
To add an active directory domain, click on Menu > Active Directory Single Sign On.
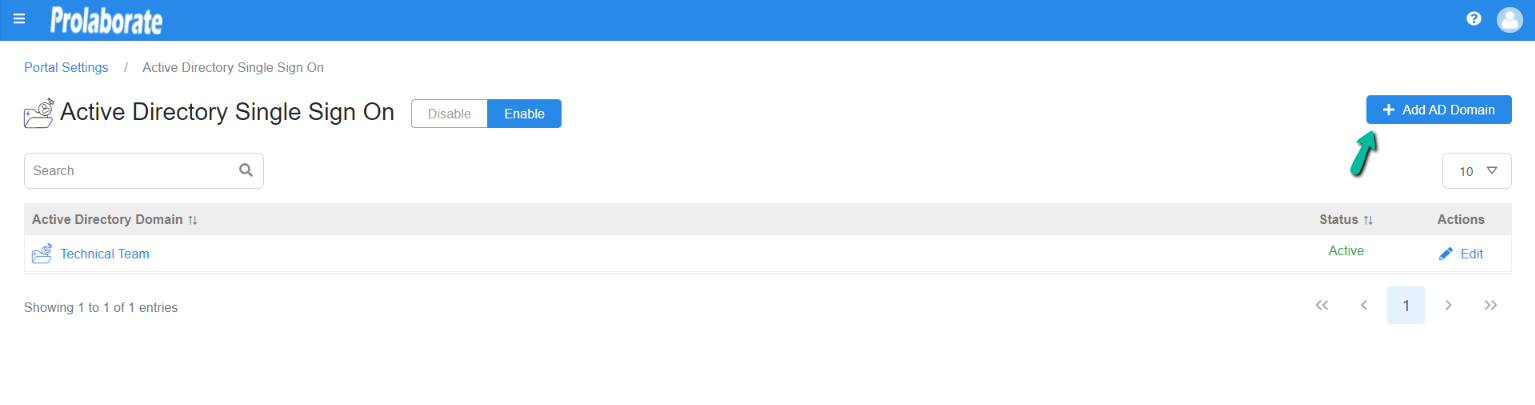
On the landing page click on Add AD Domain button.
Below is the screenshot for reference.


How to Configure Active Directory (AD) with Prolaborate?
To configure AD, click on Menu > Active Directory Single Sign On > Add AD Domain.
On clicking, Add AD Domain You will land on the following page.
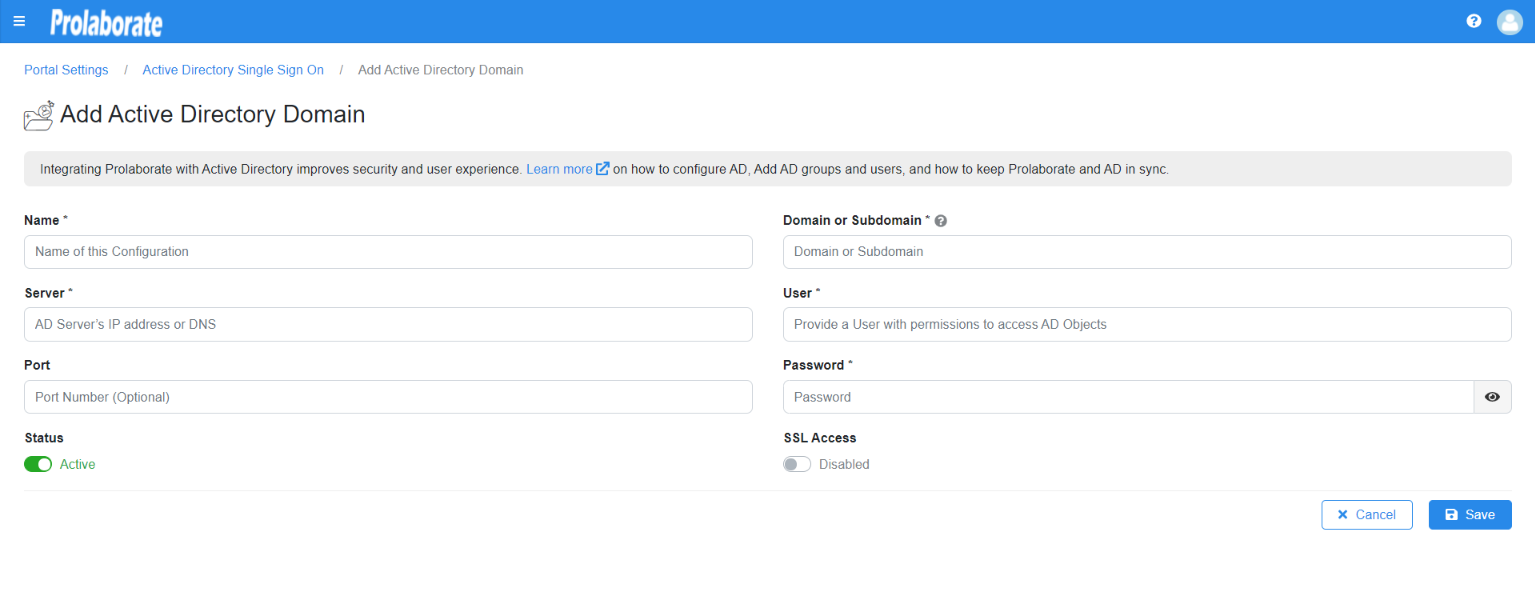
Provide the details in the respective fields.
| Name | Give a Name to the setup. Ideal to give a name based on the domain. |
| Server | Enter the Active Directory Server’s IP address or domain name. |
| Port | Enter the Port Number. |
| Domain or Subdomain | Enter the Domain or subdomain address. Global domain names should not be used. |
| User | Enter a username used to login to the AD server (This is the user with permissions to access and retrieve AD objects) |
| Password | Enter the password of the user |
| SSL Access | Enable/disable SSL option based on your AD server’s configuration |
Click on Save.
If the details are valid, Prolaborate will save the settings. If not, you will see the error message and the details will not be saved.
If you have more than one domain or sub-domain, repeat the above steps for each.
In the upcoming article, we will cover the topic of adding Active Directory Users to Prolaborate and adding Active Directory Group to Prolaborate.
However, as a best practice, we would recommend adding Active Directory Group to Prolaborate rather than adding Active Directory Users directly to Prolaborate. By doing so it will give you the leverage of managing and controlling the users in Prolaborate at ease.
Steps to Add Active Directory Groups at Prolaborate
Adding Active Directory Groups into Prolaborate is a highly recommended practice. You can add Active Directory Groups into Prolaborate at the Application level and on the Repository level.
When you have multiple repositories with multiple access permissions it is always ideal to add Active Directory Groups at the application level rather than adding into repository level.
When you have single repositories with defined access permission then you can add Active Directory Groups at the repository level.
Steps to Add Active Directory Groups at Application Level
When you add Active Directory Groups at the application level you can manage the groups at ease.
Prolaborate provides you the leverage of getting rid out of routine maintenance work such as adding or removing a user from the group etc since whenever a user is added to the Active Directory Groups, they will automatically be added into Prolaborate. On the other side, adding an Active Directory Groups will expedite you in assigning or removing the group to the new repository or from the existing repository with ease.
Prolaborate also empowers you by cautioning you when a user is removed from the existing Active Directory Groups and this feature will be covered exclusively later in this article under the topic Sync Users from Active Directory.
To add user groups at the application level through the active directory click on Menu > User and License Management.
On the landing page click on Active Directory Groups > Add Groups
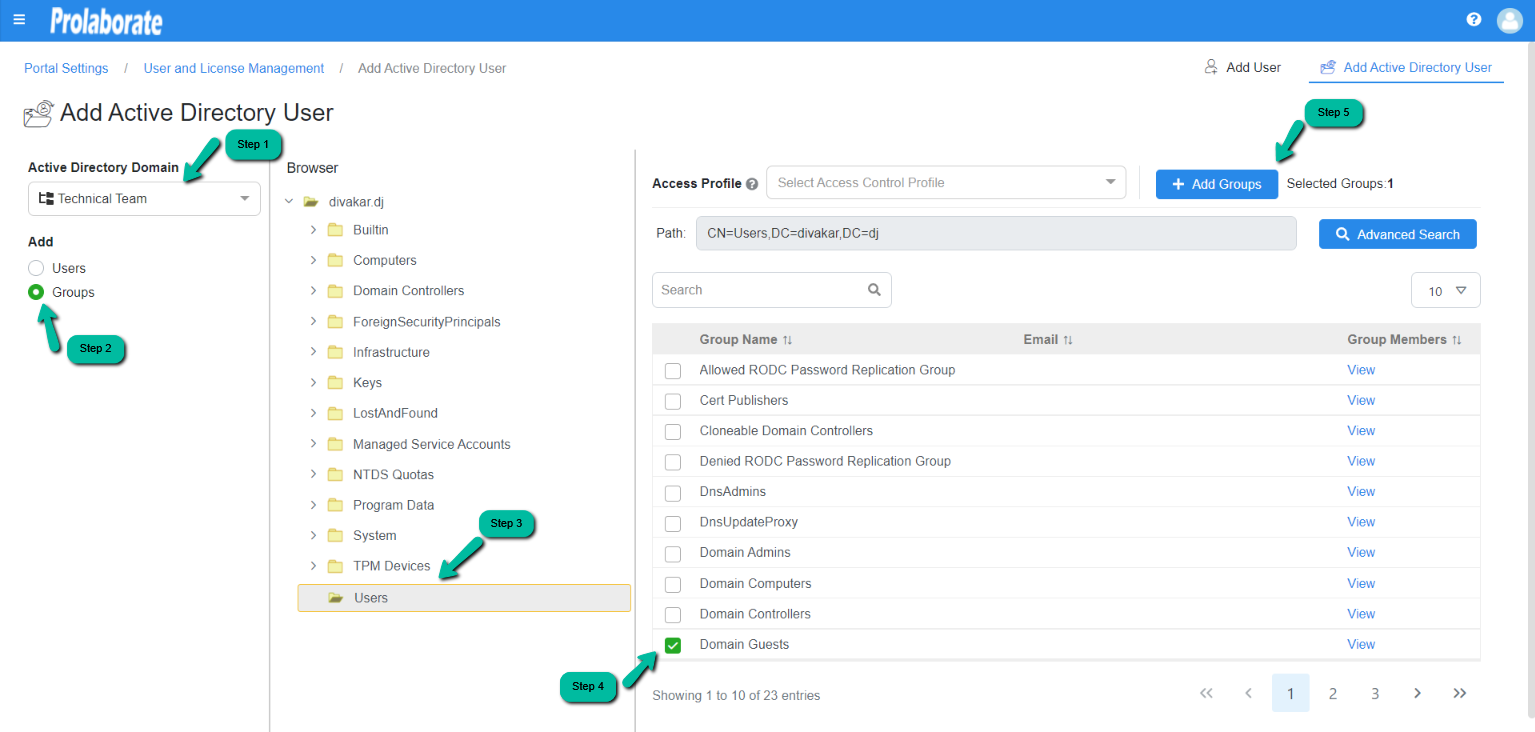
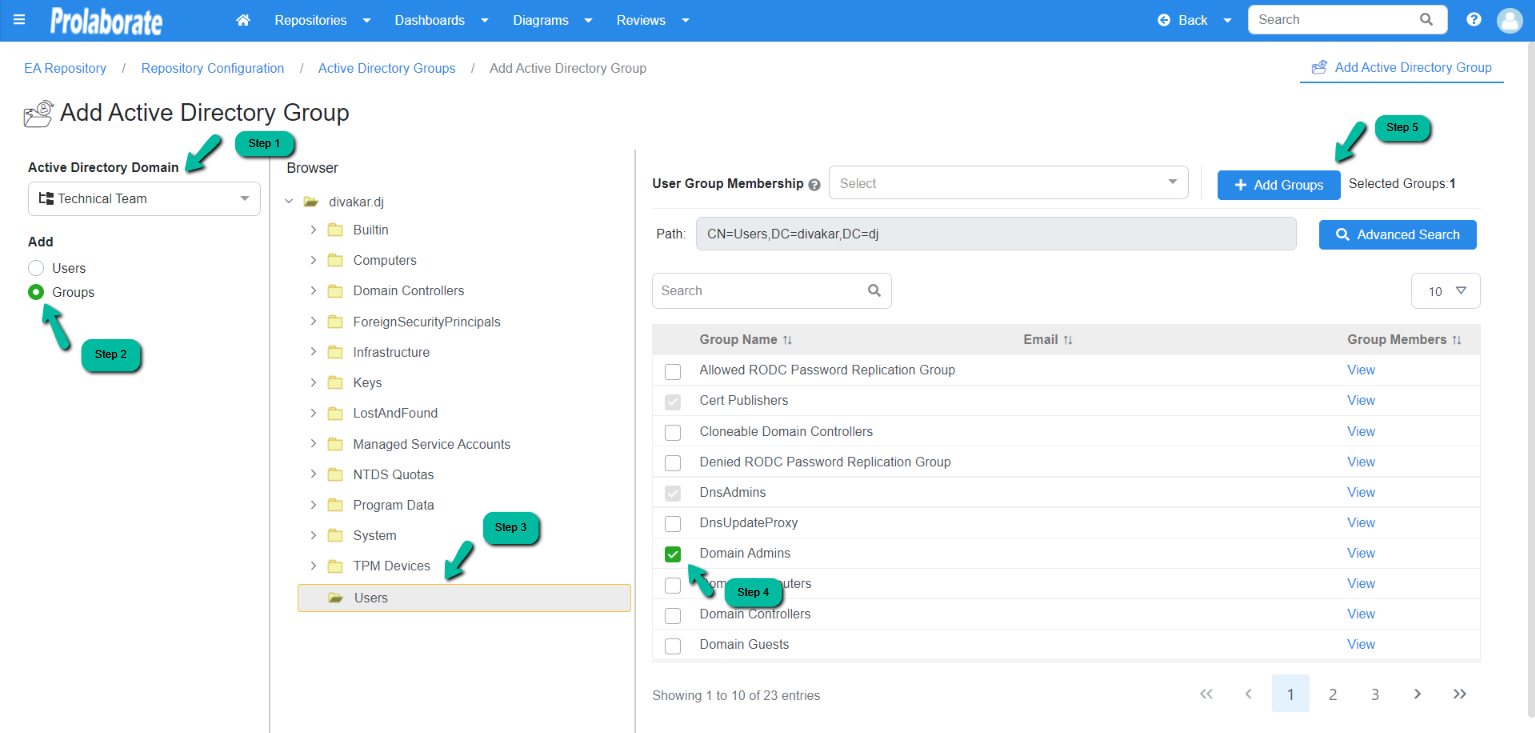
Now select the active directory from the active directory domain dropdown list and then choose Groups.
Select the folder Users from the active directory browser.
Now choose the groups you want to add and then click on Add Groups.
Below is the screenshot which shows the steps in adding a Group.
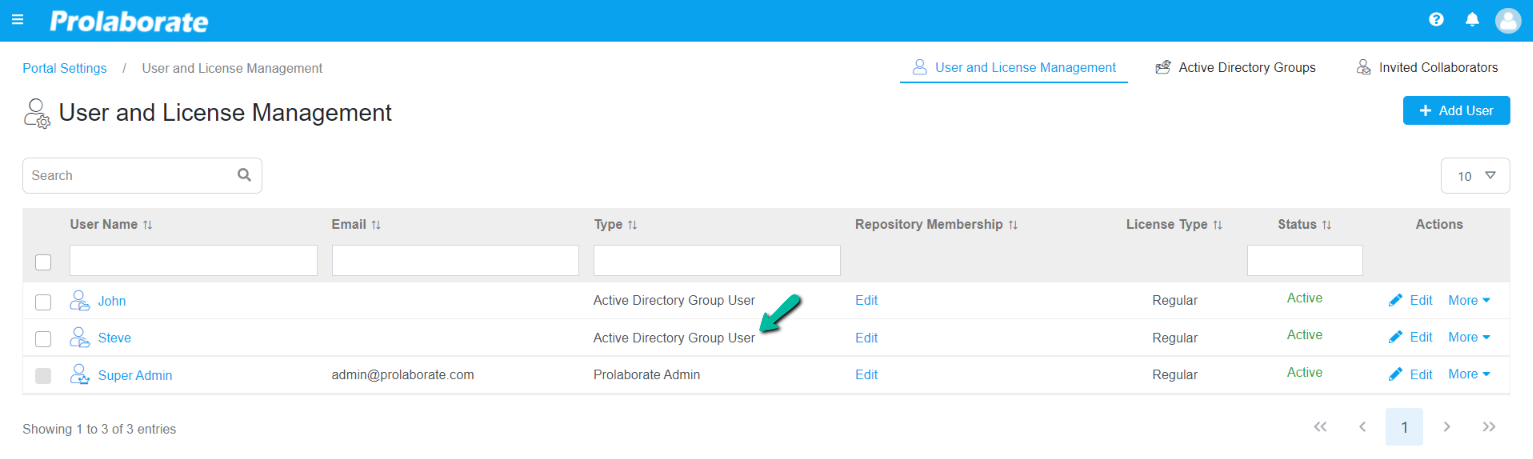
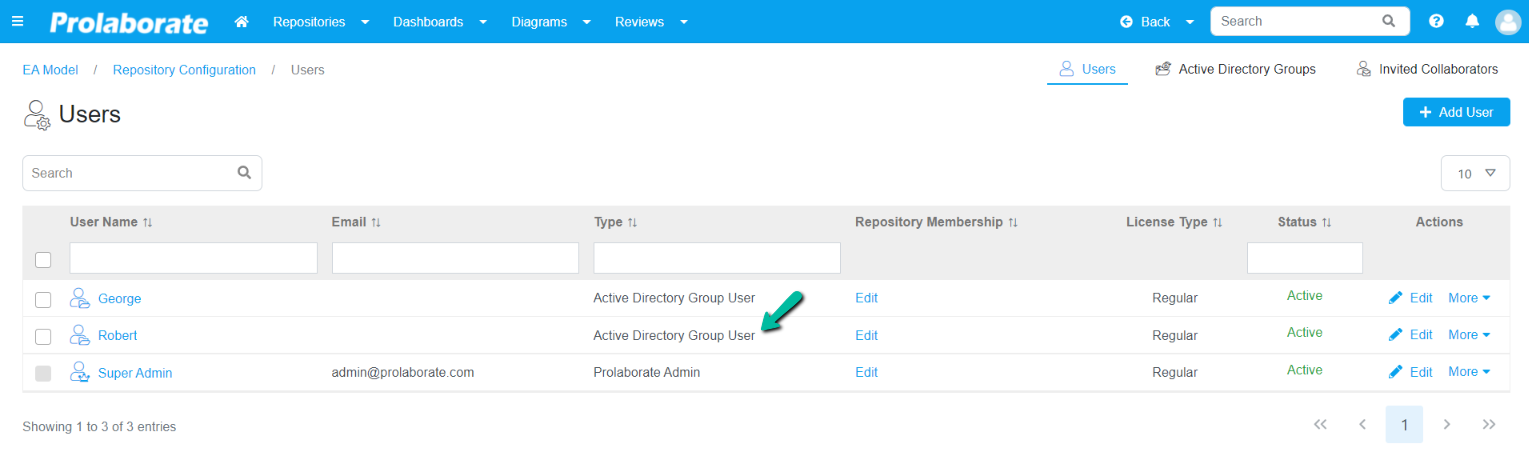
Upon adding the user through Active Directory User Groups they will be listed as Active Directory Group User on the Users page.
Below is the screenshot which shows the user who has been added through Active Directory Group User.
How to Add Active Directory Groups at Repository Level?
To add a group at the repository level through the active directory click on Menu > Users.
On landing the page click on Add User > Add Active Directory Groups > Add Group.
Select the active directory from the dropdown list and then choose Groups.
Select the folder Users from the active directory browser.
Now choose the groups you want to add and then click on Add Groups. While adding users you cannot choose groups who have been already added as user groups at the application level.
Below is the screenshot which shows the steps in adding user groups.
Upon adding the user through Active Directory Groups they will be listed as Active Directory Group User on the User and License Management page.
Below is the screenshot which shows the user who has been added through Active Directory Group User.
Steps to Add Active Directory Users
When you want more users to be added to Prolaborate it is recommended to create a new group in Active Directory and add those users into that group. Add that Active Directory Group into Prolaborate rather than adding each user from Active Directory into Prolaborate.
The reason why we recommend this practice is defining access permission for extensive users consumes enormous time and effort. However, you can add Active Directory Users to Prolaborate when there are fewer users to be added or when there is less scope to manage users i.e adding or deletion of users, etc.
You can add Active Directory Users into Prolaborate at the Application level and Repository level.
Steps to Add Active Directory Users at Application Level
To add a user at the application level through the active directory click on Menu > User and License Management.
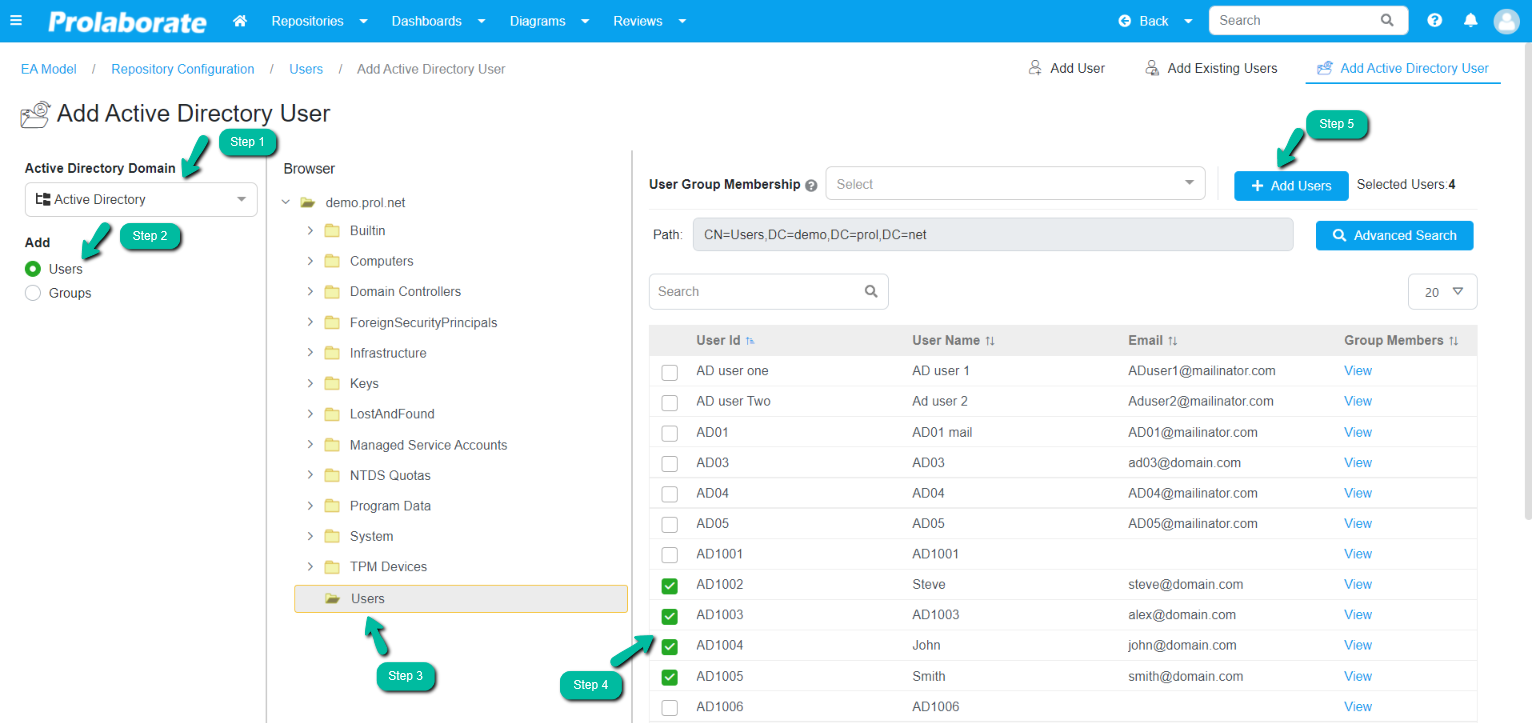
On the landing page click on Add User > Add Active Directory User.
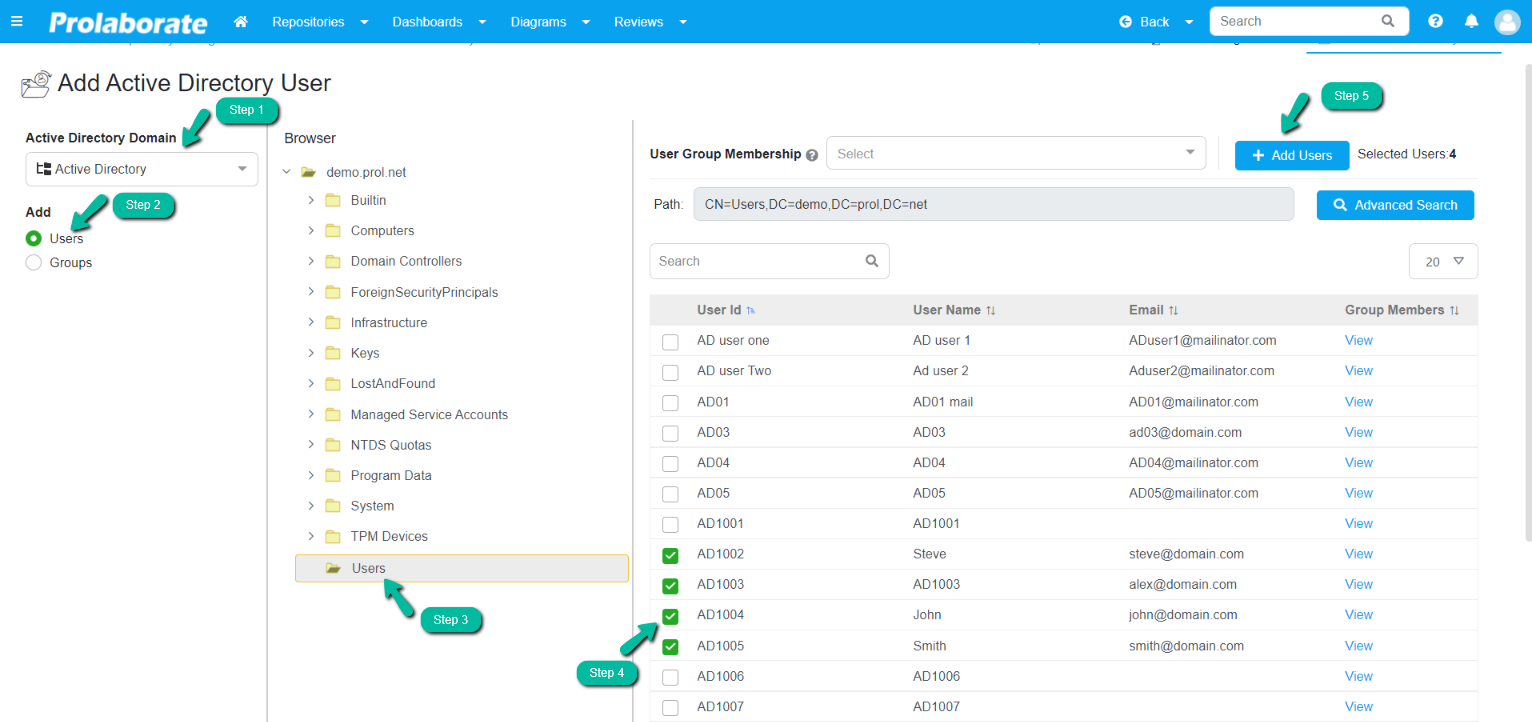
Now select the active directory from the active directory domain dropdown list and then choose Users.
Select the Users folder from the active directory browser.
Now choose the users you want to add and then click on Add Users.
Below is the screenshot which shows the steps in adding users.
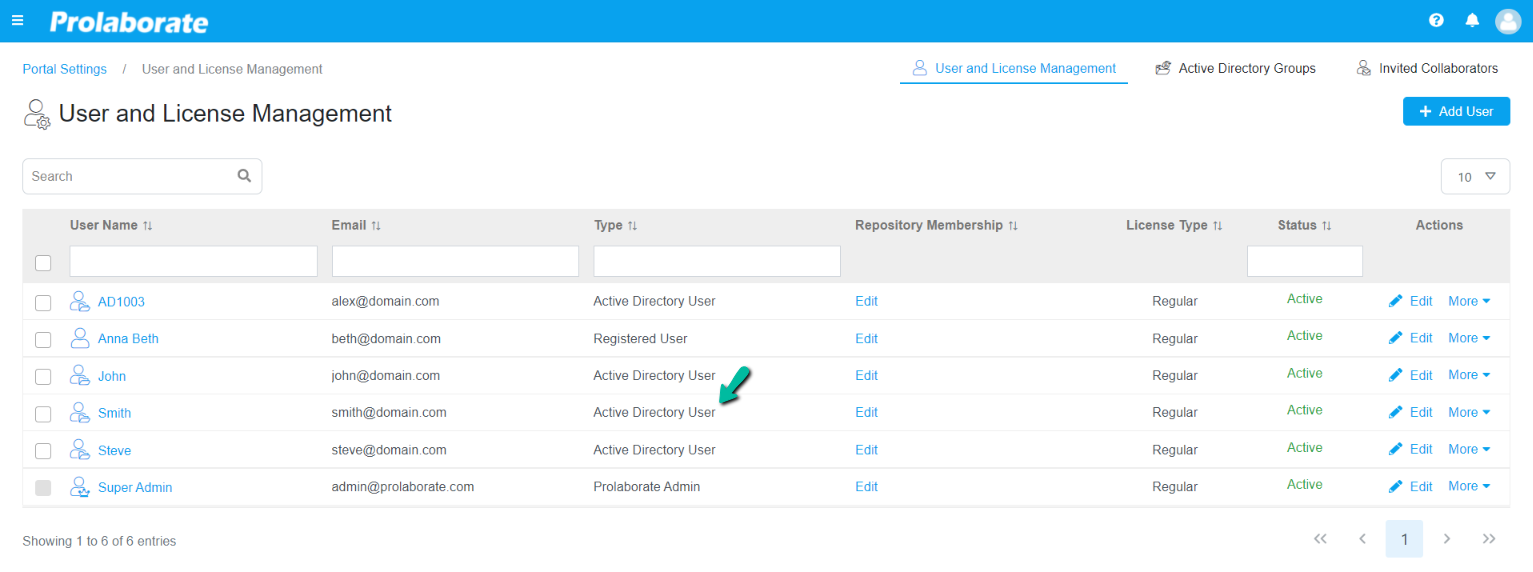
Upon adding the user through Active Directory User, they will be listed as Active Directory User on the Users page.
Below is the screenshot which shows the user who has been added through Active Directory User.
Steps to Add Active Directory Users at Repository Level
To add users at the repository level, select the repository in which you want to add the users.
Click on Menu > Users.
On landing the page click on Add Users, and when the form opens click on Add Active Directory User.
Now select the active directory from the active directory domain dropdown list and then choose Users.
Select the folder Users from the active directory browser.
Now choose the users you want to add and then click on Add Users. While adding users you cannot choose users who have been already added as a user at the application level.
Below is the screenshot which shows the steps in adding users.
Upon adding the user through Active Directory User, they will be listed as Active Directory User on the Users and License Management page.
Below is the screenshot which shows the user who is been added at the repository level through Active Directory User

How to Sync Active Directory Changes in Prolaborate
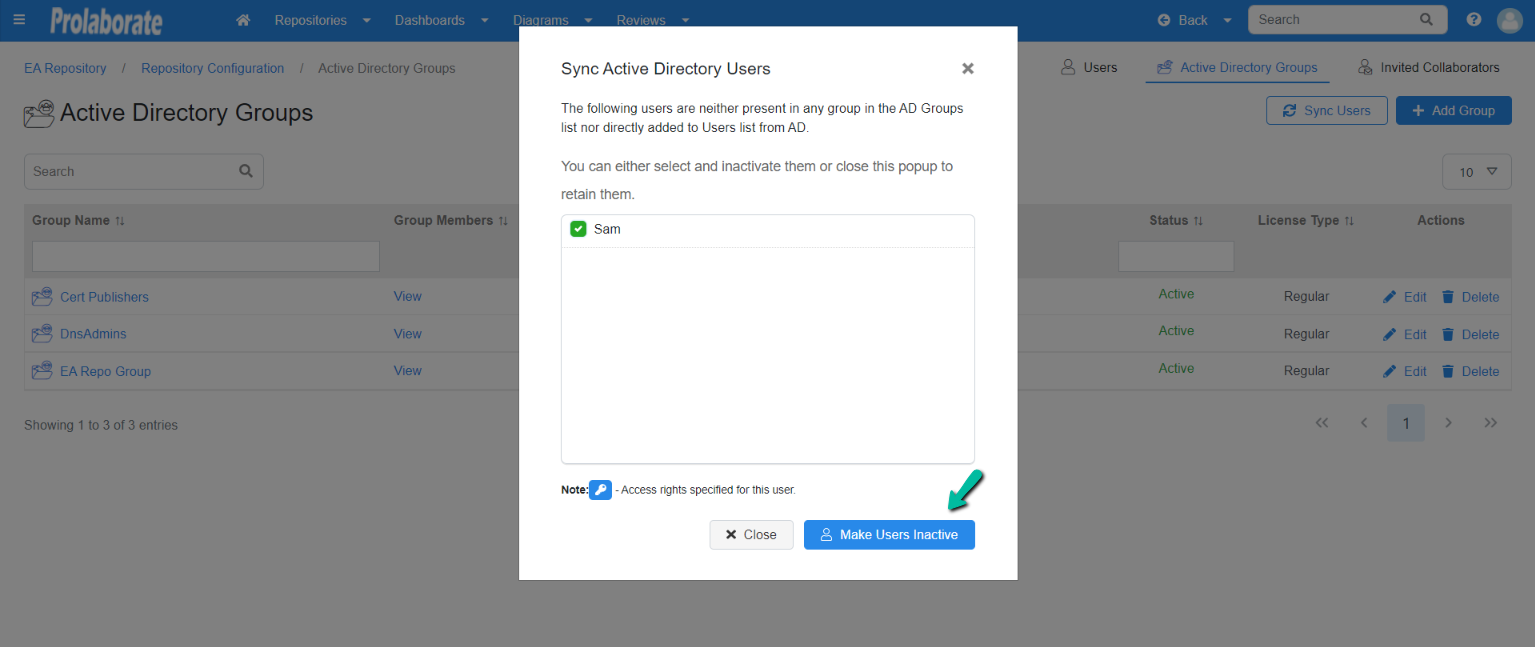
If a user is removed from the active directory but already exists as a Prolaborate user Sync Users feature will enable you to manage them either by allowing them to access Prolaborate or can restrict them from logging into Prolaborate.
Whenever you click on Sync Users this will prompt you the user list who has been deleted from the active directory or the active directory group.
Below is the screenshot which shows a user who has been deleted from the active directory but exists as a user in Prolaborate and upon clicking on Sync Users Prolaborate prompt the admin either to allow him to the user of Prolaborate or the access to Prolaborate can be restricted.
Manage Active Directory
To manage the active directory, click on Menu > Active Directory Single Sign On. Landing in the Active Directory Single Sign On the page lists all the existing active directory domains. On this page, you can perform the following functionalities.
Steps to Edit Active Directory Domain
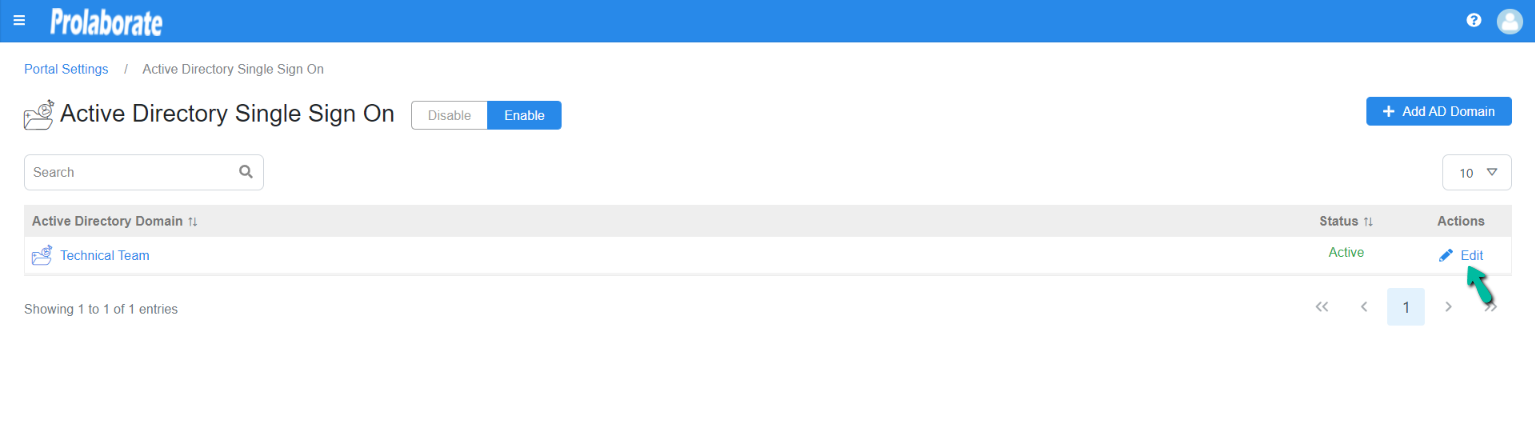
To edit the active directory domain, click on the Edit icon, you will then be able to edit the details of the active directory.
Below is the screenshot which shows the Edit icon.
How to Disable Active Directory?
You can use this feature to restrict the user from signing in through Active Directory Single Sign On.
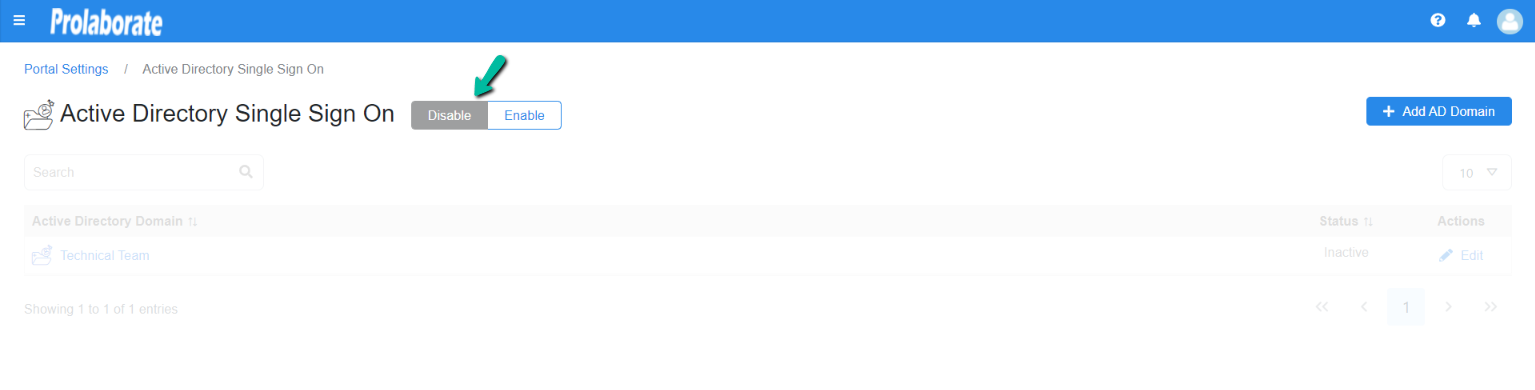
To disable the active directory, you can toggle the Disable/Enable button.
Below is the screenshot which shows the Disable/Enable button in the Active Directory Single Sign On page is toggled to Disable.
How License Consumption works for Active Directory Users?
When you add users through Active Directory Users the license count will be reduced instantly.
When you add user groups through Active Directory Groups, then the license count will get reduced only when the user in the group logs in using the credentials.
For instance, if a group has five members and out of five only three members have logged in then the license will reduce only to three and not five.
When a user group is added through Active Directory Groups and whenever the user group in the active directory is updated with new members then the users will automatically get updated in the user group in Prolaborate.
Login to Prolaborate
Once the AD Users/Groups are added to Prolaborate, the users can login using their Active Directory credentials.
Note:
- that they should use only their samaccountname to login into Prolaborate