
Modeling Languages
You can simplify Enterprise Architect MDG Technologies using Prolaborate. Prolaborate lets you create custom forms to cater to different users. You can choose the right mix of attributes to design user specific forms. This helps you to maximize relevance and minimize the information overload.
This user guide will cover the following workflows:
- Set Default Attributes
- Add Modeling Languages
- Configure Modeling Language Profiles
- Customize Forms
- Set Application Modes
- View the Result of Configuration
- Manage Modeling Languages
- Manage Custom Attributes
Note: Settings in Modeling Languages will impact all the users in the Repository.
Set Default Attributes
The first and foremost setting to define are the set of Basic Attributes which you want your users to see by default. You can set the default basic attributes for
- Artifacts
- Connectors
- Class Attributes
- Class Operations
To do it, click on Menu > Modeling Languages and select any one of the options from the dropdown as shown in the screenshot.
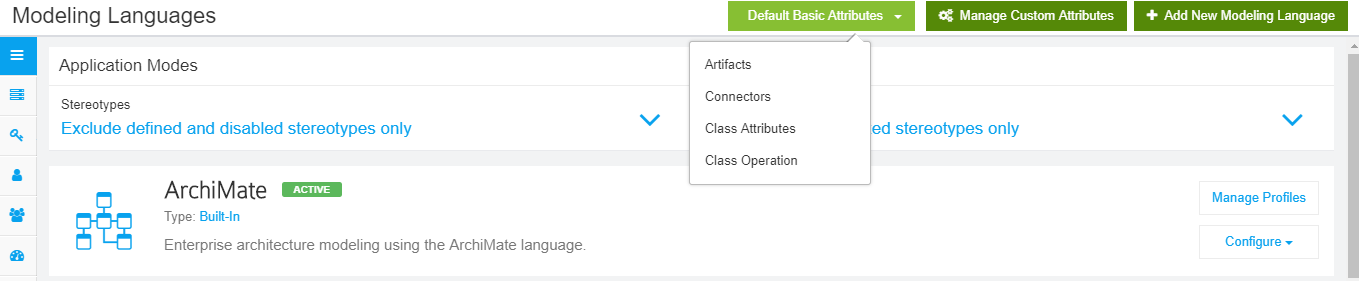


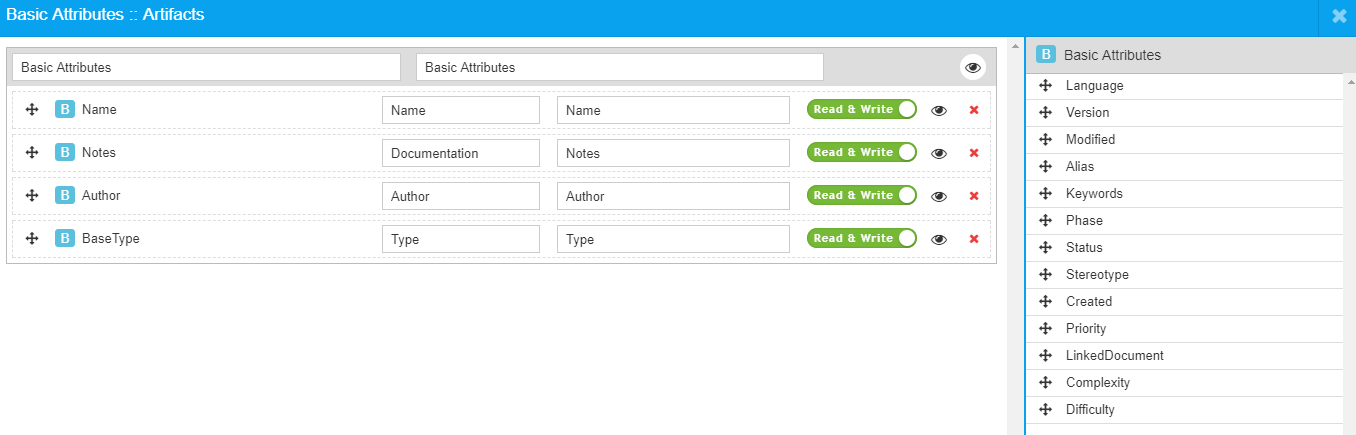
Let’s select Artifacts. As you can see all the basic attributes of an element in Enterprise Architect are present here. You can pick and choose the attributes you want your users to see by default.
As per the configuration in the screenshot below, your users will see Name, Notes, Author, and BaseType for all the elements which have Type other than Connector.
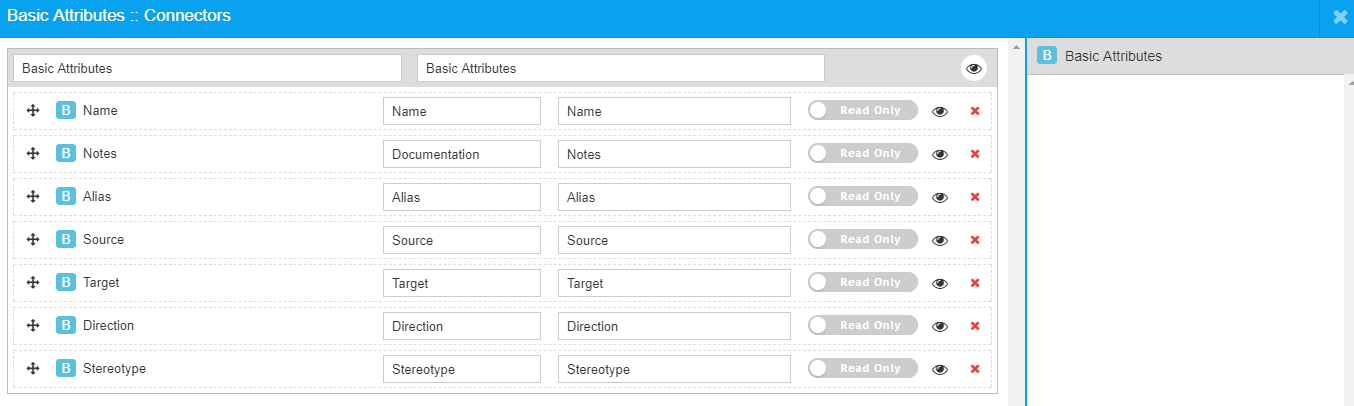
In a similar way, you can configure the default Basic attributes for Connectors, Class Attributes and Class Operations.
Note: These settings will not apply in a retrospective manner. They will apply only to new profiles and newly uploaded MDGs.
Add Modeling Languages
Modeling Languages or MDGs form the core of Enterprise Architect. In the Modeling Languages page, click on Add New Modeling Language:
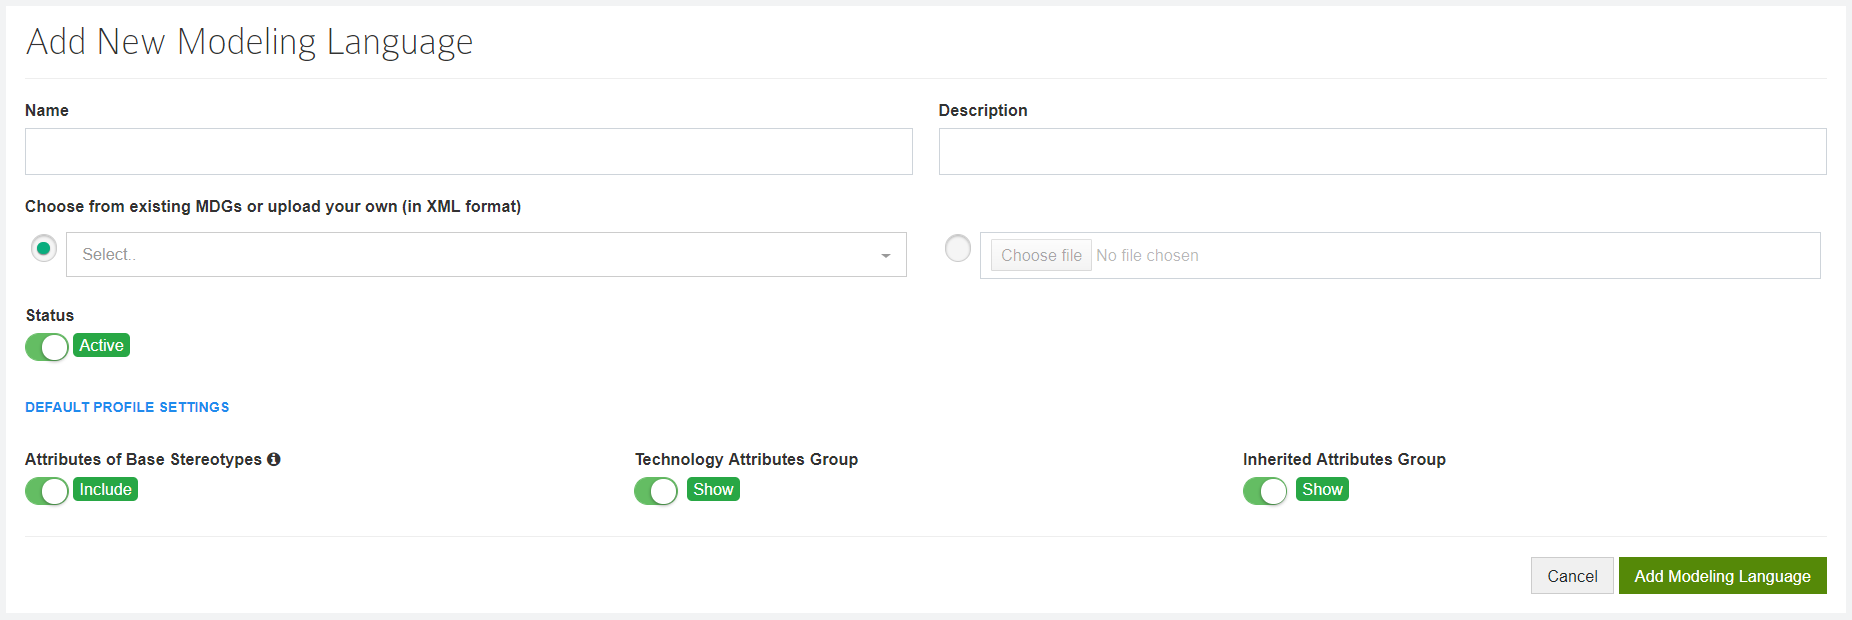
Please fill the form as per instructions below:
| Field | Description |
|---|---|
| Name | Enter the name of the MDG Technology |
| Description | Give a description explaining its purpose |
| Choose from existing MDGs or upload your own (in XML format) | Chooose from the existing list of MDGs or upload a valid MDG Technology file. Please use Edit option if you want to upload an updated MDG file as you cannot add the same MDG technology file again. |
| Status | Do not change it unless you don’t want this to be used anywhere in Prolaborate. |
| Attributes of Base Stereotypes | If this setting is enabled, MDG Technologies of Base Stereotypes needs to be present already inorder to add the current MDG. For example, if you have a MDG file based out of BPMN 2.0, BPMN 2.0 needs to be preset already in Prolaborate and only then you can upload your MDG file. Disable this setting if you don’t want to bring in inherited attributes to the form. Please note this cannot be undone. |
| Technology Attributes Group | If this setting is set to Show, Technology Attributes will be visible in Properties Window of all the Stereotypes in this MDG. Disable this flag if you think your users need not see the Technology attributes. This can be changed later. |
| Inherited Attributes Group | If this setting is set to Show, Inherited Attributes will be visible in Properties Window of all the Stereotypes in this MDG. Disable this setting if you think your users need not see the Inherited attributes. This setting will be applicable only if “Attributes of Base Stereotypes” setting is enabled. |
Once you have filled up all the details, click on Add Modeling Language.
In the upcoming section, we will see how these settings impact the Form Configuration of Stereotypes in the MDG.
Configure Modeling Language Profiles
Different kinds of forms can be created for the same stereotype using Profiles. A profile will have a specific form configuration. It helps you create multiple views which you can switch as per your requirement.
To add a profile, click on Manage Profiles on a Modeling Language.

List of Profiles popup opens up which shows the all the profiles that are present already. There will be a Default Profile present by default if you are opening it for the first time.
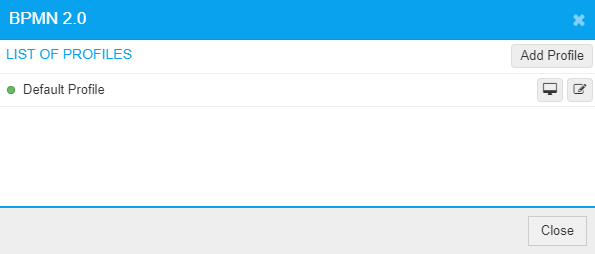
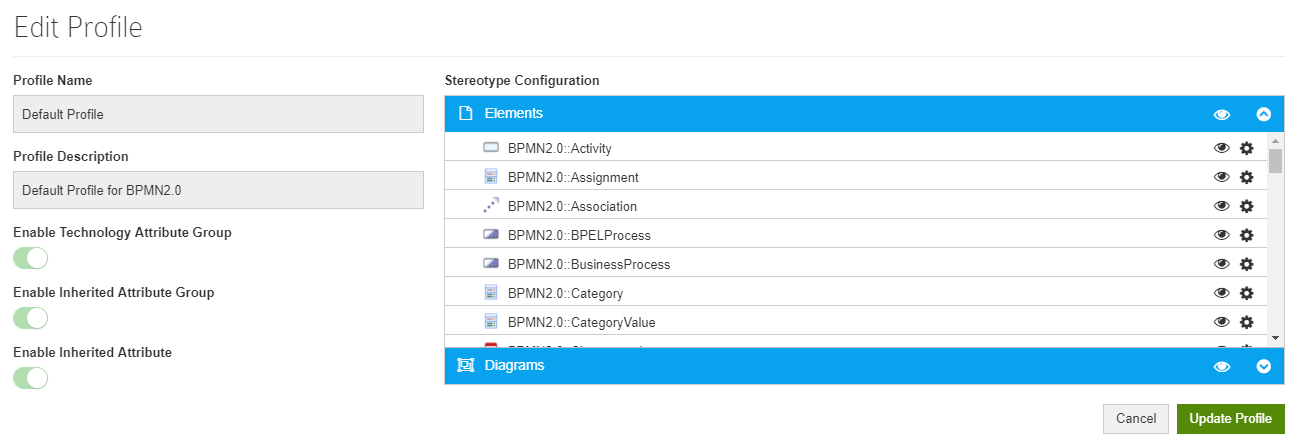
Click on Edit icon in the popup and Edit Profile page will open. This page will list all the stereotypes, Elements and Diagrams, belonging to this MDG (In this case, it is BPMN 2.0). You cannot change the toggles related to Attributes from a profile which you have already created. You need to create a new profile if you want to change them.
Show or Hide Stereotypes
If you think there are too many items in the EA Repository Browser and you find it hard to traverse the browser, you can hide few stereotypes which you don’t use regularly. Click on the eye icon to hide stereotypes from the Repository browser. This setting will depend on the Application Modes > Stereotypes setting explained in subsequent section.
Note: This setting will just hide the items. Access permissions will not be impacted.
Customize Form of Stereotypes
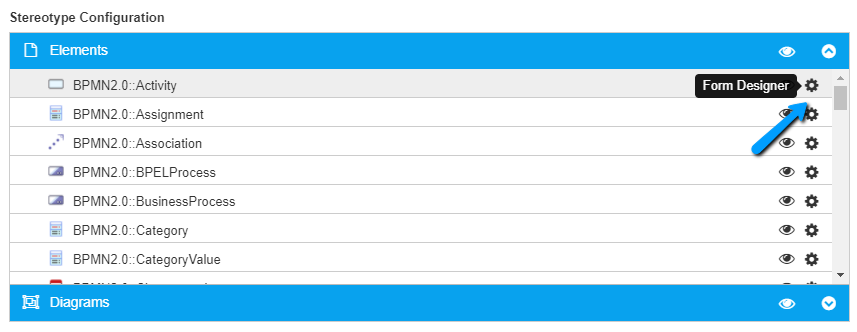
Before we see how to customize the form of stereotypes, let’s see how the 3 toggles, which we saw while adding a new modeling language, impacts the form configuration of Stereotypes. Click on Form Designer of a Stereotype.
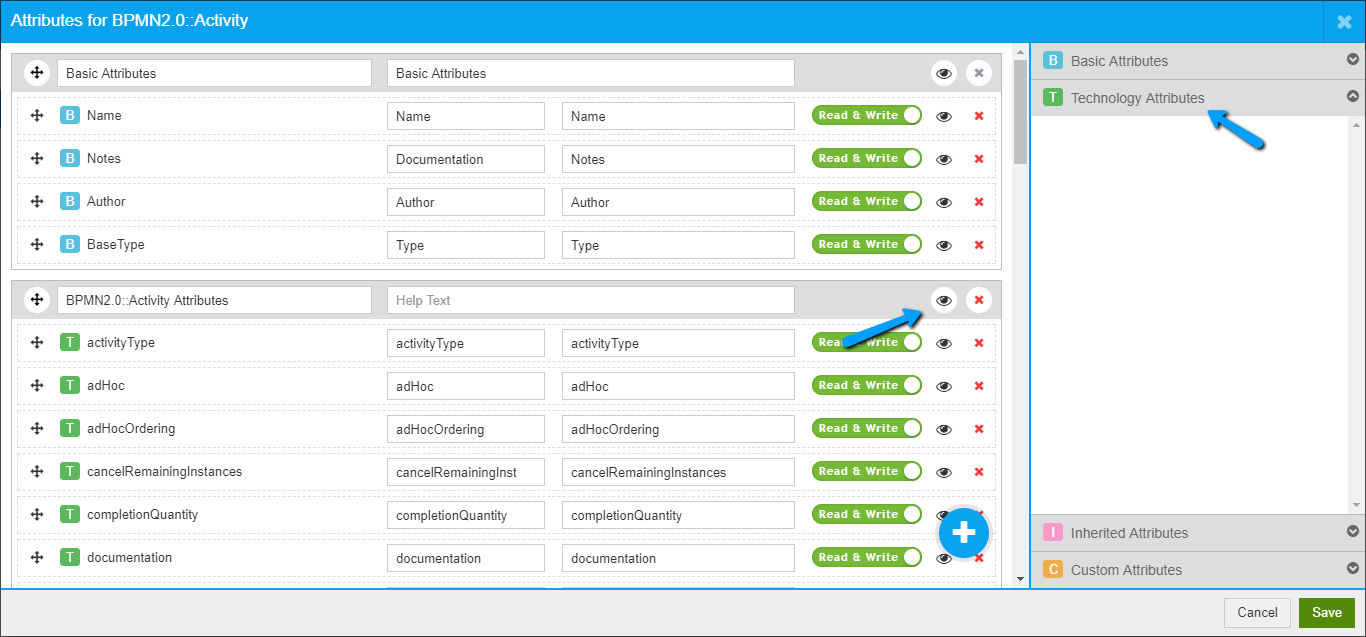
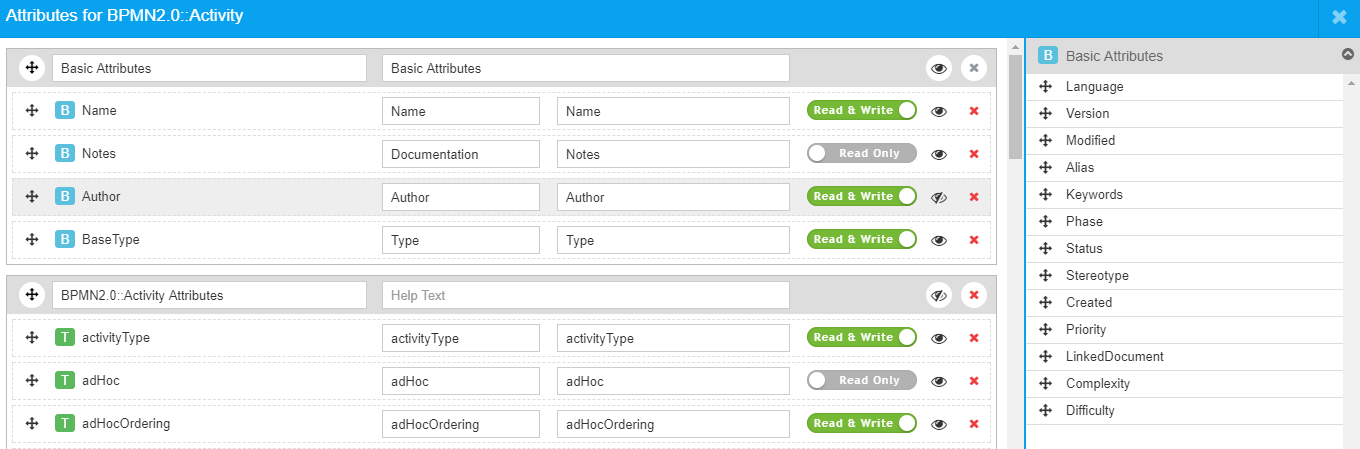
- Technology Attributes Group SettingIf you had set this setting to Show, the Technology Attributes for all the stereotypes (named as BPMN2.0 :: Activity Attributes for Activity) will be set to Show and all the users of Prolaborate will be able to see these Attributes when opening an BPMN2 Activity.
2. Attributes of Base Stereotypes SettingThe inherited attributes will be shown in the Form Designer only when you set this setting to Include. If you notice the screenshot below, the stereotype Choreography Model has been inherited from Collaboration Model and so, the attributes of Collaboration Model have been added here.
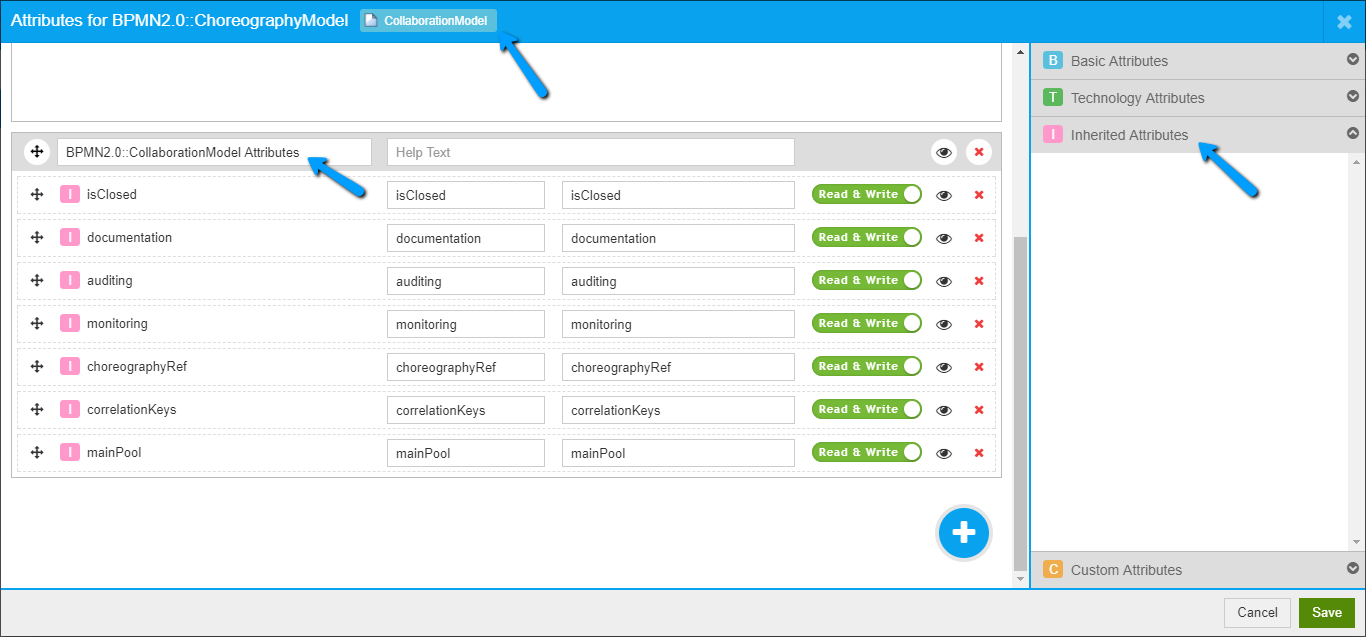
If you had set “Inherited Attributes Group “to Show, the Inherited Attributes section (named as BPMN2.0 :: Collaboration Model Attributes) will be set to Show and all the users of Prolaborate will be able to see these attributes when opening an BPMN2 Choreography Model.
In this section so far we have seen default form configuration based on settings. Now, we will see how to customize the form further as per your requirements.
You can do the following from Form Designer page
- Change the Name of the attributes
- Add a Help Text to the attributes if your users need guidance
- Show or hide attributes
- Add attributes by drag and drop
- Remove attributes
- Change organization level access. Please note if you change an attribute’s access to “Read Only”, nobody will be able to do it.
- Add or remove Groups and alter their details
Once you are done, click on Save in the Form Designer and Update Profile in the Edit Profile page.
Add Custom Attributes
Custom attributes section in the Form Designer page shows you the list of attributes that are created by you and your peers. You can drag and drop custom attributes to the form as well.
To create a new custom attribute, click on Manage Custom Attributes in the Custom Attributes section to bring up the List of Custom Attributes.

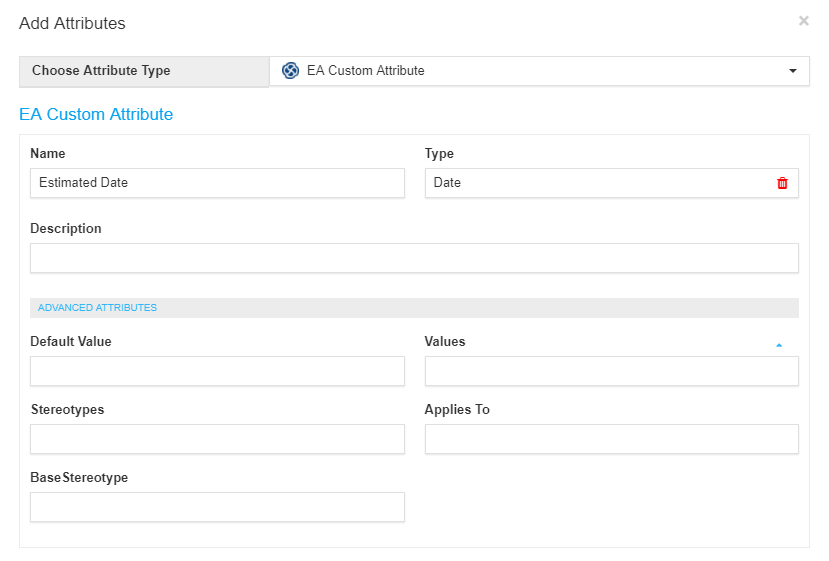
Click on Add and below form will open up. Select the Attribute Type as EA Custom Attribute, fill in the details as required, and click on Save. For help on Tagged values, please refer to the Documentation from Sparx Systems website.
Customize Form of Class Attributes
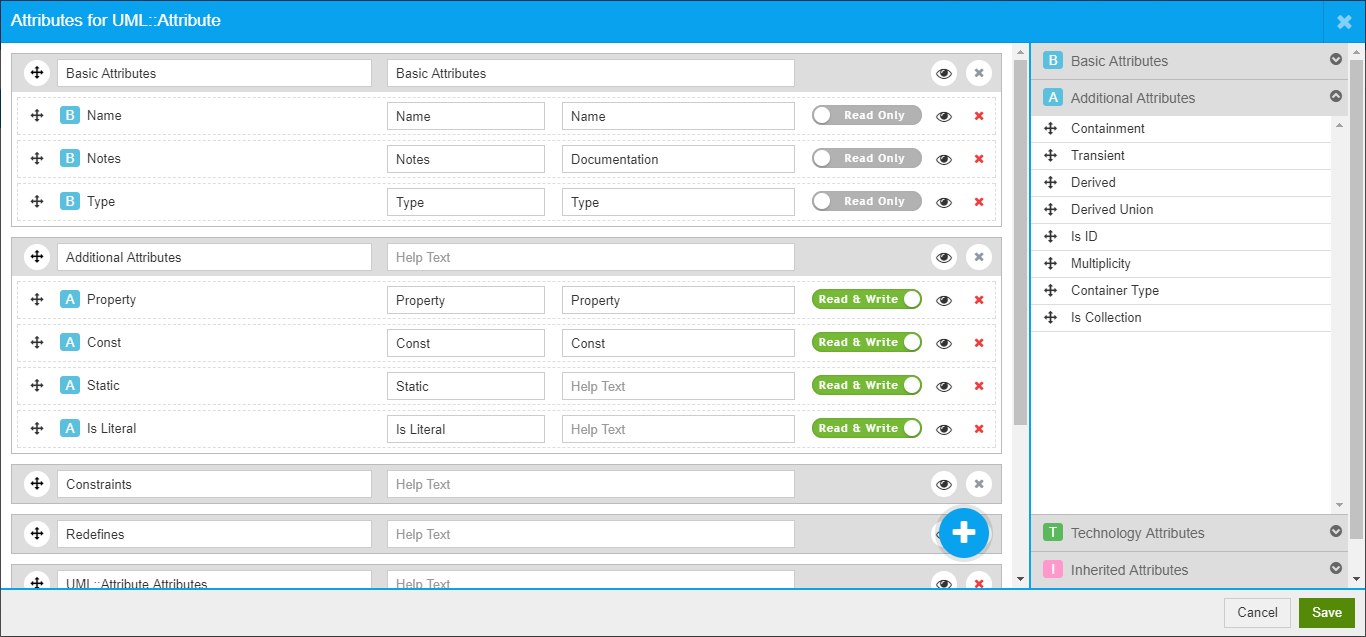
You can even customize the form of Attributes of a Class. Open the currently active Profile of Prolaborate MDG and select UML::Attribute. You can edit it in a similar way as how you edit a stereotype.
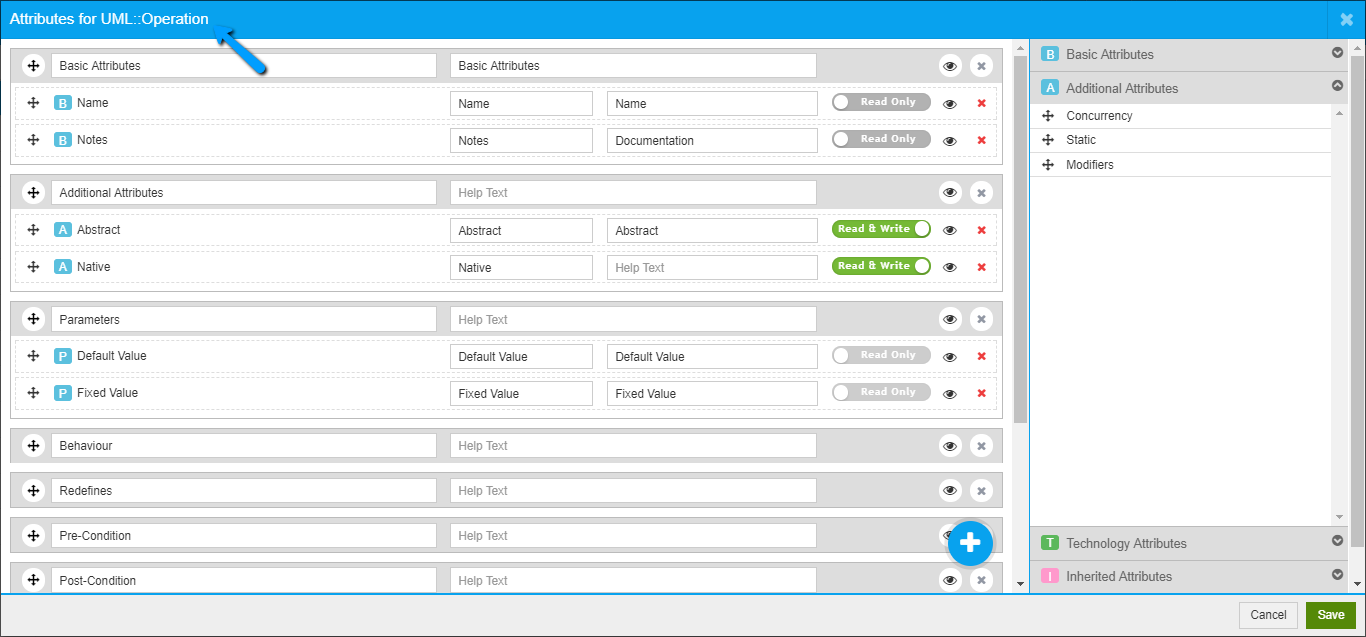
Customize Form of Class Operations
Form of Operations of a Class can also be edited in a similar way as above. Select UML::Operations and you will see its form as below.
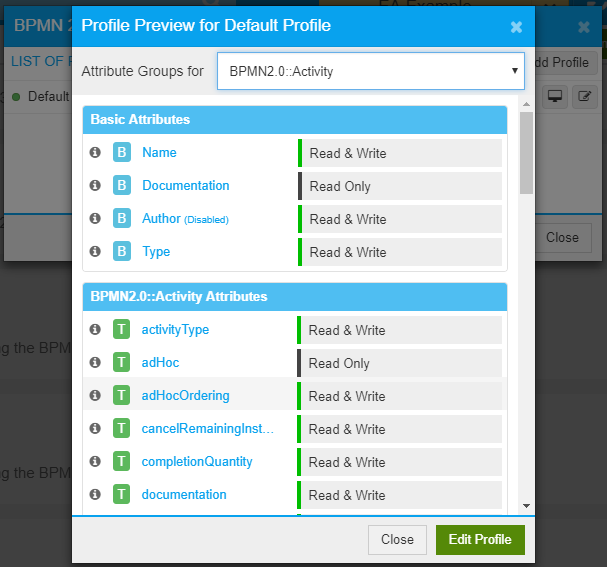
Preview a Profile
If you want to preview the changes made in a Profile, you can do so from a single view rather than by going to the form designer of each stereotype. Click on Preview icon from the List of Profiles popup. Select a Stereotype to view how it has been configured.
Please note the changes are same as what we did in the earlier section.
Add Profile
If you want an additional profile without altering the default, you need to do the following:
Click on Add Profile in the List of Profiles popup and Add New Profile page will open. Fill the details, configure stereotypes and their forms as described above.
Set Profile as Active
For the new Profile to take effect, you need to set that Profile as Active. To do it, click on “Set as Active” Icon in the List of Profiles popup.
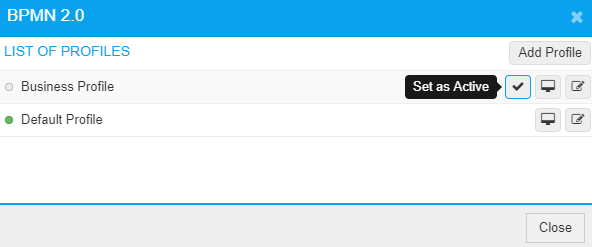
Note: The Set as Active option will be available only if the Modeling Language contains more than one profile.
Set Application Modes
You can set the Application Modes in the Modelling Languages page.
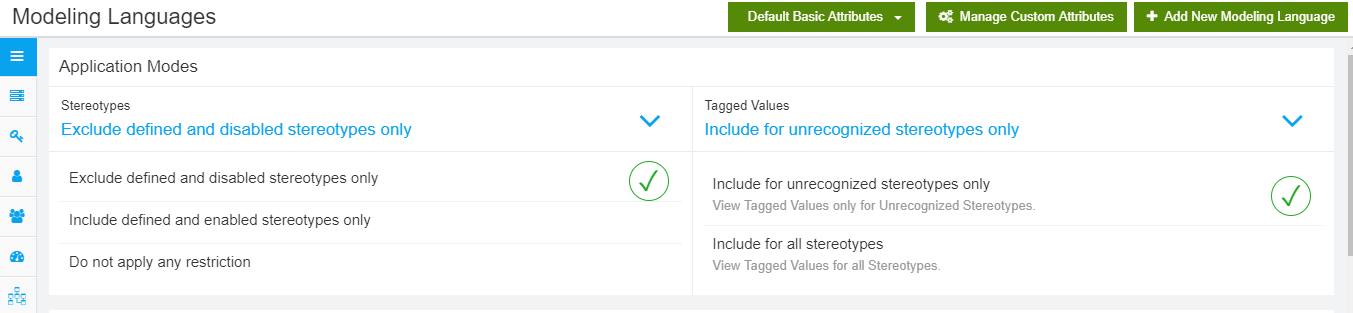
Stereotypes
Application Modes for Stereotypes help you in controlling the visibility of Stereotypes in the Repository browser.The application modes available are
- Exclude defined and disabled stereotypes only – Use this mode to see all the stereotypes from your Enterprise Architect model except for the ones which are hidden in the MDG Profile in Prolaborate.
- Include defined and enabled stereotypes only – Use this mode to see only those stereotypes which are defined in Prolaborate. Also, those stereotypes should not be hidden in the MDG Profile in Prolaborate.
- Do not apply any restriction – This mode shows all stereotypes ignoring Stereotype Configuration
Tagged Values
Application Modes for Tagged Values help you control the visibility of Tagged Values in the Attribute panel.The options available are
- Include for unrecognized stereotypes only – Use this mode to see Tagged values only for those Stereotypes which are defined in Prolaborate
- Include for all stereotypes – Use this mode to see Tagged values for all stereotypes
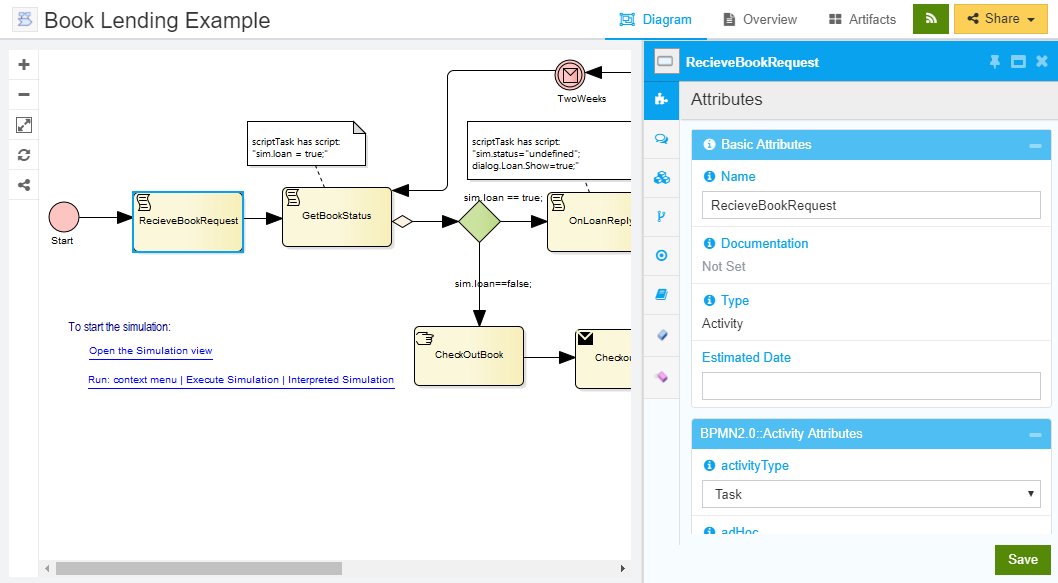
View the Result of Configuration
Now that we are done with the configuration, let’s see how it has impacted the form of a Stereotype (Say Activity). Please check the groups, attributes, the custom attribute. This is how the form will show up for all the users in your organization.
We have successfully completed configuring a form.
Manage Modeling Languages
Edit and Delete options are available under the Configure button in the Modeling Languages page.
If you have made some changes in the MDG file after you have uploaded in Prolaborate, you can just use the Edit option and upload the updated MDG file.
Note: This upload will not impact the Prolaborate settings which you have done in that MDG.
Manage Custom Attributes
Click on Manage Custom Attributes from Modeling Languages page to see the list of custom attributes.You can do the following from this page:
- Add custom attribute Click on Add and Add Custom Attributes form will open up. You can enter the details of click on Save to create a new attribute.
- Edit custom attributes
- View the details of attributes
- Export/Import custom attributes from other repositories
Please check out the following video tutorial on Modeling Languages: