
Setting up a SAML Application in Oracle
Prerequisites
Your Prolaborate site should have a valid SSL Certificate.
If you don’t have a SSL Certificate, you can create a self-signed certificate yourself. Please get in touch with Prolaborate team to know more about it.
Service Provider Configuration
To configure the Service Provider, click on Menu → SAML Settings.
From the top right of the page that opens, click on Enable SSO.
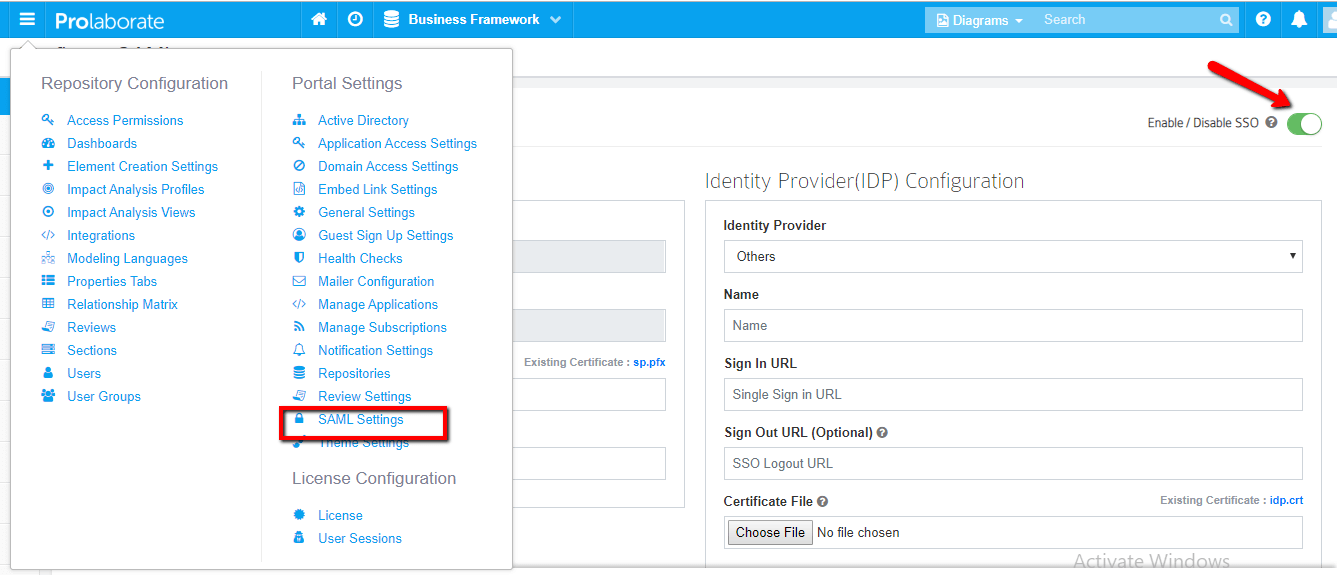


Under Service Provider Configuration,
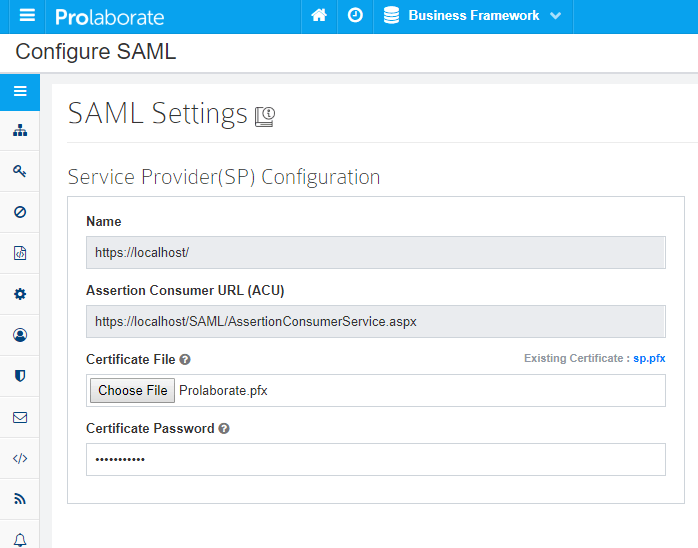
- Name and Assertion Consumer URL will be prefilled. Note that these URLs will be used as ‘ Entity ID’ and ‘‘Audience URI (SP Entity ID)’’ in Oracle configuration respectively.
- Choose the .pfx file of your SSL certificate
- Enter the Password of the .pfx file
Configuring Prolaborate in Oracle
The following sections will elaborate the steps involved in setting up Prolaborate in Oracle.
Create a new SAML Application
To create a SAML application, follow the below steps:
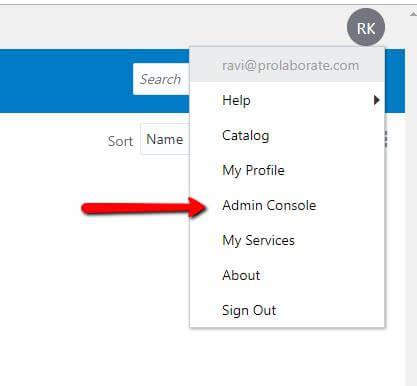
- Log in your Oracle account as a user and Click on Admin console
2. Click on Add Application button

3. In the Add Application window to click on SAML Application to create new application
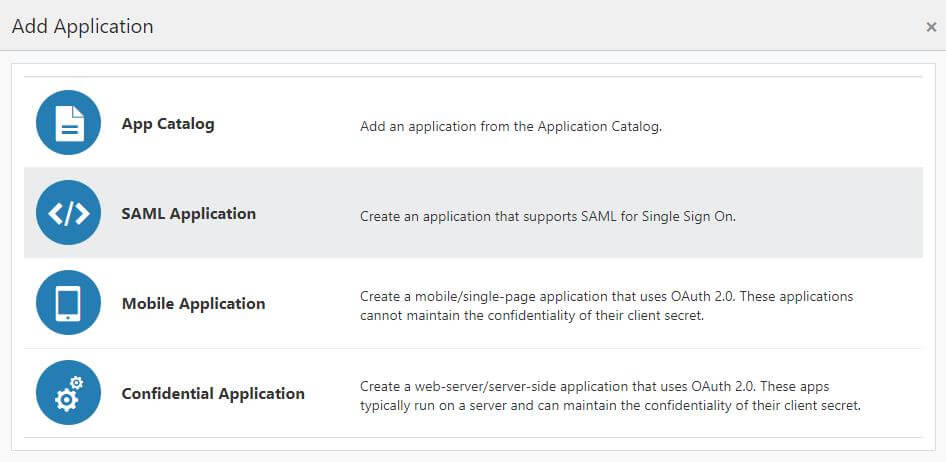
4. Add SAML Application page will appears.
App Details Tab
In the App Details section to provide values as per following instructions:
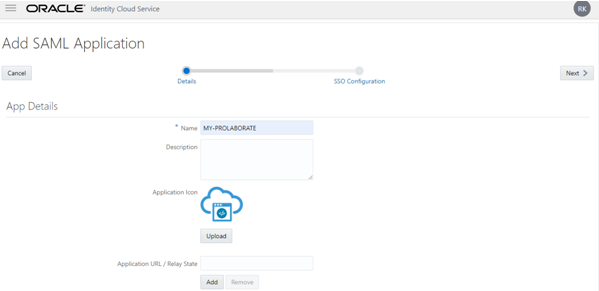
- In the Name field, enter your Application Name (say Prolaborate).
- In the Description field, enter fewer characters to provide a description of your Prolaborate.
- Click Upload to add an icon for your Prolaborate application.
- Application URL / Relay State field – You can leave these options.
- Click on Add to add App Links that are associated with the application. The Link window appears.
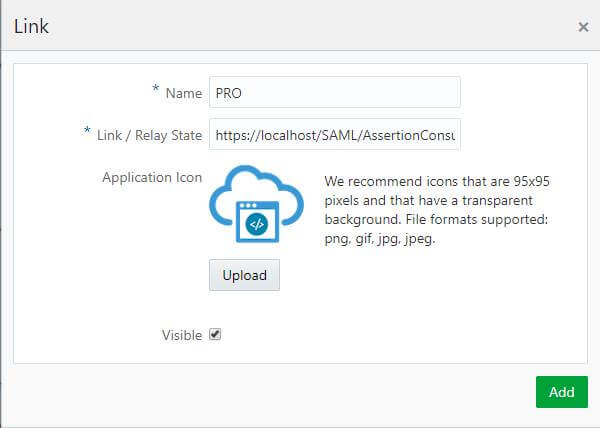
6. In the Link window to provide values for the following fields:
7. In the Name field, enter the App Link name.
8. In the Link field, enter the URL used to access the application.
9. Click Upload to upload an icon.
10. Select Visible check box if you want your application to appear automatically on each user’s My Apps page.
11. Click on Save.
12. In the Custom Login URL you can leaves this field blank.
13. In the Custom Error URL you can leaves this field blank
14. In the Linking callback you can leaves this field blank.
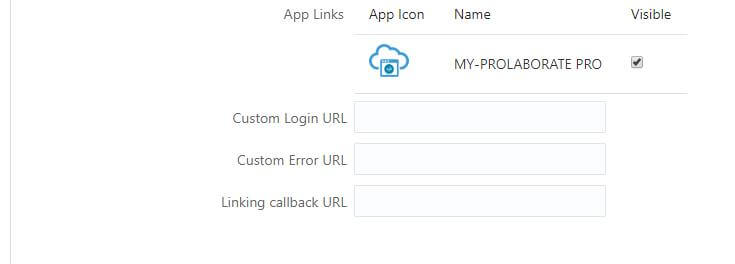
15. In the Display Settings section to enable the User can request access and click on Next at top right side of the page

SSO Configuration Tab
Click on SSO Configuration Tab to define SSO attributes.
- In Step 1, General section of the SSO Configuration

In the General section of the SSO Configuration page, define the following:
- Fill ‘Entity ID’ and ‘Assertion Consumer URL’ fields from Prolaborate Service Provider Configuration as stated above (In section Service provider Configuration).
- NameID Format: Select the type of format to use Email address. The service provider and the identity provider use this format to easily identify a subject during their communication.
- NameID Value: Select the NameID Value as Primary Email to identify the user that is logged in.
- Signing Certificate: Upload the .cer certificate file is used to encrypt the SAML assertion.
2. In Step 2, Advanced settings section of the SSO Configuration
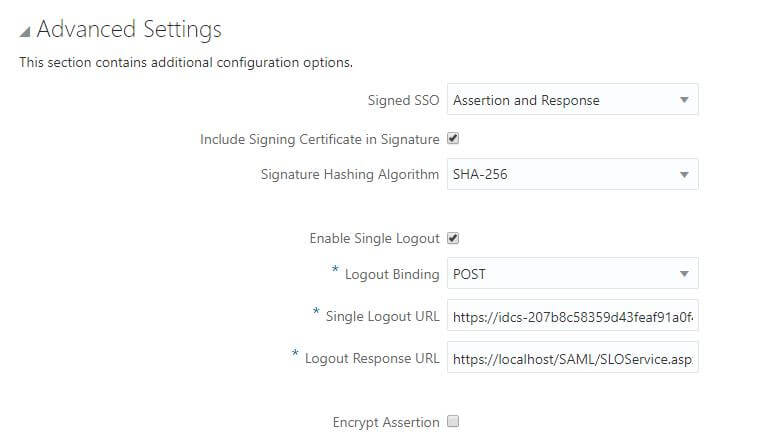
Advanced Settings section of the SSO Configuration page, define the following:
- Signed SSO: Select Assertion and Response option from drop down list at Signed SSO field and Enable Include Signing Certificate in Signature .
- Enable Single Logout: Select to configure SAML single logout. Single logout enables a user to lot out of all participating sites in a federated session almost simultaneously. This check box is selected by default.
- Logout binding: Select log out request is sent as POST (transported in HTML form-control content, which uses a base-64 format). This list box appears only if you select the Enable Single Logout check box.
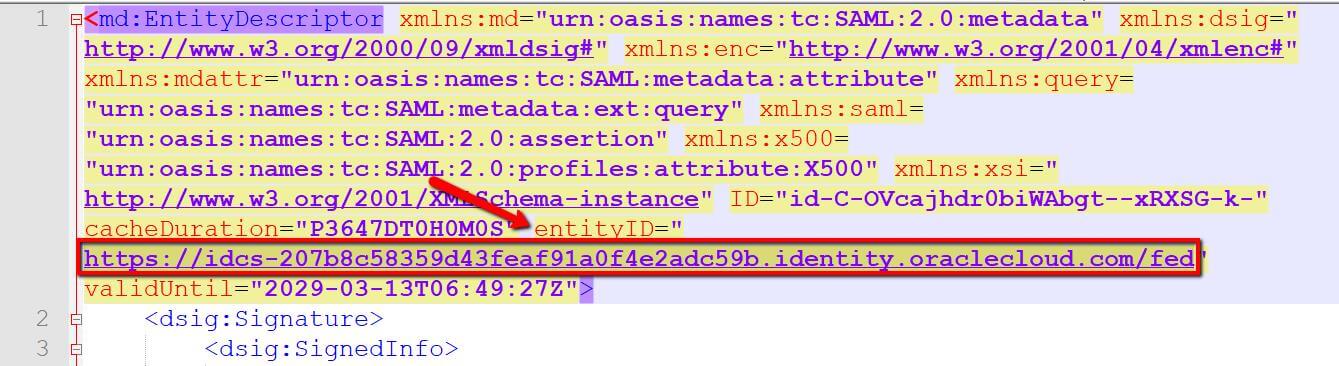
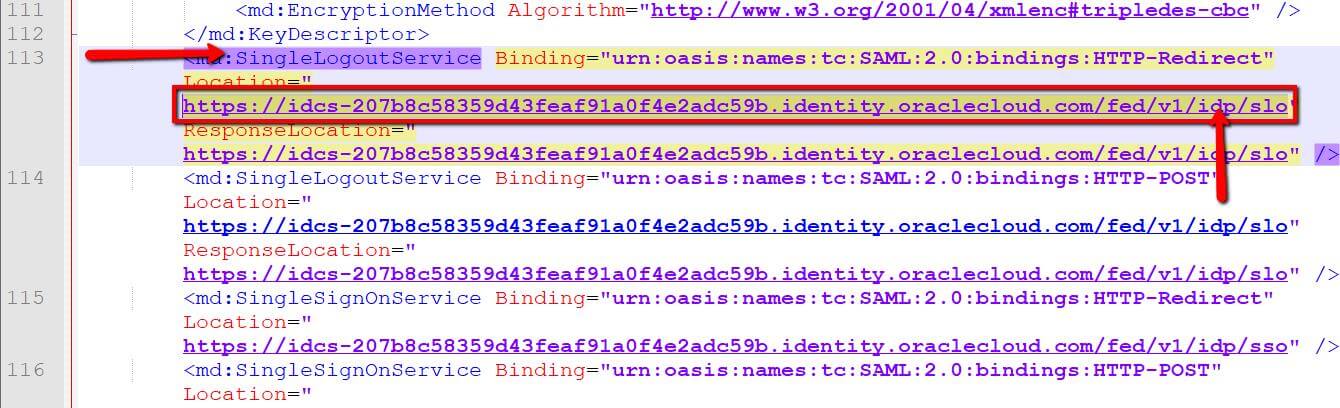
- Single Logout URL: Open the Identity Provider Metadata Xml file to copy the Single Logout Service URL with SP configuration like below image.
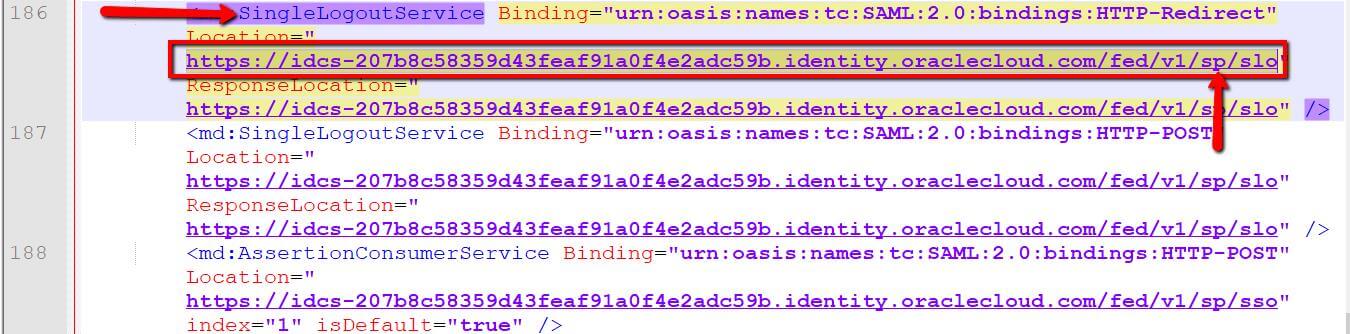
5. Logout Response URL: Enter the URL from Service Provider Name field of your Prolaborate with this URL ?/SAML/SLOService.aspx.
3. In Step 3, Attribute Configuration section of the SSO Configuration
- Attribute Configuration: Expand Attribute Configuration on the SSO Configuration page to add user-specific and group-specific attributes to the SAML assertion. Click on plus(+) symbol to add the attributes.
- Attribute Configuration should be configured as below:
| Attribute Name | Value |
|---|---|
| firstname | First Name |
| lastname | Last Name |
| username | User Name |
| Primary Email |
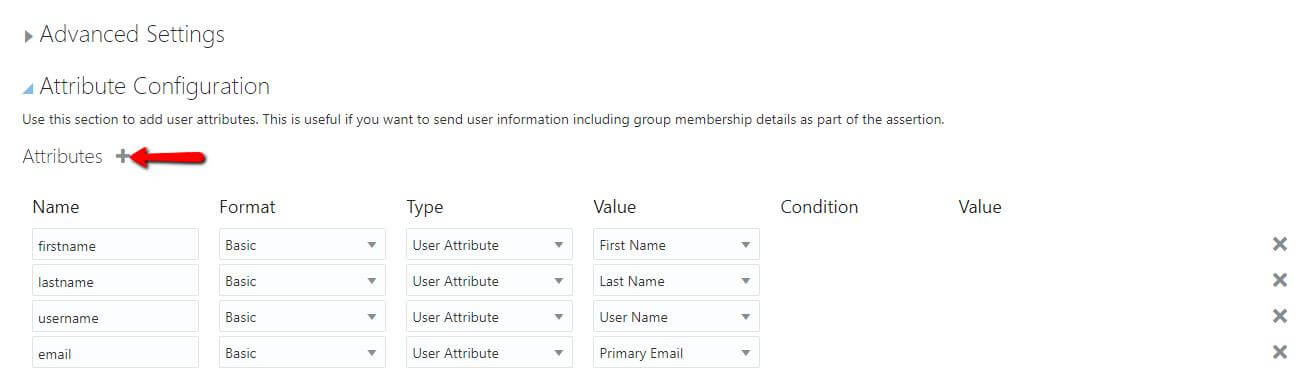
2. Enter the Attribute Configuration details and Click on Save.
4. In Step 4, Download the certificate file
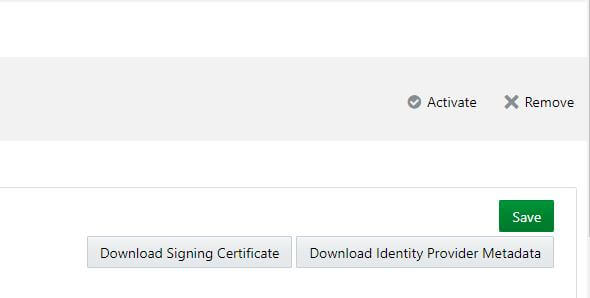
- Download Identity Provider Metadata: Click on Download Identity Provider Metadata to download the metadata file in XML format.
- Download Signing Certificate: Click on Download Signing Certificate to download the certificate file in PEM format.
- Click on Activate to activate the Prolaborate application.
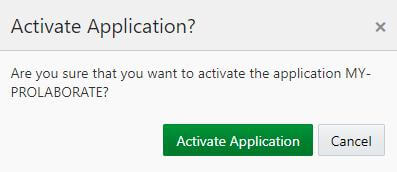
4. In Activate Application window appear and click on Activate Application.
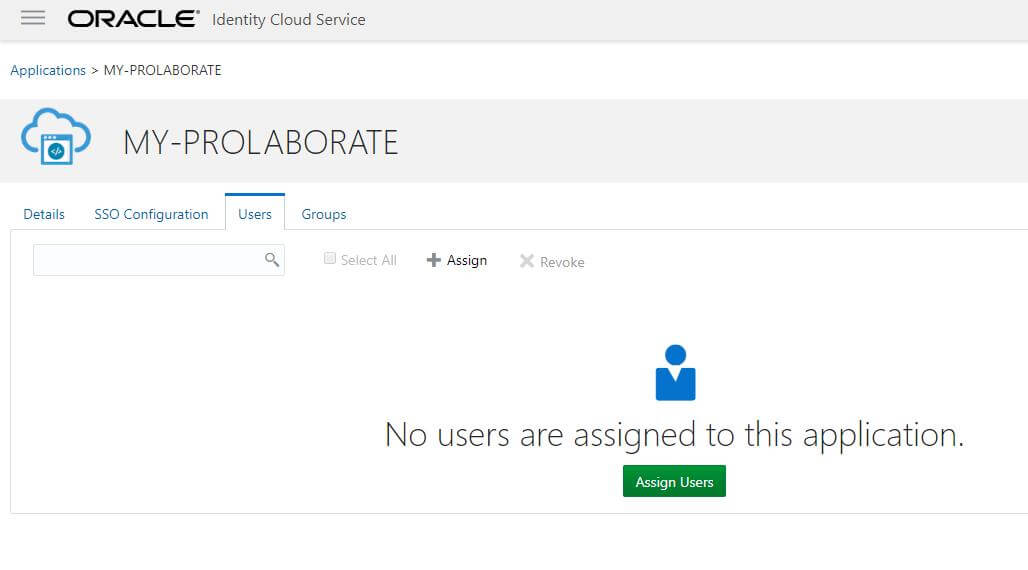
Users Tab
Click on Users tab in your Oracle Account to assign the user
- Click on Assign Users button.
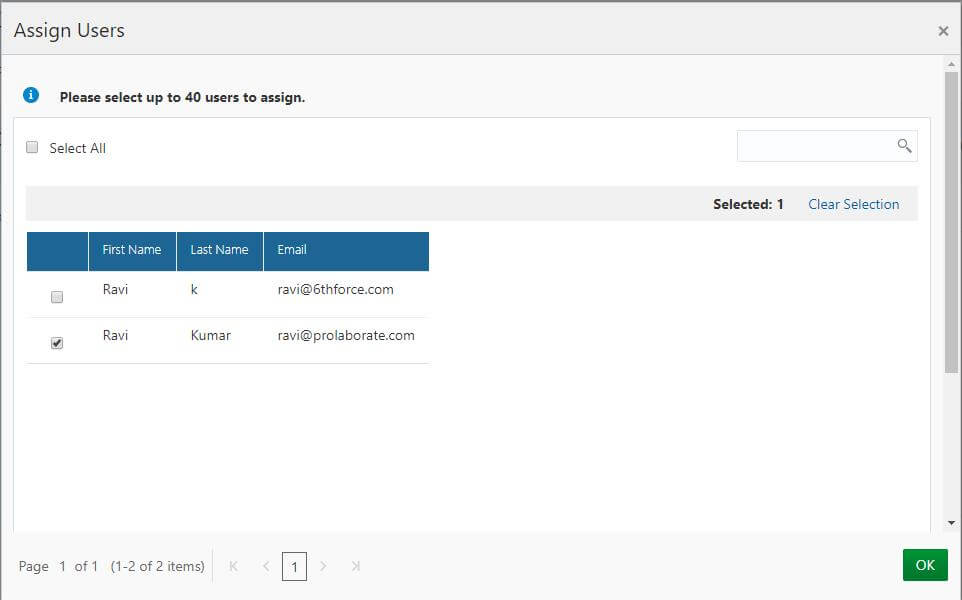
2. Select the users to whom to give access to Prolaborate and Click Ok.
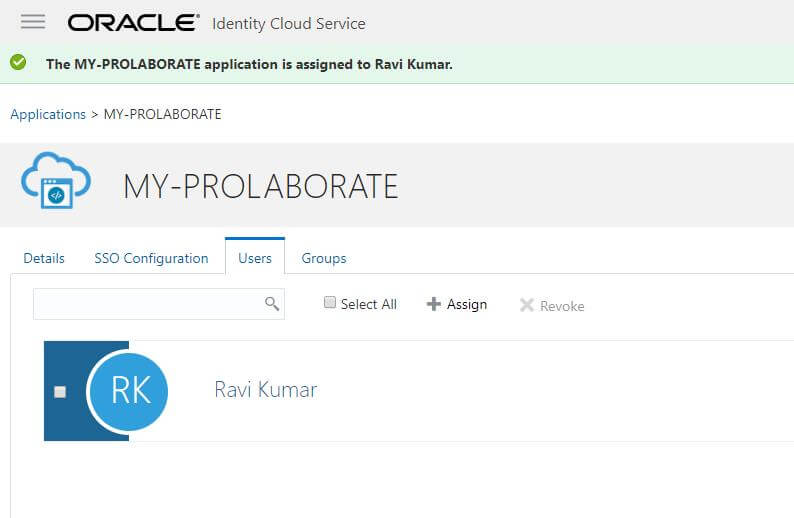
3. The users whom we have selected will now show up in Users tab.
Identity Provider Configuration
Go back to Prolaborate, click on Menu → SAML Settings.

Fill the Identity Provider Configuration as per the instructions below:
- Select your Identity Provider as Others.
- Fill Name using Identity Provider Entity id availed from from Identity Provider Metadata Xml file (Refer to section SSO Configuration tab).
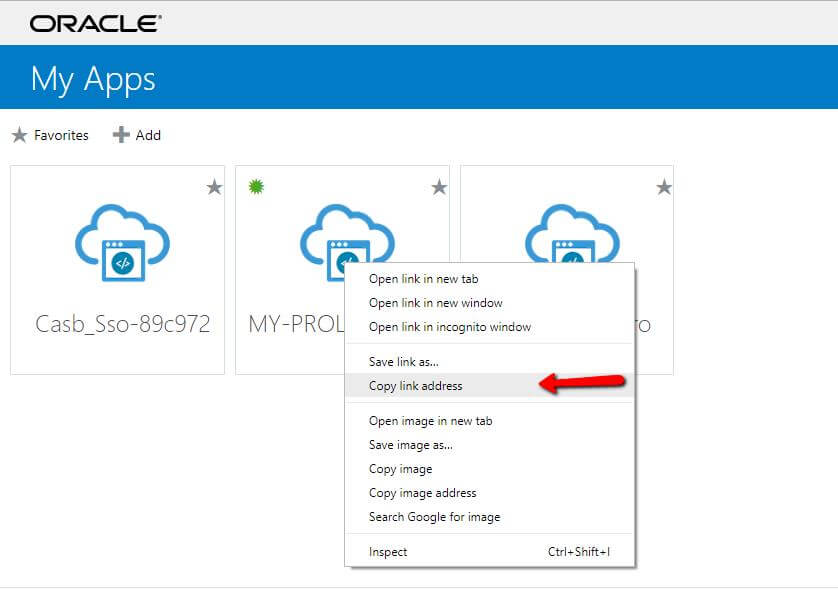
3.Fill Sign In URL using Your SAML application link address at Oracle as per instruction below.
- Open Prolaborate application in an Oracle user account and copy the application link address then paste to Sign in URL field in your Prolaborate Identity provider configuration.
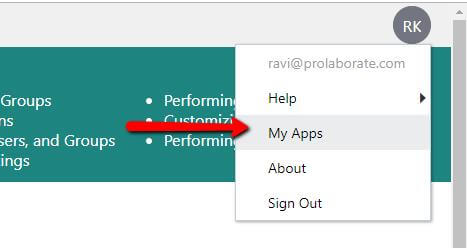
- Click on My Apps to log in your Oracle account as a user with User Sign in URL.
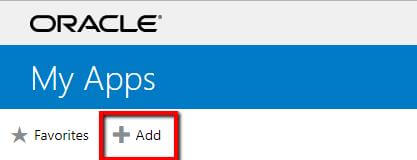
3. Click on Add.
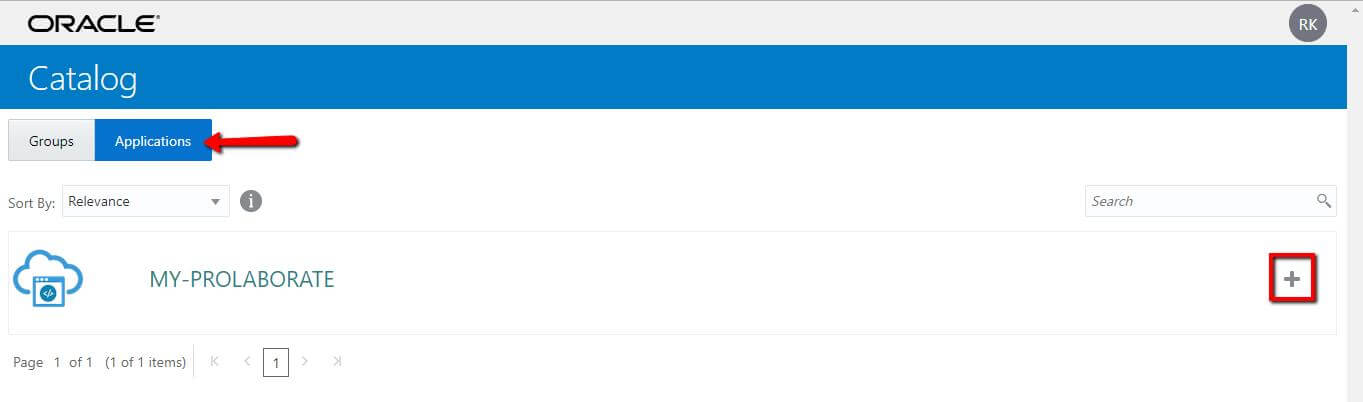
4. Select Application and Click on Add (+) symbol to your Prolaborate application.
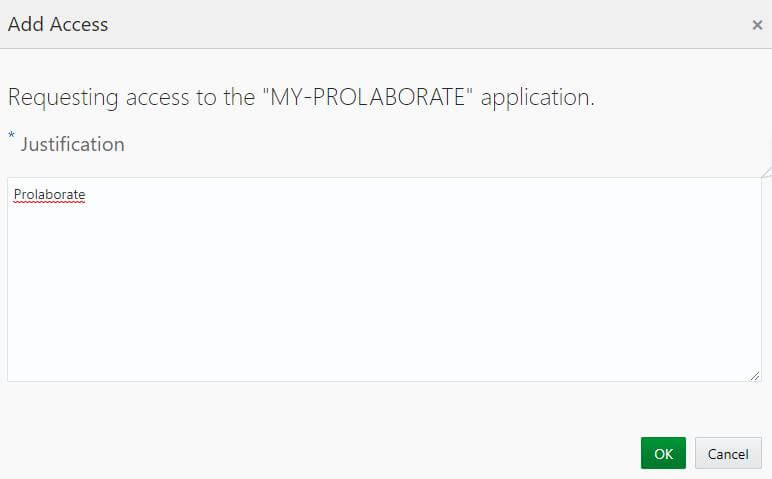
5. Give justification as Prolaborate and click on OK.
6. Copy your Prolaborate application link address.
7. Paste the URL to Identity Provider Configuration Sign in URL field of your Prolaborate Identity Provider configuration.
4. Fill Sign Out URL using Identity Provider Single Logout Service availed from from Identity Provider Metadata Xml file (Refer to section SSO Configuration tab).
5. Choose the converted .cer Certificate file from Oracle Configuration (Refer to section SSO Configuration tab). If you don’t know how to convert it, then follow the below instructions.
- Open ssl.exe (32bit) and run a below query in openssl command prompt.
- The .pem file placed at open ssl bin folder.
- openssl x509 -outform der -in your-cert.pem -out your-cert.crt.
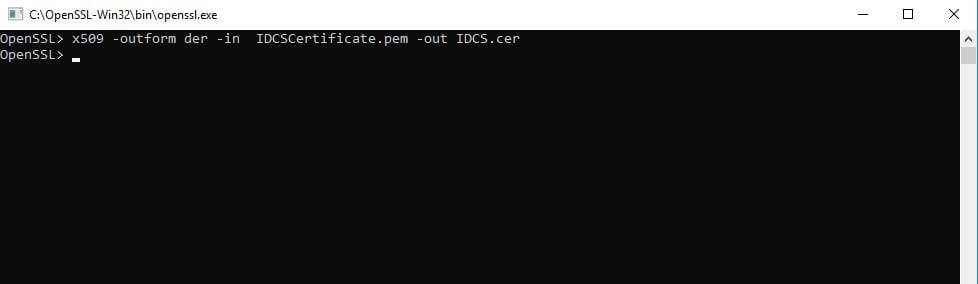
4. The Converted file to be saved at same open ssl bin folder.
Enter the Identity Configuration fields in your Prolaborate SAML Settings and Click on Save.
Default Access Control Profile
Click on Manage Profiles to create a new profile.
Click on Create Profile.
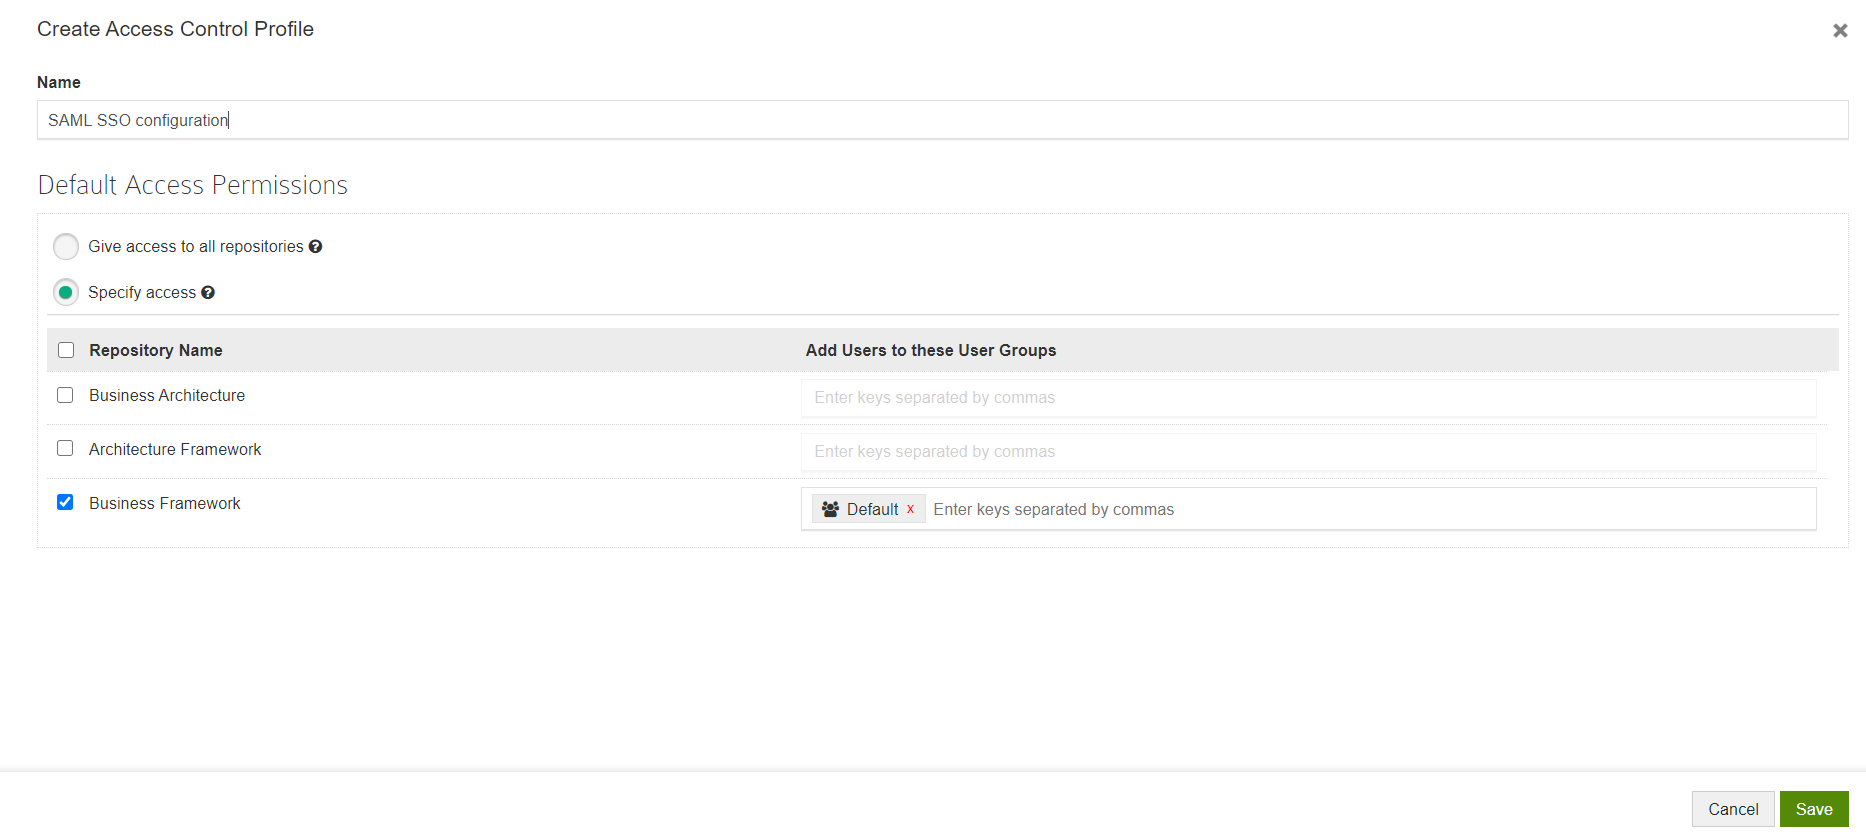
Give a Name to the Profile and configure permissions.
This is the permission that will be provided to all the users logging into Prolaborate using their SSO credentials.
You can choose any one of the following options:
- Give access to all repositories – Any user logging with their SSO credentials will be given access to all repositories
- Specify access – Any user logging with their SSO credentials will be added to the user groups you have specified after selecting the repositories
Click Save.
Now, go back to SAML Settings page.
Select the newly created profile and click Save.
Log in with oracle Credentials
Once the configuration is done, your users will start to see a new button on the login page called Login with SSO .
When they click on Login with SSO,
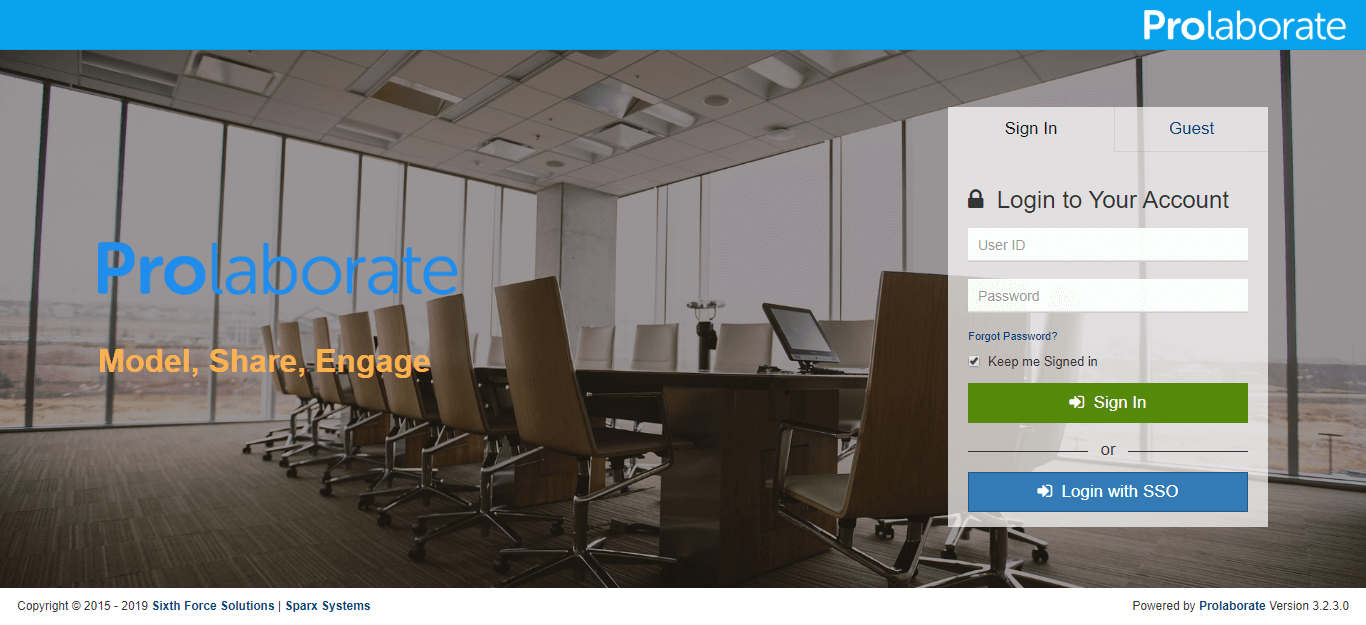
They will be redirected to an URL as per configuration. They can then give their Oracle credentials to login to Prolaborate.
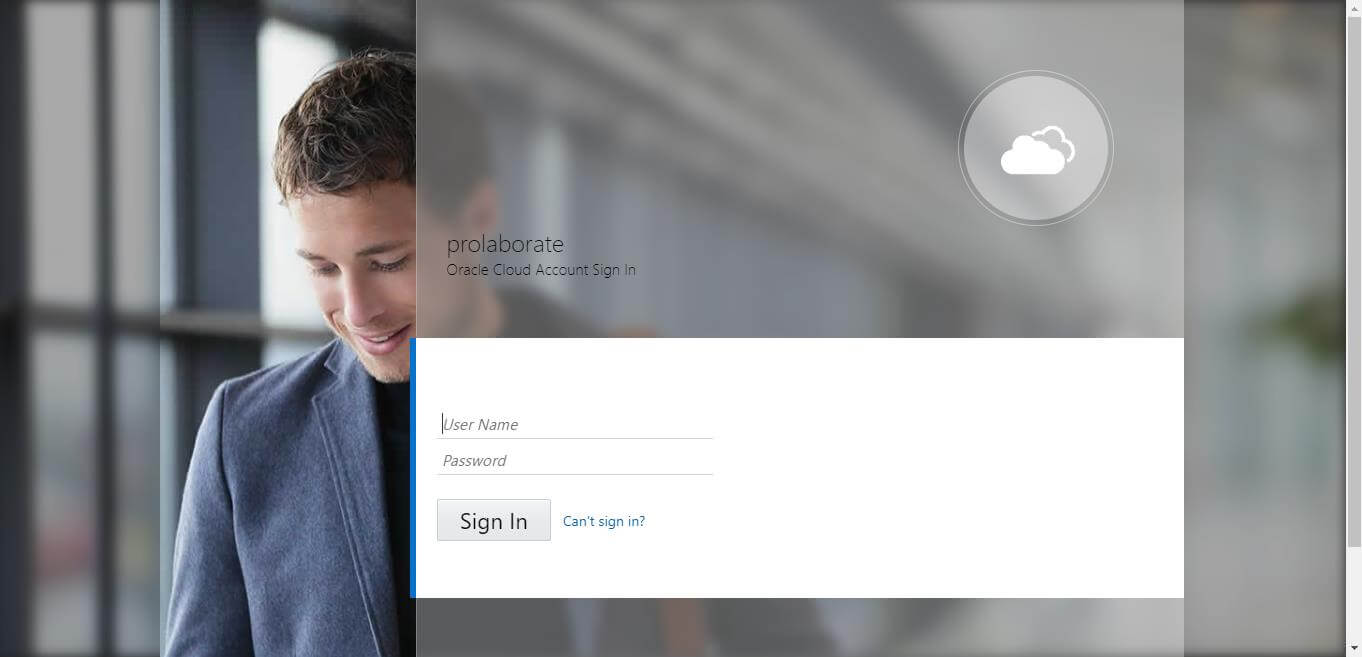
You will be redirected to Prolaborate successfully if the configuration is done right as said in the document.
Note the Repositories you see will be based on Default Access Control Profile

Logging out from Prolaborate
When a user initiates a logout, the user will be logged out from all applications in the current Identity provider login session.